Home Appliances / Cookers & Ranges
User Manual for Belling Cookcentre 100DFT Electric Cooker
Quick guide and user manual for the Belling Cookcentre 100DFT. Includes setup, cooking instructions, programmer settings, cleaning, and troubleshooting tips.
Table of contents
Manual images
Click an image to enlargeQuick guide from the manual
This manual provides essential instructions for operating your Belling Cookcentre 100DFT. Before using the appliance, ensure the clock/programmer is set to the correct time, as the main oven will not operate until it is set to manual mode. Always preheat the oven for approximately 15 minutes before cooking. Keep the grill door open when using the grill function. If you experience a power failure, you must reset the clock to resume operation.
Getting to know your product
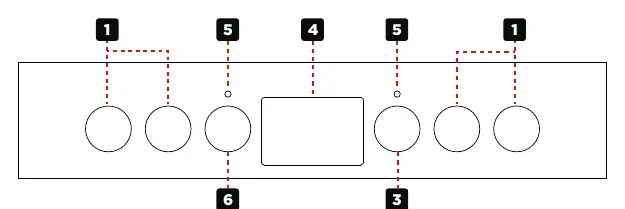
The appliance features a hob with multiple cooking zones, a top oven/grill, and a main fanned oven. The control panel includes knobs for selecting cooking zones, oven functions, and a digital clock/programmer for timing your cooking.
Using the hob
Choose the required setting on the control knob. Always position pans over the center of the hotplate elements. Lift pans rather than sliding them to avoid scratching the ceramic surface. Do not use the hob as a storage area or chopping board. If the surface is cracked, switch off the appliance immediately and contact a service engineer.
Using the grill
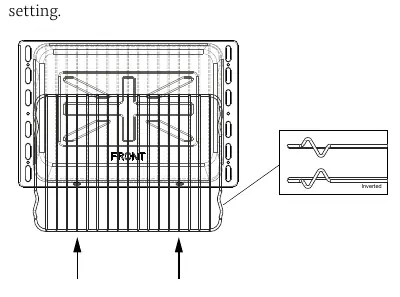
The grill door must be fully open during use. The grill trivet inside the grill pan can be inverted to provide high or low positions. For best results, preheat the dual grill for 3 minutes or the single grill for 5 minutes. The cooling fan will operate automatically to keep the fascia cool.
Using the ovens
The top oven and main fanned oven have specific shelf positions. Always position shelves with the upstand at the rear. When using the fanned oven, you can cook multiple items simultaneously without flavor transfer. Do not place items directly on the oven base; always use the shelves. The thermostat indicator light will cycle on and off to maintain the set temperature.
Clock and programmer
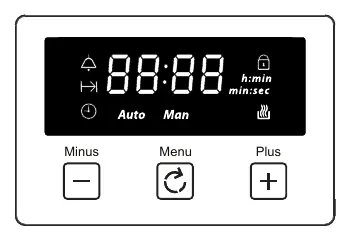
The programmer controls the main oven. Use the Menu button to scroll through functions, and the Plus/Minus buttons to adjust settings. You can set a minute minder, cooking duration, or end-of-cooking time. If the display shows 'Auto', the oven is in automatic mode; press the plus and minus buttons simultaneously or the Menu button to return to manual operation.
Cleaning and maintenance
Always switch off and allow the appliance to cool before cleaning. Use warm, soapy water and a soft cloth. Do not use abrasive cleaners, wire wool, steam cleaners, or harsh chemicals. Enamelled parts like the grill pan and shelves can be cleaned in a dishwasher, but cast iron items and control knobs should be hand-washed.

Troubleshooting
If the oven does not work after a power failure, reset the clock. If condensation appears on the doors, preheat the oven at a higher temperature and cover food where possible. If the ignition or cooling fan fails, or if the oven temperature seems inconsistent, contact the Customer Care helpline.
Manufacturer information
Belling
Practical help
Common problems
Oven not working after power failure
Switch off the electricity supply, then switch it back on and re-set the programmer/clock to the correct time.
Condensation on oven doors
Pre-heat the oven at a high temperature before cooking and cover food where possible. Avoid leaving food in the oven to cool down.
Cooling fan continues to run after switching off
This is normal operation to ensure control knobs remain cool and to allow for temperature adjustments.
Oven becomes hotter than set temperature
The thermostat may need replacing; contact Customer Care for a service engineer visit.
Before use
- Ensure all packaging is removed from the oven interior.
- Check that shelves are correctly installed in the desired positions.
- Set the clock/programmer to the correct time of day.
- Preheat the oven for 15 minutes before first use.
- Ensure the appliance is connected to the correct electrical supply.
Specs in practice
- Electrical supply
- 220-240V ~ 50 Hz
Images and diagrams
- Control Panel: Identifies cook zones, oven functions, clock/programmer, and thermostat indicator.
- Grill Pan: Shows the trivet which can be inverted for high or low grilling positions.
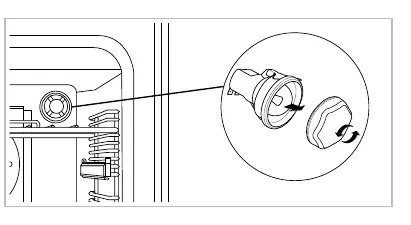
- Shelf Runners: Illustrates how to remove and insert shelves correctly.
Model compatibility
- Only use hob guards designed by the manufacturer.
- Do not use steam cleaners on any part of the appliance.
- Do not use soft tub margarine for rich fruit cakes unless specified.

Manual page author
Michael Turner
Technical manual editor
Reviews PDF manuals for structure, safety notes, and practical product details so readers can find the right information quickly.