Electronics / Monitors
User Guide for BenQ XL Series Gaming Monitor
Quick start guide for the BenQ XL Series e-Sports gaming monitor. Includes instructions for stand assembly, S Switch connection, optional shield installation, and VESA mounting.
Quick answers from the manual
Quick answer
- This guide covers the assembly, connection, and basic setup of the BenQ XL Series e-Sports monitor, including stand installation, S Switch usage, and VESA mounting. p. 1, 2
Key actions
- Assemble the stand by attaching the base to the column and locking it. p. 1
- Connect the S Switch, PC (HDMI/DP), and audio devices. p. 1
- Install the optional shield for e-Sports focus. p. 2
First start
- Connect the power cord, connect your PC via HDMI or DP, and connect the S Switch to the monitor. p. 1
Show 2 more answers Show less
Technical specifications
| Parameter | Value | Meaning | Pages |
|---|---|---|---|
| VESA Mount | 100x100mm | Standard wall mount pattern | p. 2 |
| Mounting Screws | M4 x 10mm | Required screw size for VESA mount | p. 2 |
Where to find it in the PDF
- Quick Start Guide p. 1, 2
Table of contents
Manual images
Click an image to enlargeQuick guide from the manual
This guide provides the essential steps to set up your BenQ XL Series e-Sports monitor. Ensure you have all components listed in the package contents before beginning assembly. The monitor supports standard VESA mounting and includes an optional shield for e-Sports focus.
Stand Assembly
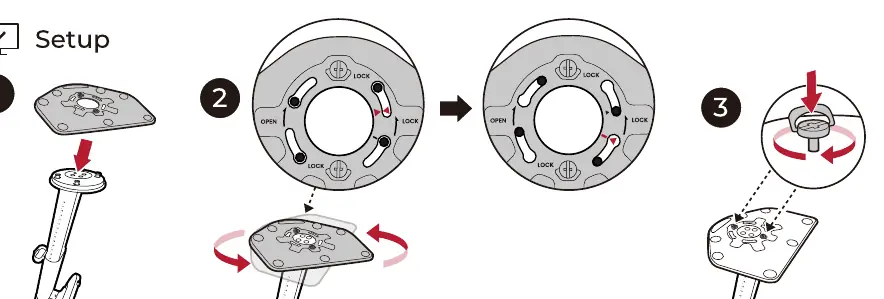
- Place the base on a flat surface.
- Attach the stand column to the base.
- Rotate the locking mechanism on the bottom of the base to secure the stand column.
- Attach the monitor panel to the stand column.
Connections
Connect your devices using the provided cables:
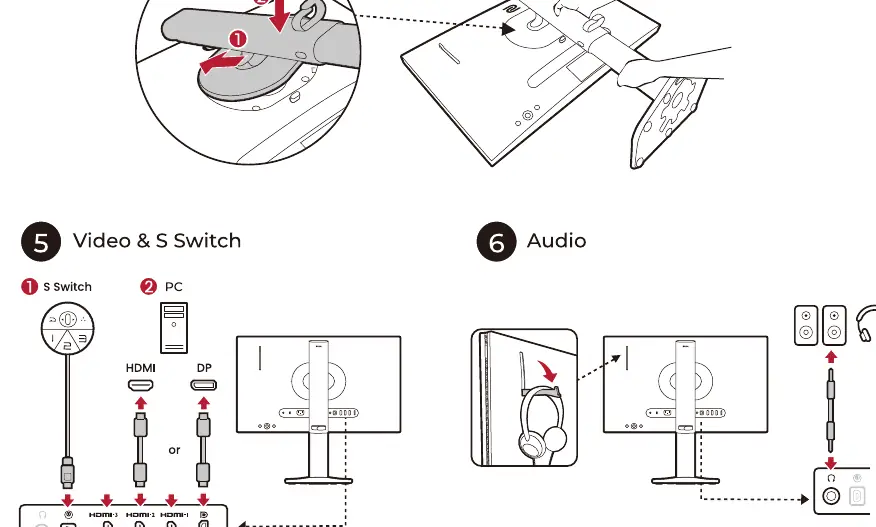
- S Switch: Connect the S Switch to the dedicated port on the monitor for quick settings access.
- Video: Connect your PC using either the HDMI or DisplayPort (DP) cable.
- Audio: Connect headphones or speakers to the audio output port on the monitor.
- Power: Connect the power cord to the monitor and a power outlet.
Adjustments and Optional Accessories
Angle Adjustment: The monitor stand allows for tilt and swivel adjustments to achieve the optimal viewing angle.
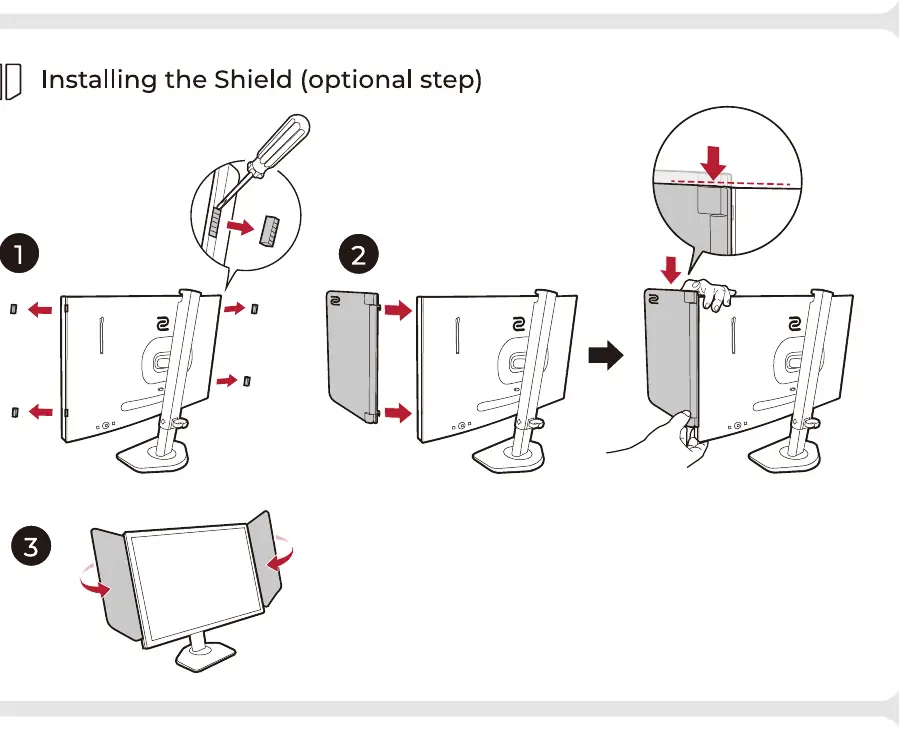
Installing the Shield: The optional shield can be installed to reduce distractions:
- Align the shield panels with the sides of the monitor.
- Insert the shield into the slots on the side of the monitor frame.
- Secure the shield in place.
VESA Mounting
The monitor is compatible with 100x100mm VESA mounts. To mount the monitor:
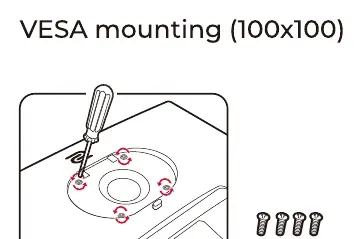
- Remove the existing stand.
- Use M4 x 10mm screws to attach the VESA mount to the back of the monitor.
Technical Specifications
The monitor is designed for specific environmental conditions:
- Operating Temperature: 0-40°C
- Operating Humidity: 10-90%
- Operating Altitude: 0-5000m
- Storage Temperature: -20-60°C
- Storage Humidity: 10-60%
- Storage Altitude: 0-12000m
Practical help
Common problems
Monitor does not display image
Ensure the PC is connected via HDMI or DP and the power cable is securely plugged in.
Stand feels unstable
Verify that the locking mechanism on the bottom of the base is fully rotated to the 'LOCK' position.
Before use
- Verify all package contents: Monitor, stand, base, power cord, DP cable, HDMI cable, S Switch, and Shield.
- Ensure you have a flat, stable surface for assembly.
- Check if you have a VESA mount (100x100mm) if you intend to wall-mount the monitor instead of using the included stand.
- Have a screwdriver ready for VESA mounting or shield installation if required.
Show more Show less
Specs in practice
- VESA mounting
- Standard 100x100mm pattern; requires M4 x 10mm screws.
- Operating Temperature
- The monitor should be used in environments between 0°C and 40°C.
Images and diagrams
- The S Switch connects to the monitor to provide quick access to game modes and settings.
- The Shield attaches to the sides of the monitor to reduce visual distractions.
Model compatibility
- Compatible with standard 100x100mm VESA mounts.

Manual page author
Emily Carter
User documentation editor