Toys / Games
User Manual for BERG Rally DRT Green Pedal Go-Kart
Comprehensive user guide for the BERG Rally DRT Green pedal go-kart. Includes assembly instructions, safety warnings, maintenance schedules, and usage guidelines.
Table of contents
Quick guide from the manual
This document provides essential instructions for the assembly, safe operation, and maintenance of the BERG Rally DRT Green pedal go-kart. Key safety requirements include adult supervision for children under 12, a maximum user weight of 60 kg, and the prohibition of use on public roads. Regular maintenance, including checking tire pressure, chain tension, and tightening the crank bolts, is required to ensure product longevity and safety.
Assembly
The go-kart requires assembly by an adult. Follow the numbered steps 1 through 20 provided in the manual. Key assembly phases include:
- Frame assembly: Connecting the main frame components.
- Steering installation: Attaching the steering column and wheel.
- Wheel mounting: Installing the wheels and ensuring proper alignment.
- Suspension: Attaching the shock absorbers.
- Seat and pedals: Finalizing the seating position and pedal attachment.
Safety and usage
To ensure safe operation, adhere to the following guidelines:
- Before use: Adjust the seat and steering wheel to the user's size. Check that steering, brakes, and tires are functioning correctly. Ensure all bolts and nuts are tight.
- During use: Ride at a controlled speed. Always use the handbrake or back-pedal brake to stop. Do not ride on public roads, hills, or slopes. Avoid sharp turns at high speeds to prevent tipping.
- Trailer: If a trailer is attached, remember that braking distance increases. Do not hook trailers on steep slopes.
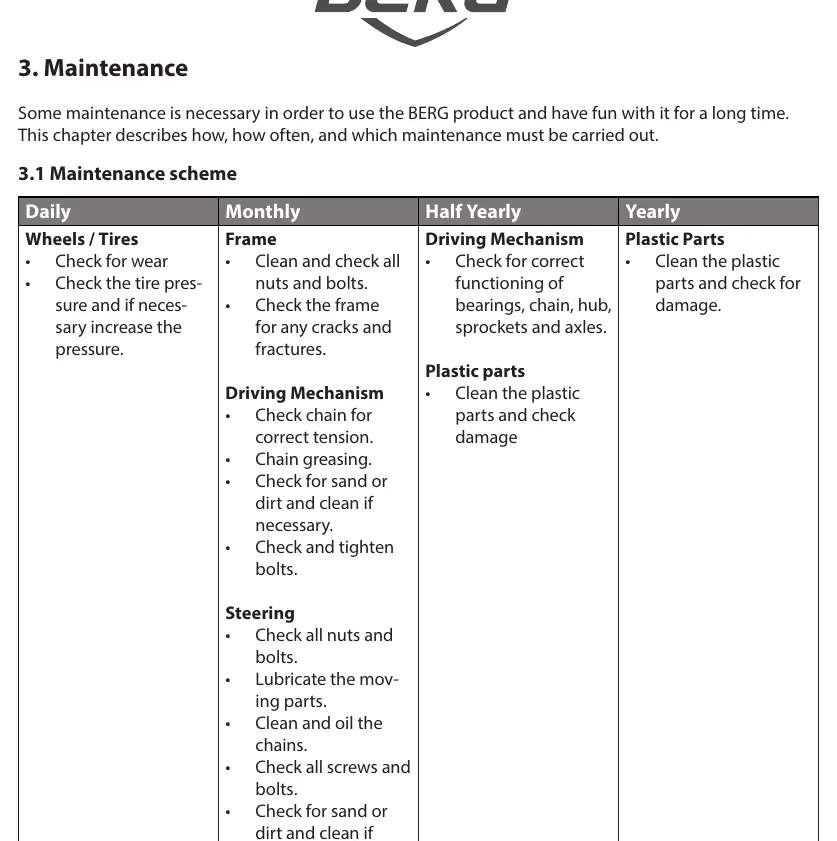
Maintenance
Regular maintenance is essential for safety and performance.
Maintenance schedule
- Daily: Check tires for wear and correct pressure.
- Monthly: Clean and check all nuts and bolts. Check frame for cracks. Lubricate moving parts. Check chain tension and clean if necessary.
- Half-yearly: Check functioning of bearings, chain, hub, sprockets, and axles.
- Yearly: Clean plastic parts and check for damage.
Chain tensioning
The go-kart features two chains. Always tension the rear/short chain first.
- Rear chain: Remove the protective hood, loosen hub nuts, move the hub forward until the chain has 6mm of downward play, then retighten.
- Front chain: Loosen crank axle bolts, turn the tensioning nut clockwise until the chain has 1cm of downward play, then retighten.
Crank adjustment
After initial use (several days of intensive use or up to two weeks of normal use), the mounting bolts for the left and right cranks must be tightened to a maximum of 30Nm to prevent play and damage.
Warranty
The frame and other parts have a 2-year warranty from the date of purchase. Wear and tear parts like chains and tires are excluded. Warranty claims require the original purchase receipt and the serial number found on the frame.
Manufacturer information
BERG Toys
Practical help
Common problems
Go-kart tips over during turns
Do not turn sharply when driving at high speeds.
Chain comes off or is difficult to pedal
Check chain tension. Rear chain should have 6mm play; front chain should have 1cm play.
Play in the pedals or crank
Tighten the crank mounting bolts (max 30Nm) after the initial break-in period.
Hard to steer or handle
Check tire pressure. Incorrect pressure negatively affects steering and braking performance.
Before use
- Adjust seat and steering wheel to the user's size.
- Check that steering, brakes, and tires are functioning correctly.
- Ensure all bolts and nuts are tightened.
- Verify tire pressure matches safety norms shown on the tire.
- Ensure all protective covers are in place.
- Instruct the child on how to operate the brake.
Specs in practice
- Maximum user weight
- 60 kg
- Rear chain tension
- 6 mm downward play
- Front chain tension
- 1 cm downward play
- Crank tightening torque
- Maximum 30 Nm
Images and diagrams
- Assembly steps 1-20 illustrate the sequence for frame, steering, seat, and pedal installation.
- Chain tensioning diagrams show how to adjust the rear hub and front crank axle.
- Crank adjustment diagram illustrates tightening the mounting bolts.
Model compatibility
- Only use original BERG accessories.
- Trailers from BERG may not be hooked on steep slopes.
- Not suitable for children under 3 years due to small parts.

Manual page author
David Miller
Documentation analyst
Organizes user manual content into clear summaries, with attention to model details, product context, and everyday usability.