Toys / Ride-on Toys
User Manual for BERG XL Frame BFR Pedal Kart
Comprehensive user manual for the BERG XL Frame BFR pedal kart. Includes step-by-step assembly instructions, safety guidelines, maintenance schedules, and warranty information.
Quick answers from the manual
Quick answer
- This manual provides assembly instructions, safety guidelines, maintenance procedures, and warranty information for the BERG XL Frame BFR pedal kart. p. 1, 6
Key actions
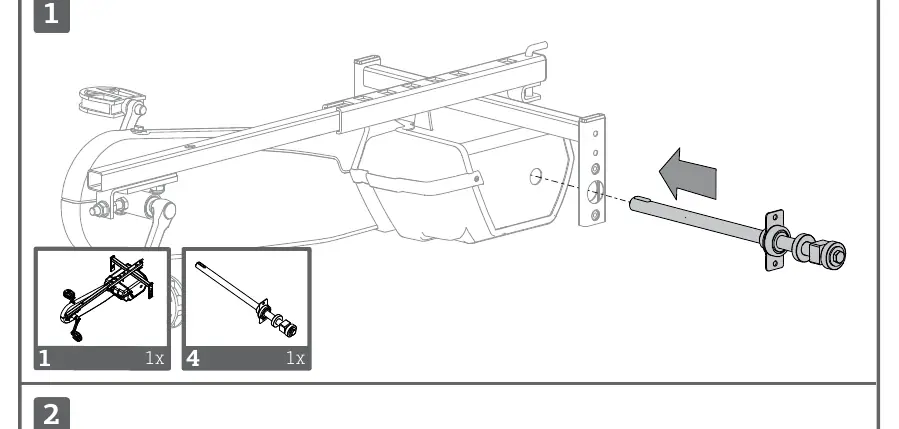
- Assemble the pedal kart frame using the provided parts and diagrams. p. 2, 3, 4, 5
- Tension the rear chain by removing the protective hood, loosening hub nuts, moving the hub forward, and retightening. p. 9
- Tension the front chain by loosening underside frame bolts, moving the crank axle forward, and retightening. p. 10
- Tighten crank mounting bolts to a maximum of 30 Nm after initial use. p. 10
First start
- Adjust the seat and steering wheel to the user's size. p. 7
- Verify that steering, brakes, and tires are functioning correctly and all bolts/nuts are fixed. p. 7
Problems and fixes
Chain is too loose or too tight
Tension the chain (rear or front) according to the specific tensioning procedures.
p. 9, 10
Play in the crank assembly
Tighten the left and right crank mounting bolts (max 30 Nm).
p. 10
Tires leaking or excessive wear
Check and adjust tire pressure to the norm shown on the tire.
p. 8Technical specifications
| Parameter | Value | Meaning | Pages |
|---|---|---|---|
| Maximum user weight | 100 kg | Maximum weight capacity for the product. | p. 7 |
| Crank tightening torque | 30 Nm | Maximum tightening moment for crank mounting bolts. | p. 10 |
| Rear chain tension | 6 mm | Downward deflection required for correct tension. | p. 9 |
| Front chain tension | 10 mm | Downward deflection required for correct tension. | p. 10 |
Where to find it in the PDF
- Warnings and Safety p. 1, 7
- Assembly Instructions p. 2, 3, 4, 5
- Maintenance p. 8, 9, 10
- Warranty p. 11
Table of contents
Manual images
Click an image to enlargeQuick guide from the manual
The BERG XL Frame BFR is a pedal kart designed for children aged 5 and older. The maximum user weight is 100 kg. This product is not intended for use on public roads, hills, or slopes. Always ensure the kart is assembled by an adult and that all safety checks are performed before use.
Safety Warnings
- Children under 12 must use the product under adult supervision.
- Do not use on public roads.
- Avoid sharp turns at high speeds to prevent tipping.
- Keep loose clothing, scarves, and shoelaces away from moving parts.
- Never ride under the influence of alcohol, drugs, or medication.
- Do not ride in the dark without lights.
- Do not overload the product (max 100 kg).
Assembly
The assembly process involves connecting the frame components, installing the steering mechanism, and attaching the pedals and chain drive. Refer to the diagrams on pages 2 through 5 for the specific sequence of bolts, nuts, and washers required for each step. Ensure all connections are tightened securely.
User Guidelines
Before use:
- Adjust the seat and steering wheel to the user's size.
- Verify that steering, brakes, and tires are functioning correctly.
- Ensure all bolts and nuts are fixed.
- Check tire pressure against the specifications on the tire.
- Ensure protective covers are in place.
During use:
- Ride at a controllable speed.
- Always use the back pedal brake to stop.
- Ride on smooth surfaces without obstacles.
- Do not place objects on or against the steering wheel.
- Do not get on or off while the kart is moving.
Maintenance
Regular maintenance is required to ensure safety and longevity.
- Daily: Check wheels/tires for damage and tire pressure.
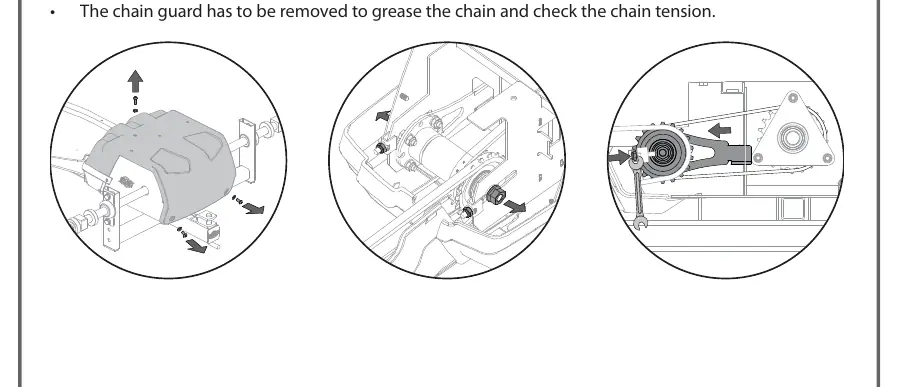
- Monthly: Clean and check all nuts and bolts; check frame for cracks; check chain tension and grease; lubricate moving parts.
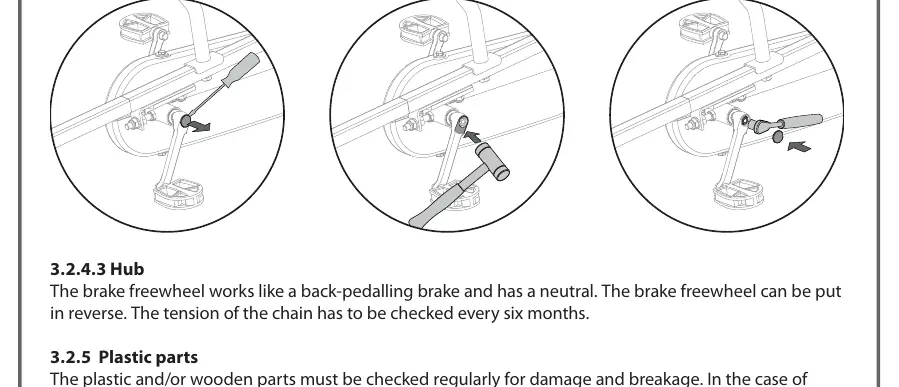
- Half-yearly: Check functioning of bearings, chain, hub, sprockets, and axles.
- Yearly: Clean plastic parts and check for damage.
Chain Tensioning: The rear chain is correctly tensioned if the middle can be pushed 6 mm downwards. The front chain is correctly tensioned if the middle can be pushed 10 mm downwards. Always remove the protective hood/housing to perform these adjustments.
Warranty
The frame has a 2-year warranty from the date of purchase. Other parts have a 1-year warranty. Wear and tear parts (chains, tires) are excluded. Warranty claims require the original purchase receipt and the product serial number found on the frame.
Manufacturer information
BERG Toys
Practical help
Common problems
Chain coming off or difficult to pedal
Check chain tension. If too tight, it is hard to pedal; if too loose, it may come off. Adjust hub position (rear) or crank axle (front).
Play in the crank assembly
Tighten the mounting bolts for the left and right cranks. Use a maximum tightening torque of 30 Nm.
Go-kart tipping over
Avoid sharp turns at high speeds and do not ride on slopes or hills.
Before use
- Adjust seat and steering wheel to user size.
- Check steering, brakes, and tires for proper function.
- Ensure all bolts and nuts are tightened.
- Verify tire pressure meets the norm shown on the tire.
- Ensure all protective covers are installed.
Specs in practice
- Max User Weight
- 100 kg
- Rear Chain Tension
- 6 mm downward deflection in the middle.
- Front Chain Tension
- 10 mm downward deflection in the middle.
- Crank Tightening Torque
- Maximum 30 Nm.
Images and diagrams
- Pages 2-5: Step-by-step assembly instructions for the frame and drive mechanism.
- Page 9: Instructions for tensioning the rear chain.
- Page 10: Instructions for tensioning the front chain and adjusting the crank.
Model compatibility
- Not for use on public roads.
- Not for use on hills or slopes.
- Only use official BERG spare parts.

Manual page author
David Miller
Documentation analyst
Organizes user manual content into clear summaries, with attention to model details, product context, and everyday usability.