Home Appliances / Steam Cleaners
User Manual for Bissell PowerFresh 2-in-1 Steam Mop 2078D Series
Comprehensive user guide for the Bissell PowerFresh 2-in-1 Steam Mop (2078D Series). Includes assembly instructions, operation steps, maintenance tips, and troubleshooting for both floor and handheld modes.
Quick answers from the manual
Quick answer
- The Bissell PowerFresh 2-in-1 Steam Mop is a steam cleaner for sealed hard floors with a detachable handheld unit. It uses a 300mL water tank and requires distilled or demineralized water. Do not use chemicals in the tank. p. 1, 6
Key actions
- Assemble the unit by snapping the foot to the body and inserting the handle. p. 5
- Fill the water tank with distilled or demineralized water. p. 6
First start
- Assemble the unit, fill the tank with distilled water, plug in, and wait for the READY light to turn solid. p. 5, 7
Show 4 more answers Show less
Problems and fixes
Reduced steam or no steam
Refill tank or ensure handle/foot are installed properly.
p. 10Maintenance and reset
- Wash mop pads in warm water with liquid detergent; air dry. p. 9
Technical specifications
| Parameter | Value | Meaning | Pages |
|---|---|---|---|
| Water Tank Capacity | 300 mL (10 oz) | Maximum water capacity. | p. 6 |
Where to find it in the PDF
- Safety Instructions p. 2
- Assembly p. 5
- Troubleshooting p. 10
Table of contents
Manual images
Click an image to enlargeQuick guide from the manual
The Bissell PowerFresh 2-in-1 Steam Mop is designed for cleaning sealed hard floors. Important: Use only distilled or demineralized water. Do not add chemicals, vinegar, or detergents to the water tank, as this may damage the unit. Always keep the mop moving while the steam trigger is depressed to avoid floor damage.
Assembly
The unit comes in three components and requires no tools:
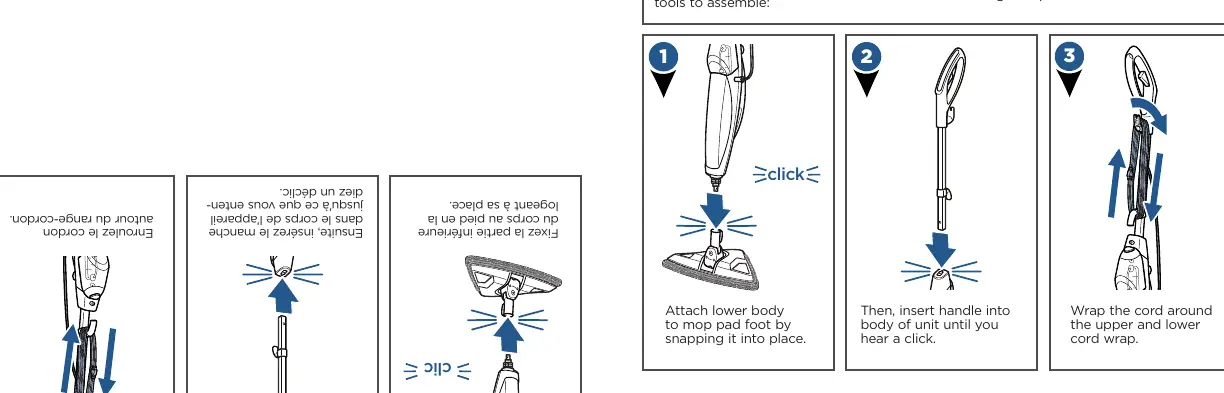
- Attach the lower body to the mop pad foot until it snaps into place.
- Insert the handle into the body of the unit until you hear a click.
- Wrap the cord around the upper and lower cord wraps.
Filling the water tank
The water tank has a capacity of 300 mL (10 oz).
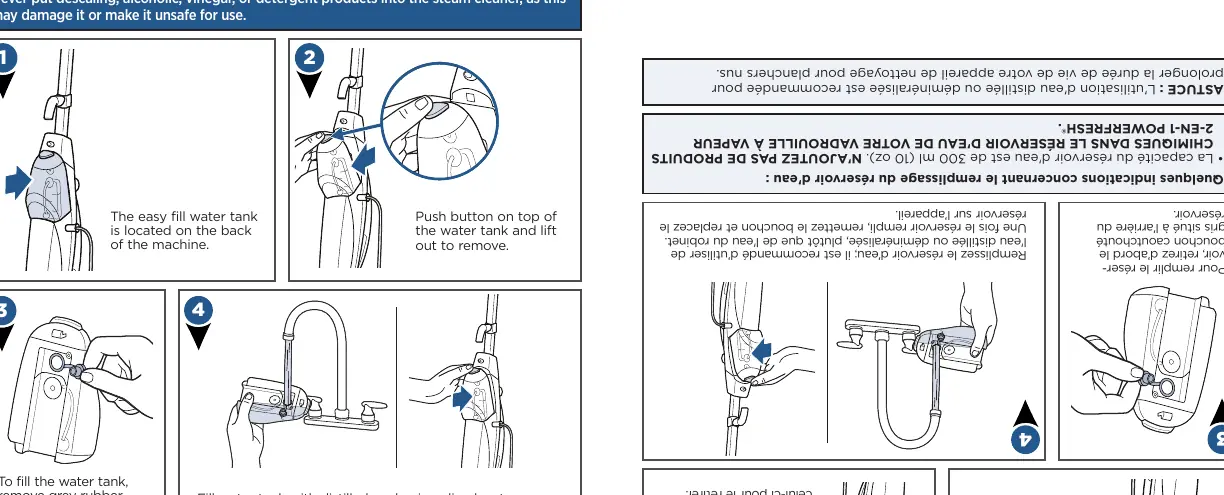
- Push the button on top of the water tank and lift to remove it from the machine.
- Remove the grey rubber nozzle on the back of the tank.
- Fill with distilled or demineralized water.
- Replace the nozzle and return the tank to the machine.
Cleaning hard floors
- Attach the mop pad by wrapping it around the bottom of the foot, ensuring the gray stitching is at the front and the quick grip release tab is at the back.
- Plug the machine into an outlet. The READY light will blink and then turn solid when ready.
- Step on the back of the foot to recline the body and begin cleaning.
- Push the trigger on the handle to release steam. Move the unit continuously while steaming.
Using the handheld steamer
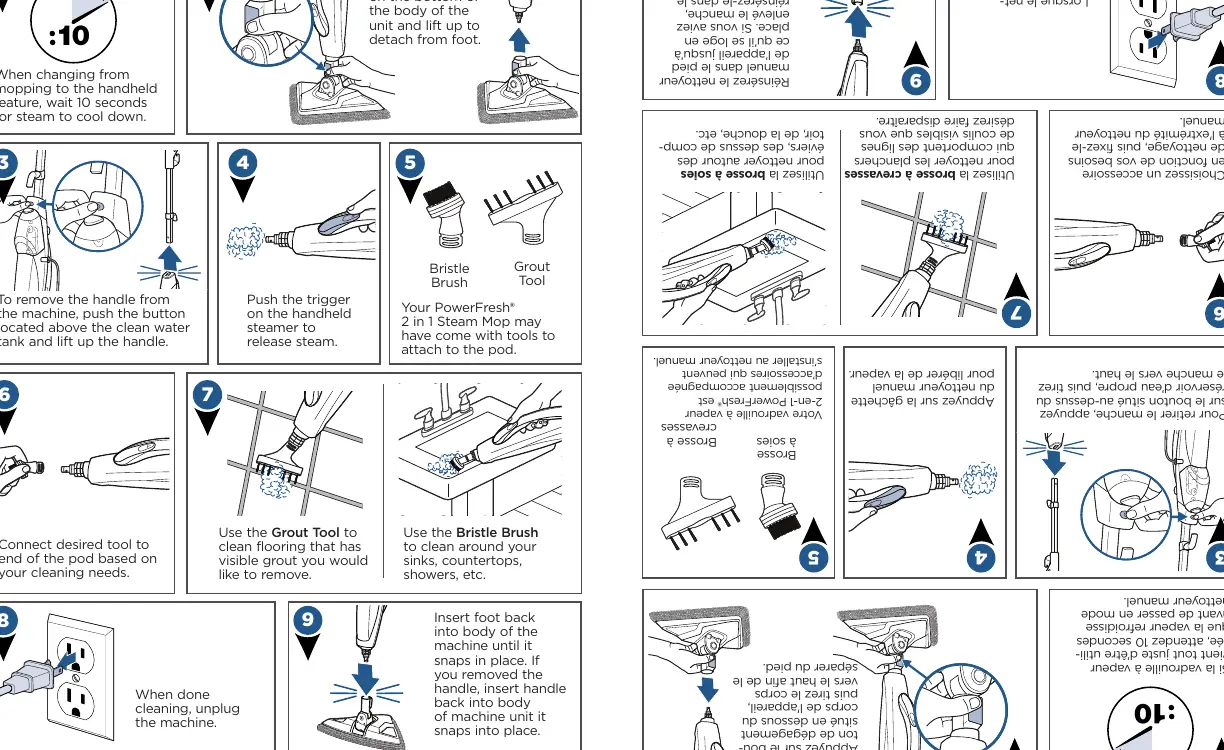
- Push the release button on the bottom of the body to detach it from the foot.
- Wait 10 seconds for steam to cool down if you just finished mopping.
- Connect the desired tool (Bristle Brush or Grout Tool) to the end of the pod.
- Push the trigger on the handheld steamer to release steam.
Maintenance and care
- Mop Pads: Machine wash in warm water with liquid detergent. Do not use bleach or fabric softeners. Air dry for best results.
- Storage: Store upright in a protected, dry area. Ensure pads are dry before storage to prevent damage to floors.
- Freezing: Do not store where there is a danger of freezing, as this will damage internal components.
Manufacturer information
Bissell Inc.
Practical help
Common problems
Reduced steam or no steam
Check if the water tank is empty. Ensure the handle and foot are installed properly (listen for the click).
Streaking on floors
The mop pad may be dirty; remove and wash it. If you have used floor polishes or wax, steam may decrease glossiness.
Leaking
The mop pad may be too wet. Remove and replace with a dry mop pad.
Knocking noise
This is normal during the first use or after refilling the tank; it will diminish after a few seconds.
Before use
- Sweep or vacuum floors thoroughly before cleaning.
- Ensure floors are sealed hard floors (not unsealed wood).
- Use distilled or demineralized water.
- Assemble handle and foot until they click.
- Check that the mop pad is attached correctly with gray stitching at the front.
Show more Show less
Specs in practice
- Water Tank Capacity
- 300 mL (10 oz). Do not overfill.
Images and diagrams
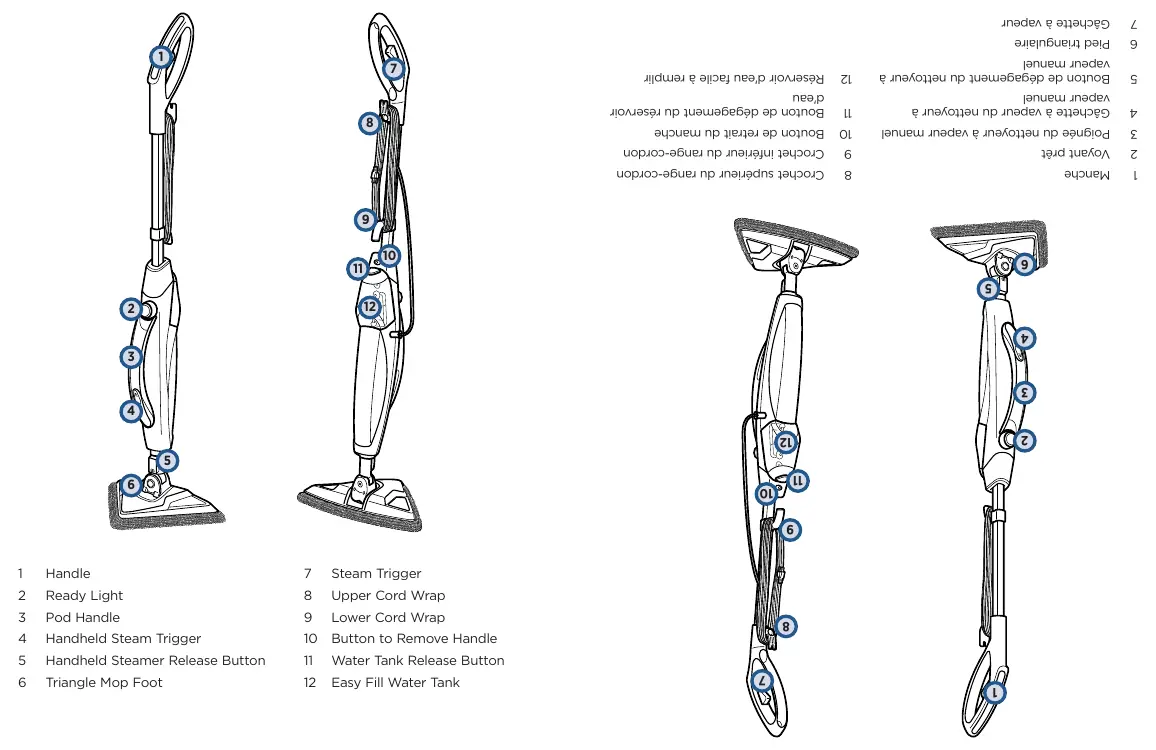
- Assembly: Shows snapping the foot to the body and inserting the handle.
- Filling: Shows removing the tank and the rubber nozzle.
- Handheld: Shows detaching the pod from the foot and attaching tools.
Model compatibility
- Not for use on unsealed wood floors.
- Use on waxed or some unwaxed floors may result in diminished glossiness.

Manual page author
Emily Carter
User documentation editor