Home Appliances / Steam Cleaners
User Manual for Bissell SteamShot 2635J Steam Cleaner
Get started with your Bissell SteamShot 2635J steam cleaner. This guide covers setup, filling with water, safe operation, and maintenance tips to keep your device running efficiently.
Quick answers from the manual
Quick answer
- The Bissell SteamShot 2635J is a handheld steam cleaner. To operate, fill the tank with water, plug it in, wait for the indicator light to turn off, and press the steam trigger. p. 5
Key actions
- Filling the water tank p. 5
- Depressurizing before refill p. 5
First start
- Unwrap power cable, fill with water, plug in, wait for indicator light to turn off. p. 5
Show 3 more answers Show less
Problems and fixes
Refilling the tank
Unplug, press trigger to release pressure, wait 5 minutes, then remove cap.
p. 5Technical specifications
| Parameter | Value | Meaning | Pages |
|---|---|---|---|
| Voltage | 220V-240V | Power supply requirement | p. 1, 4 |
Where to find it in the PDF
- Product View and Operations p. 2, 5
- Safety Instructions p. 4
Table of contents
Manual images
Click an image to enlargeQuick guide from the manual
The Bissell SteamShot 2635J is a handheld steam cleaner designed for cleaning hard surfaces. To use it, fill the tank with water, plug it into a power outlet, wait for the indicator light to turn off, and press the steam trigger to release steam. Always ensure the device is depressurized before refilling.
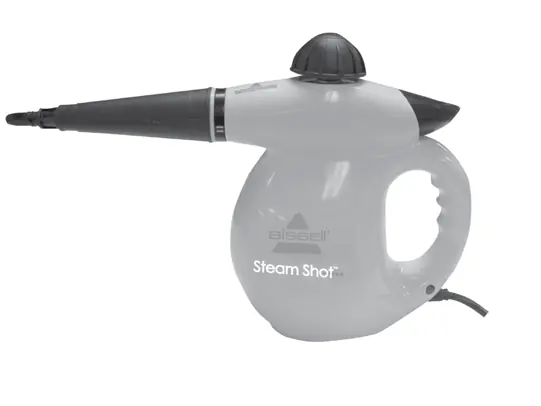
Product Overview
The SteamShot includes the following components:
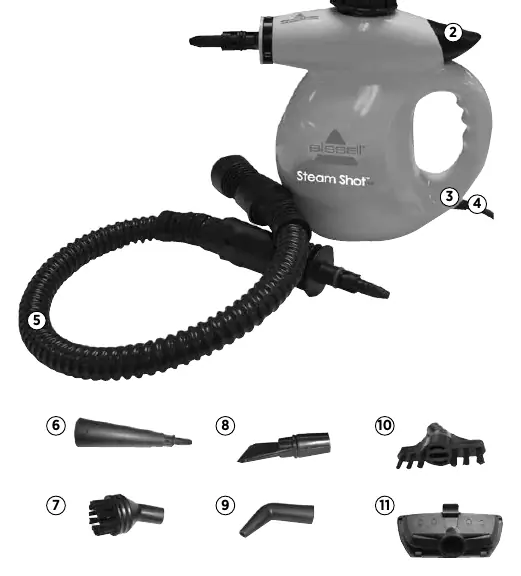
- Safety Cap: Must be pushed down and turned anti-clockwise to open.
- Steam Trigger: Used to release steam.
- Indicator Light: Red light indicates the unit is heating; turns off when ready.
- Extension Hose: For reaching difficult areas.
- Various Tools: Includes detail brush, flat scraping tool, angle concentrator, grout brush, and window squeegee.
Operations
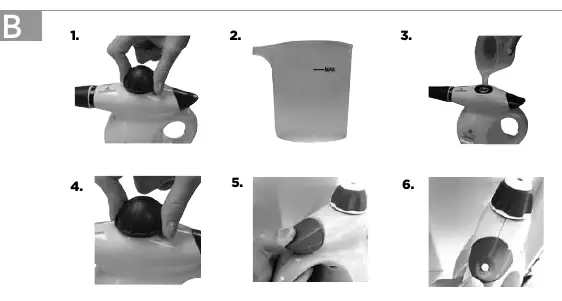
Filling with water
- Ensure the unit is unplugged.
- Push down on the safety cap while turning it anti-clockwise.
- Fill the measuring cup to the max fill line.
- Slowly pour water into the steamer.
- Replace the safety cap by pushing down and turning clockwise.
Note: Do not add anything except cool water to avoid damaging the heating element and voiding the warranty. If you have hard water, distilled or demineralized water is recommended.
Using the steamer
- Unwrap the power cable and plug the unit into an appropriate outlet.
- The red indicator light will turn on.
- When the light turns off, the steamer is ready to use.
- Press the steam trigger to release steam.
- Important: The round button must be engaged to open the trigger and release steam.
Safety and Maintenance
Safety Warnings:
- Always unplug the unit before filling or refilling.
- Press the trigger until the steamer depressurizes before removing the safety cap.
- Wait 5 minutes for the unit to cool before refilling.
- Keep face and skin away from steam to avoid burns.
- Never tilt the steamer more than 45 degrees during use.
- Do not use on clothing while wearing it.
- Use caution when cleaning glass; warm the surface first from a distance of 4-6 inches.
Maintenance:
- Before disconnecting a tool, ensure steam is no longer coming from the nozzle.
- Use an oven mitt to remove tools or wait for them to cool.
- Store indoors.
Manufacturer information
Bissell Inc.
Practical help
Common problems
Steam not releasing
Ensure the round button is engaged to open the trigger.
Need to refill water
Unplug the unit, press the trigger to release all pressure, wait 5 minutes for it to cool, then remove the safety cap.
Before use
- Unwrap the power cable.
- Ensure the safety cap is securely tightened.
- Fill the tank with cool tap water or distilled water.
- Plug the unit into an appropriate outlet.
- Wait for the red indicator light to turn off before using.
Show more Show less
Images and diagrams
- Part 1: Safety Cap
- Part 2: Steam Trigger
- Part 3: Indicator Light
- Part 5: Extension Hose
Model compatibility
- For household use only.
- Use only manufacturer's recommended attachments.

Manual page author
Emily Carter
User documentation editor