Home Appliances / Steam Cleaners
User Manual for BISSELL PowerFresh Sanitize Professional Steam Mop 1979H
Get the most out of your BISSELL PowerFresh Sanitize Professional Steam Mop 1979H with this comprehensive user guide. Includes assembly instructions, steam control settings, maintenance tips, and troubleshooting steps.
Quick answers from the manual
Quick answer
- To use the BISSELL 1979H, fill the tank with distilled water, attach a mop pad, plug in, wait for the READY light to turn solid, select the steam level, and pull the trigger to release steam. p. 6, 8, 9
Key actions
- Assemble the unit by snapping the foot to the body and screwing the handle in. p. 5
- Fill the water tank with distilled or demineralized water. p. 6
- Clean floors by moving the mop back and forth slowly. p. 9
First start
- Plug in, wait for the READY light to turn solid, press the power button, select steam level, and pull the trigger. p. 8
Show 4 more answers Show less
Problems and fixes
Reduced steam or no steam
Refill tank, select steam level, or check wand/foot installation.
p. 11
Knocking noise
Fill tank or shake the pod to let the tube reach water.
p. 11Maintenance and reset
- Wash mop pads in warm water with non-bleach detergent; air dry. p. 10
Technical specifications
| Parameter | Value | Meaning | Pages |
|---|---|---|---|
| Tank Capacity | 560 mL (19 oz) | Water tank volume | p. 6 |
Where to find it in the PDF
- Product View p. 4
- Assembly p. 5
- Troubleshooting p. 11
Table of contents
Manual images
Click an image to enlargeQuick guide from the manual
The BISSELL PowerFresh Sanitize Professional Steam Mop is designed for cleaning hard floors such as ceramic tile, laminate, marble, stone, and sealed hardwood. Important: Always use distilled or demineralized water to prolong the life of the machine. Do not add chemicals, detergents, or descaling products to the water tank. Before cleaning, ensure the machine is assembled, the tank is filled, and the READY light has turned solid after plugging in.
What's in the Box
- Handle
- Body
- Foot
- Screw
- Water Cup
- (2) Microfibre Soft Mop Pads
- (2) Microfibre Scrubby Mop Pads
- Spring Breeze Scent Discs
- Carpet Glider
Assembly
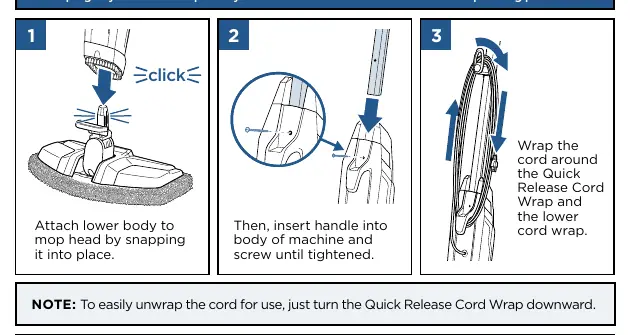
- Attach the lower body to the mop head by snapping it into place until you hear a click.
- Insert the handle into the body of the machine and screw until tightened.
- Wrap the cord around the Quick Release Cord Wrap and the lower cord wrap.
Filling Your Easy Fill Water Tank
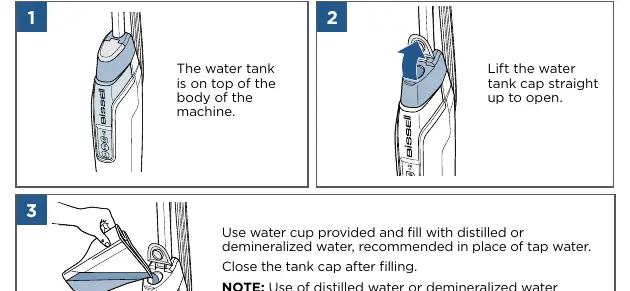
The tank capacity is 560 mL (19 oz). Lift the water tank cap straight up to open. Use the provided water cup to fill with distilled or demineralized water. Close the cap securely after filling.
Attaching Microfibre Mop Pads
The Microfibre Soft Mop Pad is for everyday use on delicate flooring like sealed hardwoods and laminate. The Microfibre Scrubby Mop Pad is for scrubbing heavily soiled floors and durable surfaces like tile. To attach, wrap the pad around the bottom of the foot, ensuring the gray stitching is on the front and the Quick Grip Release Tab is on the back.
Using the SpotBoost Brush
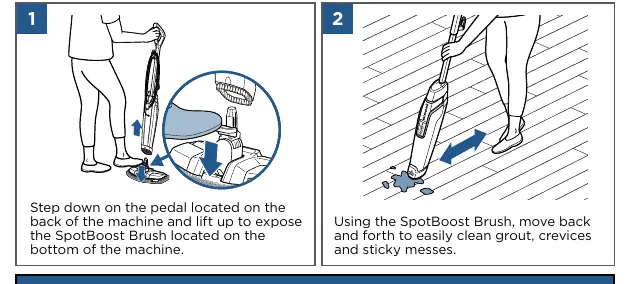
Step on the pedal located on the back of the machine and lift up to expose the SpotBoost Brush. Use this brush to clean grout, crevices, and sticky messes by moving the machine back and forth.
Using SmartSet Steam Control
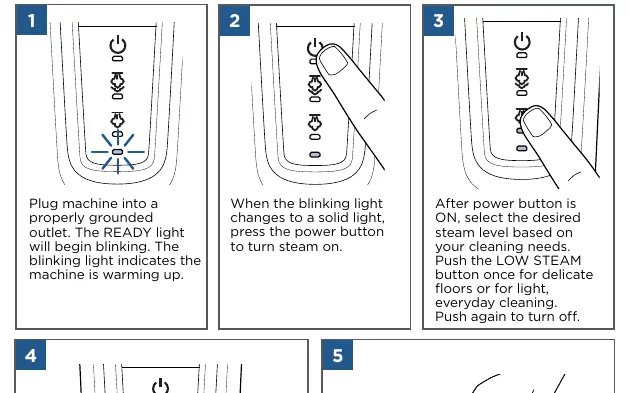
Plug the machine into a grounded outlet. The READY light will blink while warming up. Once the light is solid, press the power button to turn steam on. Select the desired steam level (LOW for delicate floors, HIGH for durable floors/sticky messes). Pull the on-demand trigger on the handle to release steam.
Cleaning Hard Floors
Thoroughly sweep or vacuum the floor before using the steam mop. Step on the back of the foot to recline the machine. Move the mop back and forth slowly and evenly at least three times over the area using continuous steam. Do not stand stationary while dispensing steam.
Cleaning and Maintenance
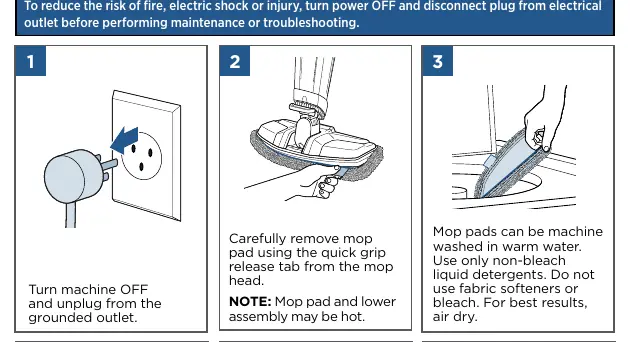
Turn the machine OFF and unplug before maintenance. Mop pads can be machine washed in warm water using non-bleach liquid detergents; air dry. Remove the scent disc from the tray if needed. Wipe all surfaces with a soft cloth and store the unit upright in a protected, dry area.
Manufacturer information
Bissell Inc.
Practical help
Common problems
Reduced steam or no steam
Check if the water tank is empty, steam level is selected, or if the wand/foot are installed properly (listen for a click).
Streaking on floors
Wash the mop pad. If using on waxed/oiled floors, steam products may decrease glossiness; check flooring manufacturer instructions.
Leaking
Ensure the mop pad is not too wet, lower the steam level, or check for cracks in the machine/tank and ensure the rubber gasket is seated.
Knocking noise
This is normal during first use or if the tank is empty. Fill the tank; if it persists, shake the pod to let the tube reach the water.
Before use
- Ensure the handle and foot are securely snapped into place.
- Fill the water tank with distilled or demineralized water.
- Attach the appropriate mop pad (Soft or Scrubby).
- Plug into a properly grounded outlet.
- Wait for the READY light to turn solid before selecting steam level.
Show more Show less
Specs in practice
- Tank Capacity
- 560 mL (19 oz)
- Power Supply
- 220-240 Volt A.C. 50-60 Hz
Images and diagrams
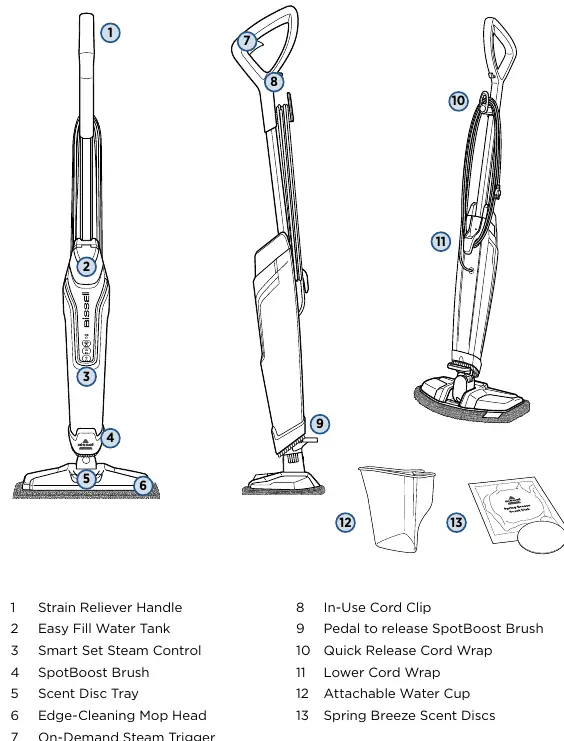
- Product parts identification (handle, tank, steam control, brush, mop head)
- Assembly steps (foot attachment, handle insertion)
- Steam control panel operation
- SpotBoost brush release mechanism
Model compatibility
- Not for use on unsealed floors.
- Use on waxed or some unwaxed floors may result in diminished glossiness.
- Test in an inconspicuous area before cleaning timber floors.
- Do not use chemicals, detergents, or descaling products in the water tank.

Manual page author
Michael Turner
Technical manual editor