Garden / Hedge Trimmers
User Manual for BLACK+DECKER 20V MAX* Hedge Trimmer LHT2220
Comprehensive user guide for the BLACK+DECKER 20V MAX* Hedge Trimmer (models LHT2220, CHH2220). Includes safety instructions, battery charging procedures, operation tips, maintenance, and troubleshooting.
Quick answers from the manual
Quick answer
- The BLACK+DECKER 20V MAX* Hedge Trimmer is a cordless tool for trimming shrubbery. To operate, slide the lock-off button backward and squeeze the trigger switch. p. 8
Key actions
- Charge the battery p. 7
- Start the trimmer p. 8
First start
- Ensure the battery is fully charged and properly installed. Slide the lock-off button backward and squeeze the trigger switch to start. p. 7, 8
Problems and fixes
Unit will not start
Check battery installation, charge, and lock-off button operation.
p. 10Technical specifications
| Parameter | Value | Meaning | Pages |
|---|---|---|---|
| Max Voltage | 20V | Maximum initial battery pack voltage (measured without a workload). | p. 1 |
| Nominal Voltage | 18V | Nominal battery voltage. | p. 1 |
| Max Cutting Diameter | 3/4 inch (19mm) | Maximum stem thickness for cutting. | p. 8 |
Where to find it in the PDF
- Components p. 6
- Charging Procedure p. 7
- Operation p. 8
- Troubleshooting p. 10
Table of contents
Manual images
Click an image to enlargeQuick guide from the manual
This manual provides essential safety, operation, and maintenance instructions for the BLACK+DECKER 20V MAX* Hedge Trimmer. Always read the safety guidelines before use. Ensure the battery is fully charged before the first use and follow the recommended trimming techniques for optimal performance.
Components
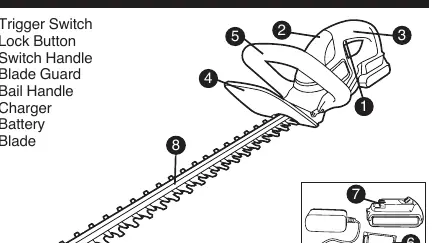
- Trigger Switch
- Lock Button
- Switch Handle
- Blade Guard
- Bail Handle
- Charger
- Battery
- Blade
Charging Procedure
The standard charger will charge a fully depleted battery in approximately 4 hours.
- Plug the charger into an appropriate outlet.
- Insert the battery pack into the charger.
- The green LED will flash to indicate charging.
- When the green LED remains on continuously, the battery is fully charged.
Important Charging Notes: Charge only when the air temperature is between 60°F and 80°F (16°C - 27°C). Do not charge below 40°F (+4.5°C) or above 105°F (+40.5°C).
Operation
Switch: To turn the unit ON, slide the lock-off button backward and squeeze the trigger switch. Once running, you may release the lock-off button, but you must continue to squeeze the trigger to keep the unit running. Release the trigger to turn the unit OFF.
Trimming Instructions:
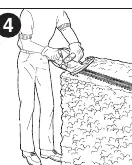
- Working Position: Maintain proper footing and balance. Hold the unit firmly in both hands, with one hand on the switch handle and one on the bail handle.
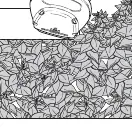
- Trimming New Growth: Use a wide, sweeping motion, feeding the blade teeth through the twigs. A slight downward tilt of the blade in the direction of motion provides the best cutting.
- Leveling Hedges: Stretch a piece of string along the length of the hedge as a guide.
- Side Trimming: Begin at the bottom and sweep up.
Maintenance
The cutting blades are made of high-quality hardened steel and do not require resharpening under normal use. If you accidentally hit a wire fence, stones, or other hard objects, inspect the blade for damage. If the blade is bent or teeth are damaged, have it repaired by an authorized service center. Clean the unit with mild soap and a damp cloth after removing the battery. Never immerse the unit in liquid. Apply a film of light machine oil to the blades after cleaning to prevent rust.
Safety
Always wear eye protection, non-skid safety shoes, and hearing protection. Keep hands away from blades. Do not use the trimmer in wet conditions. Check the hedge for foreign objects like wire fences before each use.
Practical help
Common problems
Unit will not start
Check battery installation, ensure the battery is charged, and verify that the lock-off button is fully pulled back before squeezing the trigger.
Battery won't charge
Ensure the battery is inserted into the charger, the charger is plugged into a working outlet, and the ambient temperature is between 40°F and 105°F.
Slow, noisy, or hot blades
Lubricate the blades, straighten any bent teeth or blade support, and tighten loose blade bolts.
Before use
- Check the hedge for foreign objects like wire fences.
- Ensure the battery is fully charged.
- Wear safety goggles and non-skid footwear.
- Ensure the lock-off button is functional.
- Hold the unit firmly with both hands.
Specs in practice
- Cutting Capacity
- Do not cut stems greater than 3/4 inch (19mm).
Images and diagrams
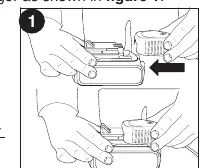
- Figure 1: Charging the battery pack.
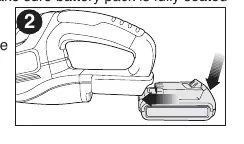
- Figure 2: Installing and removing the battery pack.
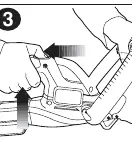
- Figure 3: Operating the switch.
- Figure 4: Proper working position.
- Figure 5: Trimming new growth.
Model compatibility
- Compatible with Black+Decker LI-ION batteries: LBX20, LBXR20, LBXR2020, LB2X4020.
- Compatible with Black+Decker LI-ION chargers: LCS1620, L2AFCBST, L2AFC.

Manual page author
Michael Turner
Technical manual editor
Reviews PDF manuals for structure, safety notes, and practical product details so readers can find the right information quickly.