Garden / Hedge Trimmers
User Manual for Yard Force 20V Hedge Trimmer LH C45W
Quick guide for the Yard Force 20V Hedge Trimmer LH C45W. Includes setup, operation, maintenance, safety warnings, and troubleshooting steps.
Quick answers from the manual
Quick answer
- The Yard Force LH C45W is a 20V cordless hedge trimmer. To operate, insert a charged battery, hold the trimmer with both hands, and press both the front and rear switch levers simultaneously. p. 10
Key actions
- Starting the trimmer p. 10
- Inserting the battery p. 10
First start
- Remove blade guard, insert battery, hold with both hands, press both switches. p. 10
Problems and fixes
Product not running
Check battery charge, contacts, or if battery is too hot.
p. 12Maintenance and reset
- Lubricate blade before and after each use. p. 11
Where to find it in the PDF
- Operation p. 10, 11
- Troubleshooting p. 12
Table of contents
Manual images
Click an image to enlargeQuick guide from the manual
The Yard Force 20V Hedge Trimmer (Model LH C45W) is designed for cutting and trimming hedges, bushes, and ornamental shrubs in domestic environments. Before use, ensure the battery is charged and the blade guard is removed. Always wear appropriate personal protective equipment, including eye and ear protection. The tool requires both hands to operate, utilizing a dual-switch safety system.
Product Description
The hedge trimmer consists of the following main components:
- Blade: The cutting element.
- Safety button: Part of the dual-switch activation system.
- ON/OFF trigger: The main power switch.
- Battery pack slot: Where the 20V battery is inserted.
Operation
Battery Installation: Align the grooves on the battery pack with the ribs in the device receptacle and push until it locks into place.
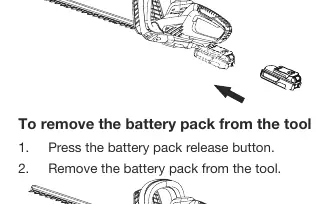
Battery Removal: Press the battery pack release button and slide the battery out.
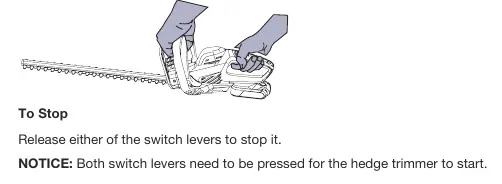
Starting the Trimmer: Hold the trimmer with both hands (one on the rear handle, one on the front handle). Depress and hold the front switch lever and the rear switch lever simultaneously to start the motor.
Stopping the Trimmer: Release either of the switch levers to stop the motor.
Cutting Tips
- Top Cutting: Use a wide sweeping motion with a slight downward tilt of the blades in the direction of motion.
- Side Cutting: Begin at the bottom of the hedge and cut upwards.
- Safety: Clear the area of cords, wires, or debris before starting. Do not force the tool through heavy shrubbery.
Maintenance and Storage
- Cleaning: Use a soft brush to remove debris from air intakes and the blade. Wipe with a dry cloth.
- Lubrication: Apply light-weight machine oil to the edge of the top blade before and after each use.
- Storage: Always fit the blade guard before storing. Keep in a dry, indoor location inaccessible to children.
- Inspection: Regularly check that all nuts, bolts, and screws are tight and that the blade is not damaged.
Troubleshooting
If the product is not running, check the following:
- Ensure there is electrical contact between the trimmer and the battery.
- Check if the battery pack is depleted and needs charging.
- Ensure both switch levers are being pressed simultaneously.
- If the battery is too hot, remove it and allow it to cool below 50°C.
Technical Data
- Voltage: 20V
- No load speed: 1300 rpm
- Max. cutting capacity: 16 mm
- Blade length: 510 mm
- Net weight: 2.3 kg
Practical help
Common problems
Product not running
Check battery charge, ensure battery is inserted correctly, ensure both switch levers are pressed simultaneously, or check if battery is too hot (allow to cool).
Before use
- Check for damaged parts.
- Ensure battery is charged.
- Clear area of cords, wires, or debris.
- Wear eye and ear protection.
- Ensure blade guard is removed.
Specs in practice
- Max. cutting capacity
- 16 mm
- Blade length
- 510 mm
- No load speed
- 1300 rpm
Images and diagrams
- Parts: Blade, Safety button, ON/OFF trigger, Battery pack slot.
- Operation: Requires pressing both front and rear switch levers simultaneously.
Model compatibility
- Use only with specified battery packs.
- Use only identical replacement parts.

Manual page author
David Miller
Documentation analyst
Organizes user manual content into clear summaries, with attention to model details, product context, and everyday usability.