Power / Power Inverters
User Manual for Westinghouse WHT 20V / WHTT 20V 22-inch Cordless Hedge Trimmer
Comprehensive user guide for the Westinghouse WHT 20V / WHTT 20V 22-inch Cordless Hedge Trimmer. Includes assembly, operation, maintenance, safety instructions, and troubleshooting.
Quick answers from the manual
Quick answer
- The Westinghouse WHT 20V / WHTT 20V is a 22-inch cordless hedge trimmer. To operate, insert a compatible battery, hold the lock-out button, and squeeze the switch trigger. p. 1, 7, 9
Key actions
- Lubricate the blade before and after each use. p. 10
- Clear the work area of debris before starting. p. 9
First start
- Insert the battery pack into the housing until latches click, then hold the lock-out button and squeeze the trigger. p. 8, 9
Problems and fixes
Trimmer will not start
Check battery installation and charging requirements.
p. 11
Battery will not charge
Check charger connection, ambient temperature, and battery insertion.
p. 11Maintenance and reset
- Clean air vents after each use and lubricate blades before and after each use. p. 10
Technical specifications
| Parameter | Value | Meaning | Pages |
|---|---|---|---|
| Voltage | 20V | DC Voltage | p. 3 |
| Speed | 2600 RPM | No Load Speed | p. 3 |
Where to find it in the PDF
- Components Diagram p. 7
- Parts List p. 12
Table of contents
Manual images
Click an image to enlargeQuick Guide from the Manual
The Westinghouse WHT 20V / WHTT 20V is a 22-inch cordless hedge trimmer designed for trimming and shaping hedges and shrubbery. Before use, ensure you have read all safety instructions, wear appropriate eye protection (ANSI Z87.1 compliant), and clear the work area of debris and obstacles. The unit requires a compatible Westinghouse battery pack and charger to operate.
Components
The hedge trimmer consists of the following main parts:
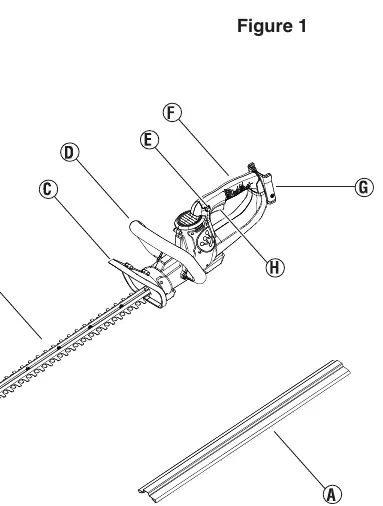
- Blade Sheath (A): Protective cover for storage and transport.
- Blade (B): The cutting element.
- Guard (C): Debris protection.
- Front Handle (D): For stability.
- Lock-out Button (E): Safety feature to prevent accidental starting.
- Top Handle (F): For directional control.
- Battery Pack Housing (G): Where the battery is inserted.
- Switch Trigger (H): Activates the motor when used with the lock-out button.
Assembly
The product requires minimal assembly. Ensure the battery pack is removed before assembly or adjustments.
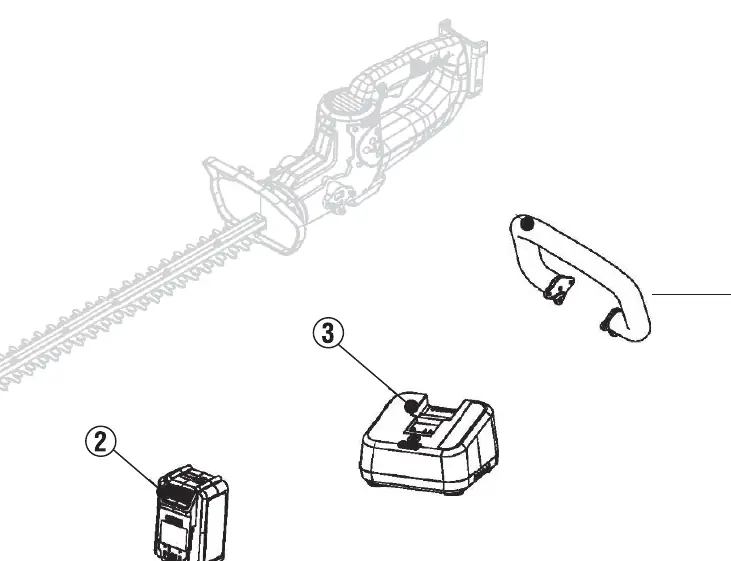
- Attaching the Battery Pack: Insert the battery pack into the battery housing until the latches on both sides click into place.
- Removing the Battery Pack: Depress the latches on both sides of the battery pack to release it from the housing.
Operation
Always hold the trimmer with both hands during operation. Never hold shrubs with one hand while operating the trimmer with the other.
- Starting: Press and hold the lock-out button, then squeeze the switch trigger.
- Stopping: Release the switch trigger.
- Operating Tips: Use a slow, sweeping motion from side to side. For level hedges, use a string as a guide. Do not force the trimmer through heavy shrubbery; if the blades slow down, reduce your pace. Do not cut stems thicker than 3/4 inch.
Maintenance
Regular maintenance ensures longer tool life and safer operation.
- Lubrication: Lubricate the blade before and after each use with light-weight machine oil. Remove the battery before lubricating.
- Cleaning: Remove the battery and blade sheath. Clean the body with a damp cloth and mild detergent. Use a small brush or vacuum to clear debris from motor air vents.
- Storage: Store in a dry, locked location inaccessible to children. Always place the blade sheath over the blade when not in use.
Troubleshooting
If the trimmer will not start, check that the battery is installed correctly and fully charged. If the battery will not charge, ensure the charger is plugged into a working outlet and that the ambient temperature is between 40°F (4.5°C) and 105°F (40.5°C).
Technical Specifications
- DC Voltage: 20V
- No Load Speed: 2600 RPM
- Weight: 5.1 lbs (2.3 kg)
Practical help
Common problems
Trimmer will not start
Check that the battery pack is installed correctly and is fully charged.
Battery pack will not charge
Ensure the charger is plugged into a working outlet. Check that the ambient temperature is between 40°F (4.5°C) and 105°F (40.5°C). Ensure the battery is inserted into the charger until the red LED appears.
Before use
- Inspect the entire product for damaged, missing, or loose parts.
- Ensure all fasteners and caps are tightened securely.
- Wear ANSI Z87.1 compliant eye protection.
- Clear the work area of cords, lights, wire, or loose string.
- Ensure the battery is fully charged.
Specs in practice
- No Load Speed
- 2600 RPM - The speed of the blade without resistance.
Images and diagrams
- Figure 1 illustrates the main components: Blade Sheath (A), Blade (B), Guard (C), Front Handle (D), Lock-out Button (E), Top Handle (F), Battery Pack Housing (G), and Switch Trigger (H).
Model compatibility
- Compatible Westinghouse Battery Packs: W20V2AH, W20V4AH, W20V5AH.
- Compatible Westinghouse Chargers: W20V2AMP, W20V2DP.

Manual page author
David Miller
Documentation analyst
Organizes user manual content into clear summaries, with attention to model details, product context, and everyday usability.