Tools / Drills
User Manual for Bosch GSR 18 V-EC TE Professional Cordless Drywall Screwdriver
Quick guide for the Bosch GSR 18 V-EC TE Professional cordless drywall screwdriver. Learn how to adjust screw-in depth, change bits, operate the tool, and maintain your device safely.
Quick answers from the manual
Quick answer
- This manual provides instructions for operating, maintaining, and adjusting the Bosch GSR 18 V-EC TE cordless drywall screwdriver, including battery handling, bit changing, and screw-in depth settings. p. 1, 7, 8
Key actions
- Change the screwdriver bit p. 7
- Adjust screw-in depth p. 8
- Reverse rotational direction p. 7
First start
- Charge the battery p. 7
- Insert the battery p. 7
Problems and fixes
Tool speed reduced or stops
Allow the tool to cool down if the battery temperature range of 0–70 °C is exceeded or if the tool is overloaded.
p. 8Maintenance and reset
- General maintenance p. 8
Technical specifications
| Parameter | Value | Meaning | Pages |
|---|---|---|---|
| Rated voltage | 18 V | Operating voltage | p. 6 |
| No-load speed | 0 – 4200 min-1 | Rotational speed without load | p. 6 |
| Max. torque | 5 Nm | Maximum torque for soft screwdriving | p. 6 |
| Tool holder | 1/4" hexagon socket | Bit interface type | p. 6 |
Where to find it in the PDF
- Product Overview and Features p. 3, 6
- Safety Notes p. 5, 6
- Assembly and Operation p. 7, 8
Table of contents
Manual images
Click an image to enlargeQuick Guide from the Manual
The Bosch GSR 18 V-EC TE Professional is a cordless drywall screwdriver designed for driving in and loosening screws. Key operational points include:
- Battery: Use only original Bosch lithium-ion batteries. Charge fully before first use.
- Depth Adjustment: Use the adjustment sleeve to set the screw-in depth. Each locking step corresponds to 0.25 mm.
- Tool Change: Always remove the battery before changing bits or performing maintenance.
- Operation: The tool features variable speed control via the On/Off switch and an LED light for working in low-light conditions.
Product Overview
The tool features the following components:
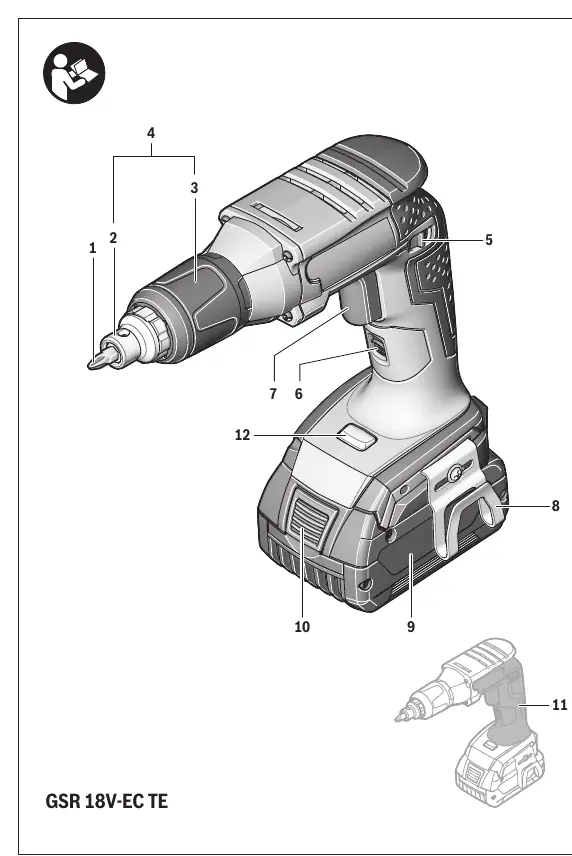
- 1: Screwdriver bit
- 2: Stop bushing
- 3: Adjustment sleeve for screwing-depth stop
- 4: Screwing-depth stop
- 5: Rotational direction switch
- 6: Lock-on button for On/Off switch
- 7: On/Off switch
- 8: Belt clip
- 9: Battery pack
- 10: Battery unlocking button
- 11: Handle
- 12: LED light
- 13: Universal bit holder
Assembly
Battery Charging
Use only the battery chargers listed in the accessories section. The battery is supplied partially charged. The lithium-ion battery is protected against deep discharging by Electronic Cell Protection (ECP). If the battery is empty, the machine switches off automatically.
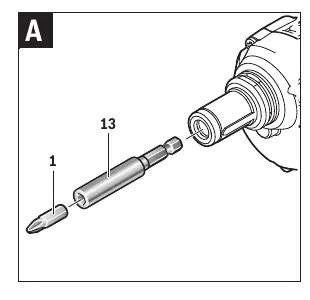
Changing the Tool
Before any work on the machine, remove the battery. Pull off the screwing-depth stop (4) toward the front. Pull out the screwdriver bit (1). If necessary, the universal bit holder (13) can also be removed and replaced. After changing, reattach the screwing-depth stop.
Operation
Starting Operation
Insert the charged battery into the handle until it engages. Set the rotational direction switch (5) to the center position to prevent unintentional starting.
Reversing Rotational Direction
Use the rotational direction switch (5) to change the direction. Rotate clockwise by moving the switch to the stop position. Rotate anticlockwise by moving the switch to the opposite stop position.
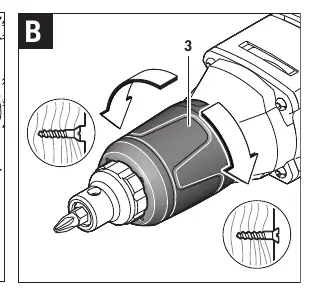
Adjusting the Screw-in Depth
Use the adjustment sleeve (3) to preset the screw-in depth. It has 8 locking steps per full turn. Turning clockwise increases the depth; turning anticlockwise reduces it. Test the setting on a scrap piece of material first.
Switching On and Off
Press the On/Off switch (7) to start. The LED (12) illuminates when the switch is pressed. To lock the switch, press the lock-on button (6). To switch off, release the On/Off switch or press it briefly if locked.
Maintenance and Cleaning
Always remove the battery before maintenance or transport. Keep the machine and ventilation slots clean for safe operation. If the battery is no longer operative, contact an authorized Bosch after-sales service agent.
Manufacturer information
Bosch
Practical help
Common problems
Tool stops rotating during use
The battery may be empty or the temperature protection (0-70°C) has been triggered. Allow the tool to cool or charge the battery.
Screw depth is incorrect
Adjust the depth stop sleeve (3). Turn clockwise for deeper driving or anticlockwise for shallower driving.
Before use
- Ensure the battery is fully charged.
- Check that the correct screwdriver bit is inserted.
- Verify the rotational direction switch is set to the desired direction.
- Ensure the depth stop is properly attached and adjusted.
- Check that the battery is securely engaged in the handle.
Specs in practice
- Rated voltage
- 18V (Battery power).
- No-load speed
- 0-4200 min-1 (Variable speed control).
Images and diagrams
- Figure A: Shows the process of changing the screwdriver bit and universal bit holder.
- Figure B: Illustrates how to adjust the screwing-depth stop using the adjustment sleeve.
Model compatibility
- Use only original Bosch lithium-ion batteries.
- Use only Bosch chargers specified for this battery type.

Manual page author
Emily Carter
User documentation editor
Prepares concise manual descriptions and highlights the most useful setup, operation, and maintenance information for readers.