Tools / Drills
Operating Instructions for Hilti TE 2, TE 2-S, and TE 2-M Rotary Hammers
Quick guide for Hilti TE 2, TE 2-S, and TE 2-M rotary hammers. Includes setup, operation, maintenance, and troubleshooting steps.
Quick answers from the manual
Quick answer
- The Hilti TE 2, TE 2-S, and TE 2-M are rotary hammers designed for drilling in concrete, masonry, wood, and metal, as well as driving screws. Always ensure the correct drilling mode is selected and the side handle is securely fitted before operation. p. 11, 12
Key actions
- Fitting the side handle p. 12
- Fitting/removing the chuck p. 12
Problems and fixes
No hammering action
Bring the tip of the drill bit into contact with the working surface, switch the rotary hammer on and allow it to run. If necessary, repeat the procedure until the hammering mechanism begins to operate.
p. 14Maintenance and reset
- Replacing the dust shield p. 13
Technical specifications
| Parameter | Value | Meaning | Pages |
|---|---|---|---|
| Weight (EPTA procedure 01) | 2.7 kg (TE 2, TE 2-S), 2.9 kg (TE 2-M) | Weight of the tool | p. 11 |
Where to find it in the PDF
- Product Overview p. 2
- Technical Data p. 11, 12
- Troubleshooting p. 14
Table of contents
Manual images
Click an image to enlargeQuick guide from the manual
This manual provides essential operating and safety instructions for the Hilti TE 2, TE 2-S, and TE 2-M rotary hammers. Before using the tool for the first time, read the safety instructions and warnings provided in this document. Always keep these instructions with the tool.
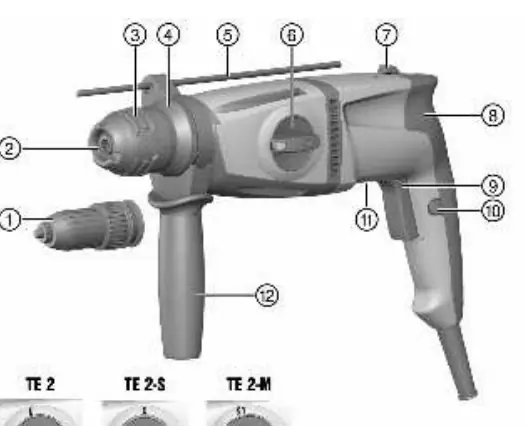
Overview of the product
The rotary hammer is designed for drilling in concrete, masonry, drywall, plastic, wood, and metal, as well as for driving and removing screws. Key components include the chuck, function selector switch, forward/reverse switch, and side handle.
Operation
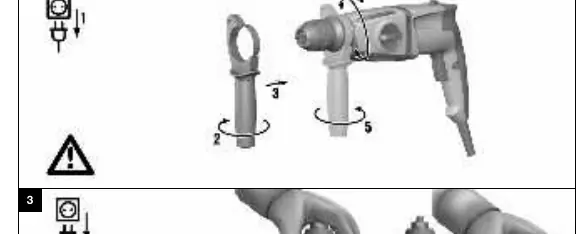
Fitting the side handle
Ensure the side handle is fitted correctly and tightened securely. The clamping band must be engaged in the groove on the product. If the depth gauge is fitted but not used, remove it to avoid hindering the operator.
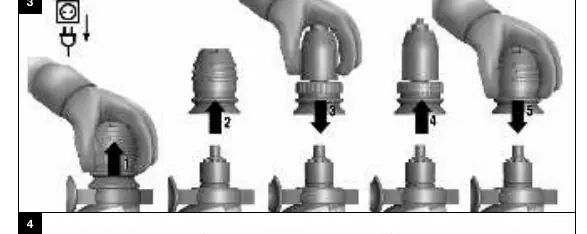
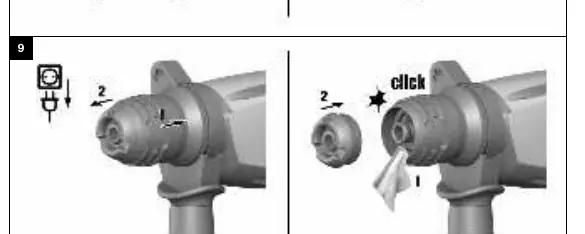
Fitting/removing the chuck and drill bits
For the TE 2-M, the chuck can be fitted or removed. When using the SDS chuck, use only the recommended grease supplied by Hilti; unsuitable grease may cause damage.
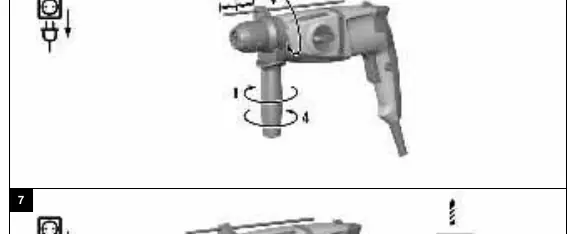
Drilling
Use the function selector switch to choose between drilling modes (e.g., rotary drilling, hammer drilling). Do not operate the forward/reverse switch while the motor is running to avoid damaging the gearing.
Care and maintenance
Always unplug the supply cord before carrying out care and maintenance tasks. Remove stubborn dirt from the tool and clean air vents with a dry brush. Use only a slightly damp cloth to clean the casing; do not use silicone-containing cleaning agents. Repairs to electrical components must be carried out only by trained electrical specialists.
Troubleshooting
If the tool does not start, check the electric supply. If there is no hammering action, the tool may be too cold; allow it to run in idle mode until the mechanism engages. If the tool does not achieve full power, ensure the control switch is fully pressed and the correct drilling mode is selected.
Manufacturer information
Hilti Corporation
Practical help
Common problems
No hammering action
The tool may be too cold. Bring the drill bit tip into contact with the surface and allow the tool to run in idle mode until the mechanism engages. Also, ensure the function selector is set to 'Hammer drilling'.
Tool does not achieve full power
Ensure the control switch is fully pressed. Check that the function selector is not set to 'Light hammering' (TE 2-S) or 'Rotary drilling only'. Verify the extension cord has an adequate conductor cross-section.
Drill bit cannot be released
The chuck is not pulled back fully. Pull the tool lock back as far as it will go and remove the tool.
Before use
- Check that the side handle is fitted correctly and tightened.
- Ensure the depth gauge is adjusted correctly if needed.
- Verify the power supply voltage and frequency match the tool's rating plate.
- Check the tool and accessories for any signs of damage.
- Ensure the correct drilling mode is selected for the material.
Specs in practice
- Weight (EPTA procedure 01)
- 2.7 kg for TE 2 and TE 2-S; 2.9 kg for TE 2-M.
- Drilling diameter (concrete/masonry)
- 4 mm to 22 mm range for all models.
- Drilling diameter (wood)
- 4 mm to 20 mm for TE 2/TE 2-S; 4 mm to 20 mm (solid) and 4 mm to 10 mm (other) for TE 2-M.
Images and diagrams
- Page 2: Overview diagram showing the chuck, function selector, and other controls.
- Page 3: Diagrams for fitting the side handle and fitting/removing the chuck.
- Page 4: Diagrams for drilling modes, depth gauge adjustment, and dust shield replacement.
Model compatibility
- TE 2-M features a three-jaw chuck and quick-release chuck options.
- TE 2-S features a light hammering mode.
- Use only genuine Hilti spare parts and consumables.

Manual page author
David Miller
Documentation analyst
Organizes user manual content into clear summaries, with attention to model details, product context, and everyday usability.