Electronics / Audio
Quick Start Guide for Caliber RMD 057DAB Car Radio
Quick start guide for the Caliber RMD 057DAB car radio. Includes installation, wiring, DAB+ antenna setup, and operation instructions for FM, Bluetooth, and USB/SD media playback.
Table of contents
Manual images
Jump to the sectionQuick Start Guide
This guide provides essential instructions for installing and operating your Caliber RMD 057DAB car radio. For detailed safety information, please refer to the full manual provided in the product packaging.
Installation and Wiring
Proper installation is critical for the safe operation of your device.
- Power Requirements: Use only in vehicles with a 12V negative ground system.
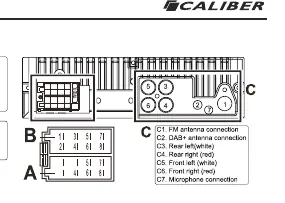
- Wiring: Connect the wiring harness according to the provided diagram. Ensure the fuse (10A) is correctly installed.
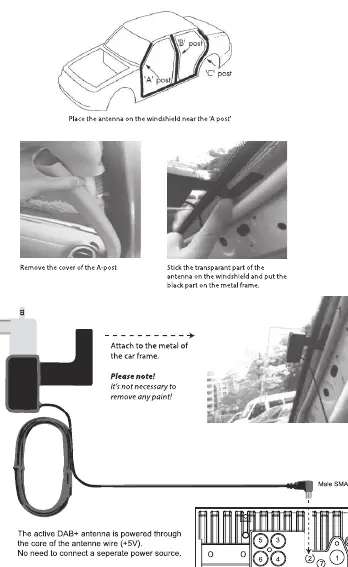
- DAB+ Antenna: For optimal DAB+ reception, install the included antenna on the windshield near the 'A' post. The active antenna is powered through the core of the antenna wire (+5V).
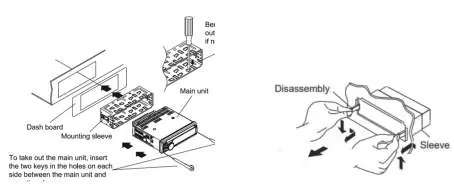
- Installation: Use the provided mounting sleeve to secure the main unit in the dashboard. Use the two keys to insert or remove the unit from the sleeve.
Controls and Operation
The device is controlled via the front panel buttons and the included remote control.
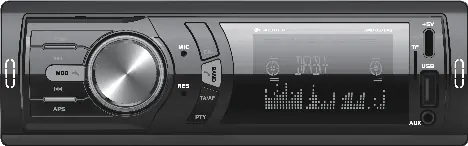
- Power: Press the [POW] button (1) to turn the device on or off.
- Playback Mode: Press the [MOD] button (8) to cycle between FM radio, DAB+ radio, USB/SD, Bluetooth, and Aux-in.
- Volume: Turn the [VOL] knob (2) to adjust the volume.
Radio Operation
The RMD 057DAB supports FM and DAB+ radio.
- FM Radio: Press the [BAND] button (9) to switch between F1-F3 bands. Use the [APS] button (15) to automatically scan and save stations.
- DAB+ Radio: Upon first startup, the radio automatically scans for available stations. To refresh, press the [APS] button.
- RDS: Functions like AF, TA, and PTY are available. Press [TA/AF] (14) to toggle traffic announcements.
Media and Connectivity
- Bluetooth: Press [MOD] (8) to select Bluetooth mode. Search for 'CALIBER_RMD057' on your phone and enter '0000' if prompted.
- USB/SD: Insert a USB drive or SD card to automatically start playback. Note: The USB-C port is for charging only and does not support file playback.
Audio and Lighting Settings
Access the audio menu by briefly pressing the [VOL] button (3). Navigate through settings (Time, Bass, Treble, Balance, Fader, Equalizer, Loudness, Lighting) by pressing the button repeatedly. Adjust values by turning the [VOL] knob (2) and confirm by pressing it.
Safety Precautions
- Do not operate the device if it distracts you from safe driving.
- Keep volume at a level where you can still hear external traffic noises.
- Do not disassemble or modify the unit.
- Ensure the vehicle temperature is between 0°C and +45°C before turning on the unit.
Manufacturer information
Caliber Europe
Practical help
Common problems
Bluetooth not connecting
Ensure 'BT' is flashing on the screen, search for 'CALIBER_RMD057' on your phone, and use '0000' as the password.
DAB+ stations not found
Ensure the DAB+ antenna is correctly installed on the windshield A-post and perform a scan using the APS button.
Radio settings not saving
Ensure the constant 12V power wire is connected correctly to the vehicle's power supply.
Before use
- Verify vehicle has 12V negative ground system.
- Install the DAB+ antenna on the windshield near the A-post.
- Connect the wiring harness according to the diagram.
- Ensure the fuse is intact (10A).
- Check that the temperature is between 0°C and +45°C.
Specs in practice
- Power Output
- 75Wx4 Max, 20Wx4 RMS.
- DAB+ Frequency
- 174-240 MHz.
- USB Charge Output
- 5.0VDC, Max 2.0A (10.0W) - for charging only.
Images and diagrams
- Wiring Diagram: Shows connections for speakers (A/B) and power/antenna (C).
- DAB+ Antenna: Shows placement on the windshield A-post and connection to the unit.
Model compatibility
- USB-C port is for charging only; it does not support file playback.
- Requires 12V negative ground vehicle electrical system.

Manual page author
David Miller
Documentation analyst
Organizes user manual content into clear summaries, with attention to model details, product context, and everyday usability.