Tools / Air Compressors & Pneumatics
User Manual for California Air Tools 10020C-22060 Air Compressor
Quick guide for the California Air Tools 10020C-22060 air compressor. Includes assembly instructions, daily operation steps, maintenance procedures, and troubleshooting tips.
Table of contents
Manual images
Click an image to enlargeQuick guide from the manual
This manual provides instructions for the California Air Tools 10020C-22060 air compressor. The unit is oil-free and designed for stable performance. Before use, ensure the unit is placed on a flat surface (incline no greater than 15 degrees) with at least 2 feet of clearance for airflow. Always use the provided air filters and ensure the power supply meets the 220V 60Hz requirements.
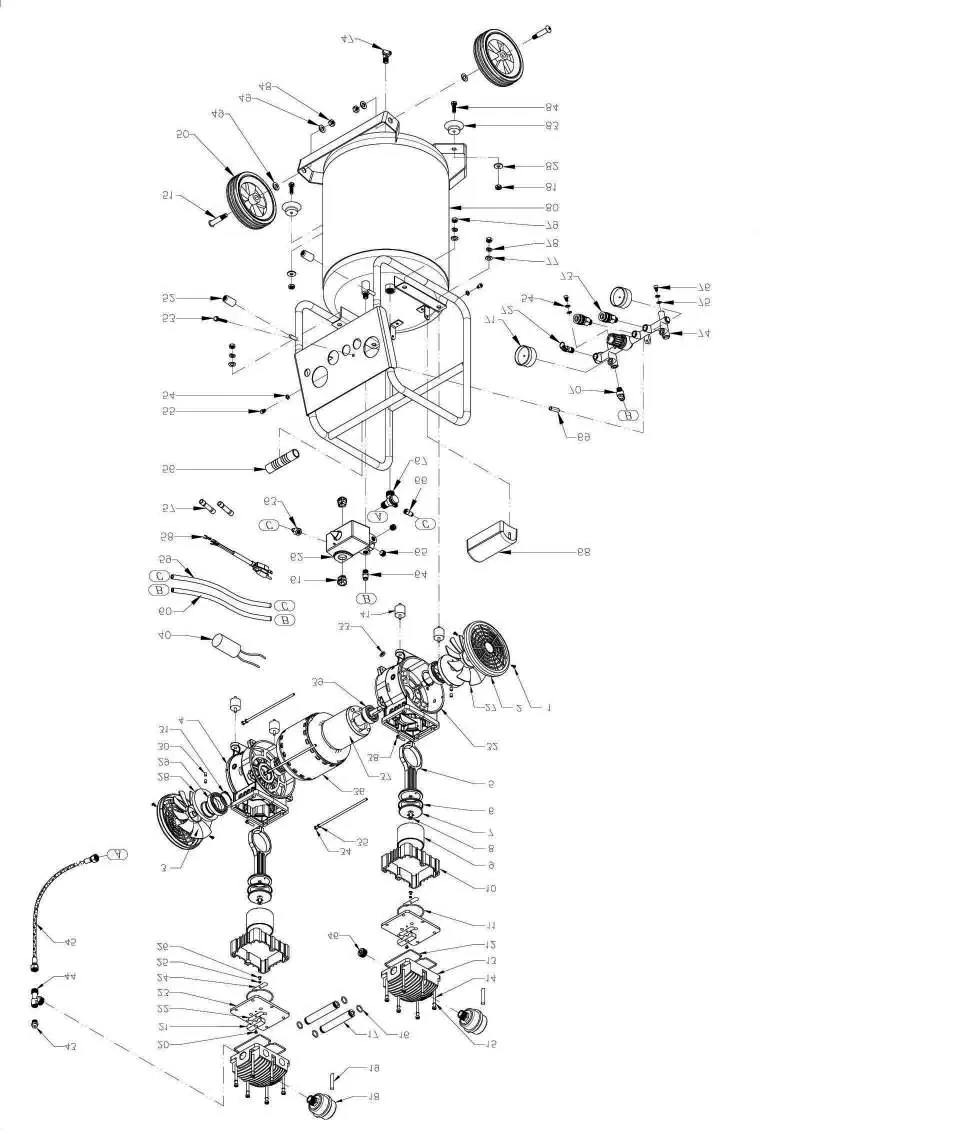
Assembly
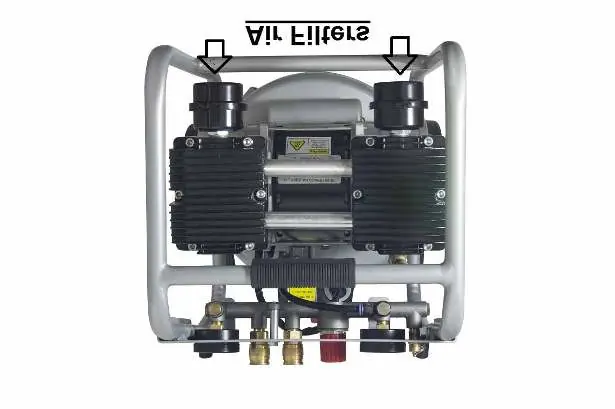
Install the Air Filter: Attach the air filters to the top back side of the motor head by screwing them into the motor head ports.
Install the Wheel Kit:
- Slide Bolt #51 through Wheel #50.
- Slide Washer #49 onto Bolt #51.
- Insert Bolt #51 through the wheel support hole on the front bottom of the tank.
- Secure with Washer #49 and Nut #48. Repeat for the second wheel.
Install Cushion Feet:
- Slide Bolt #84 through Cushion Foot #83.
- Insert through the support hole on the back bottom of the tank.
- Secure with Washer #82 and Nut #81. Repeat for the second support.
Operation
Test Run: Before first use, plug in the unit, turn the switch to ON, and let the tank fill. The pressure switch should automatically shut off the motor at 120-125 PSI. If it does not, or if there is a leak, turn off immediately.
Daily Operation:
- Ensure the power switch is OFF and the drain valve is closed.
- Connect the air hose to the 1/4 inch quick connect coupler.
- Plug in the power cord and turn the switch to ON.
- Allow the tank to fill until the motor stops.
- Use the regulator knob to adjust the output pressure as needed.
Shutting Down: Turn the power switch to OFF, unplug the power cord, and release remaining pressure through the air supply hose.
Maintenance
Draining the Air Tank: Drain the tank every 2 to 3 days to prevent rust and corrosion. Place the compressor over a container, slowly turn the drain valve knob to the open position, and allow water to drain. Close the valve tightly after draining.
Air Filter: Regularly clean the air filter element by brushing off dirt or blowing it off. If the filter is clogged, replace it with a new one.
Testing for Leaks: Spray soapy water on connections. If bubbles appear, tighten the connection or replace the faulty part.
Troubleshooting
If the compressor does not start, check if the thermal protector has tripped due to overheating or if the voltage is insufficient. If the motor hums but does not start, the capacitor may be damaged. For pressure drops, check all connections for leaks. If the unit fails to reach maximum pressure or is excessively noisy, contact customer support.
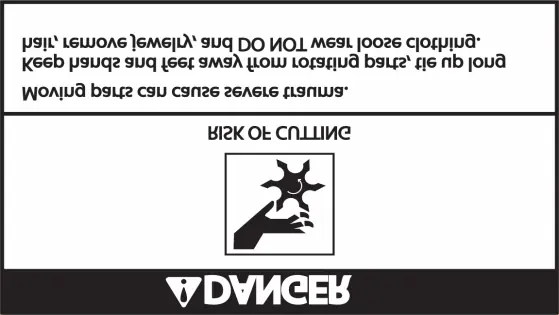
Safety
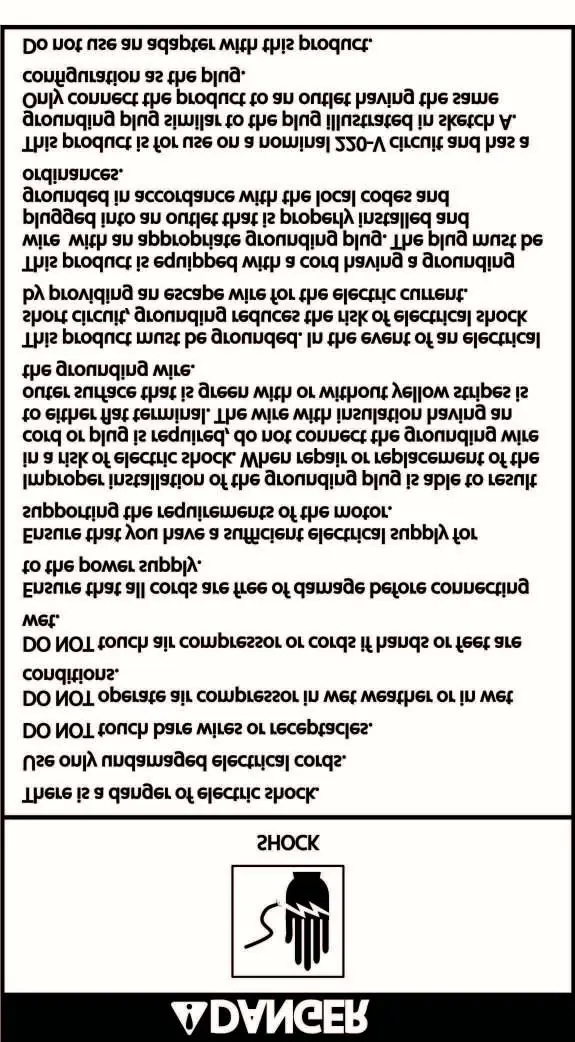
Always operate in a well-ventilated area away from flammable materials. Do not touch hot surfaces such as the cylinder head. Use only 3-wire extension cords (minimum 14 gauge, maximum 25 feet) to prevent voltage drops and motor damage. Do not use adapters.
Practical help
Common problems
Pressure drop in the tank
Check for air leaks at connections using soapy water. Tighten any loose fittings.
Compressor stopped and does not start
The thermal protector may have tripped due to overheating. Allow the motor to cool down and check for voltage drops caused by long or thin extension cords.
Motor hums but does not start
The capacitor may be burned out. Contact customer support.
Compressor does not reach maximum pressure
The compressor head gasket or reed valve may be faulty. Stop the compressor and contact the dealer.
Before use
- Inspect the air tank and all parts for damage.
- Ensure the compressor is on a flat surface (max 15-degree incline).
- Maintain at least 2 feet of clearance around the unit.
- Install air filters properly.
- Verify the power supply matches the 220V 60Hz requirement.
- Ensure the drain valve is closed.
Images and diagrams
- Parts Diagram: Exploded view showing all components and their reference numbers for assembly and repair.
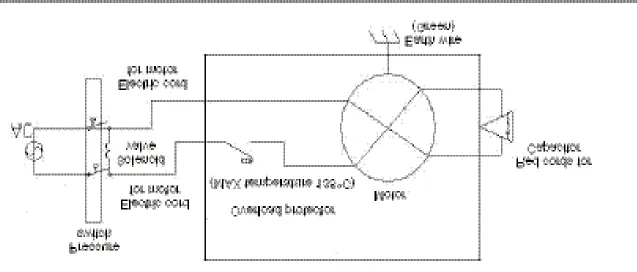
- Electrical Circuit: Wiring diagram showing the connection between the pressure switch, motor, and capacitor.
- Air Passage Drawing: Schematic showing the flow of air from the intake through the tank to the output.
Model compatibility
- Use only 3-wire extension cords with a 3-blade grounding plug.
- Extension cords must be at least 14 gauge and no longer than 25 feet.
- Do not use adapters with this product.

Manual page author
David Miller
Documentation analyst
Organizes user manual content into clear summaries, with attention to model details, product context, and everyday usability.