Tools / Air Compressors & Pneumatics
User Manual for Sealey SAC5001S and SAC10001S Air Compressor
Quick guide for the Sealey SAC5001S and SAC10001S oil-free air compressors. Includes setup, operation, maintenance schedules, and troubleshooting steps.
Table of contents
Manual images
Click an image to enlargeImportant Information
This manual covers the Sealey SAC5001S (50L) and SAC10001S (100L) oil-free air compressors. These units are designed for reliable, quiet operation with automatic pressure cut-out switches. Always ensure the compressor is used in a well-ventilated area and that the air supply is clean. Important: Do not confuse compressor displacement (air in) with free air delivery (air out). Always check the 'Free Air Delivery' figures in the specification chart when selecting tools.
Safety
Read all safety instructions before use. Key safety requirements include:
- Ensure the voltage matches the power supply and the plug is fitted with the correct fuse.
- Use a Residual Current Device (RCD) for electrical safety.
- Do not touch the cylinder, cylinder head, or pipe from the head to the tank as these may be hot.
- Do not operate without an air filter.
- Do not tamper with the pressure switch or safety valve.
- Drain condensation from the tank daily to prevent corrosion.
- If the power cable is damaged, it must be replaced by the manufacturer or authorized service personnel.
Preparation
Before first use, perform the following steps:
- Inspect the unit for damage.
- Attach the castor wheels to the bracket on the bottom of the tank using the supplied fixings.
- For SAC10001S, attach the handle to the mounting tubes.
- Install the compressor on a flat surface (maximum 10° incline).
- Screw the air filter holders into the inlet ports.
Operation
Follow these steps to operate the compressor:
- Ensure the main switch is in the 'OFF' (down) position.
- Connect the air tool to the air outlet.
- Ensure the tank drain valve is closed.
- Plug into the mains supply and pull up the main switch to start.
- Allow the tank pressure to rise to the maximum; the compressor will cut out automatically.
- Use the regulator knob to set the required operating pressure for your tool. Adjust up to the required pressure rather than down.
- Lock the setting by screwing the locking ring tight underneath the knob.
To stop the compressor, press down the main switch. Always unplug the unit and set the outlet pressure to zero after use.
Maintenance
Regular maintenance is essential for longevity:
- Daily: Drain condensation from the tank; check that all nuts and bolts are tight; drain the filter regulator.
- Every 100 Hours: Clean or replace the air filter element. Check the safety valve operation.
- Every 200 Hours: Check the automatic cut-out at maximum pressure.
- Every 500 Hours: Replace air filters; check all tube fittings and electrical connections.
Note: Air contaminants like body filler dust or paint overspray will clog the intake filter and cause internal damage not covered by warranty.
Troubleshooting
If you encounter issues, consult the troubleshooting table. Common faults include pressure drops due to leaks at connections or the safety valve, motor failure to restart due to thermal cut-out or tripped fuses, and excessive moisture in discharged air due to high humidity environments.
Manufacturer information
Sealey Group
Practical help
Common problems
Pressure drop in the tank
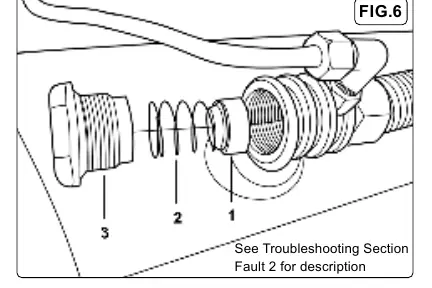
Check for air leaks at connections, safety valve, or cylinder head gasket. Tighten connections or replace the safety valve/gasket if necessary.
Motor stops and will not restart
Thermal cut-out may have operated; allow the unit to cool for 30 minutes. Alternatively, check if the supply fuse has tripped.
Compressor does not stop at max pressure
Possible pressure switch fault, clogged filter, or head gasket/valve fault. Contact an authorized service agent.
Excessive moisture in discharged air
Caused by high humidity. Drain the tank after each use.
Before use
- Ensure the compressor is on a flat, firm surface.
- Verify that the mains voltage matches the rating plate.
- Ensure the air filter is fitted.
- Check that the tank drain valve is closed.
- Ensure the air hose is not tangled or pinched.
- Check that all guards and covers are in place.
Specs in practice
- Air Displacement
- The volume of air taken in by the compressor ('air in').
- Free Air Delivery
- The actual volume of air delivered by the compressor ('air out'), which varies by pressure.
- Maximum Pressure
- The maximum pressure the tank can hold (116psi / 8bar).
Images and diagrams
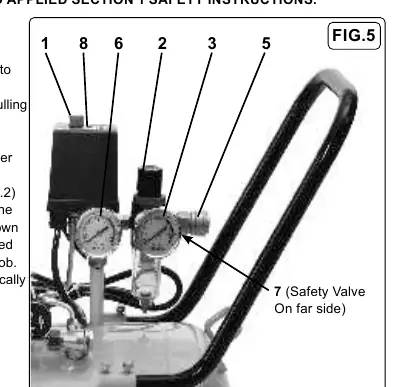
- Fig 5: Shows the main switch, regulator knob, locking ring, and pressure gauges.
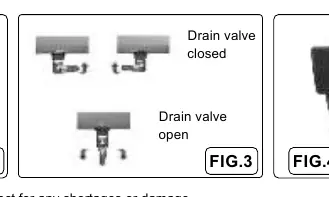
- Fig 3: Illustrates the drain valve position (open/closed).
- Fig 6: Shows the non-return valve components (seal, spring, cap).
- Fig 7: Shows the safety valve operation.
Model compatibility
- Requires 230V/13A power supply.
- Not for use in environments with flammable gases, dust, or acids.
- Use only genuine Sealey parts for repairs.

Manual page author
David Miller
Documentation analyst
Organizes user manual content into clear summaries, with attention to model details, product context, and everyday usability.