Tools / Air Compressors & Pneumatics
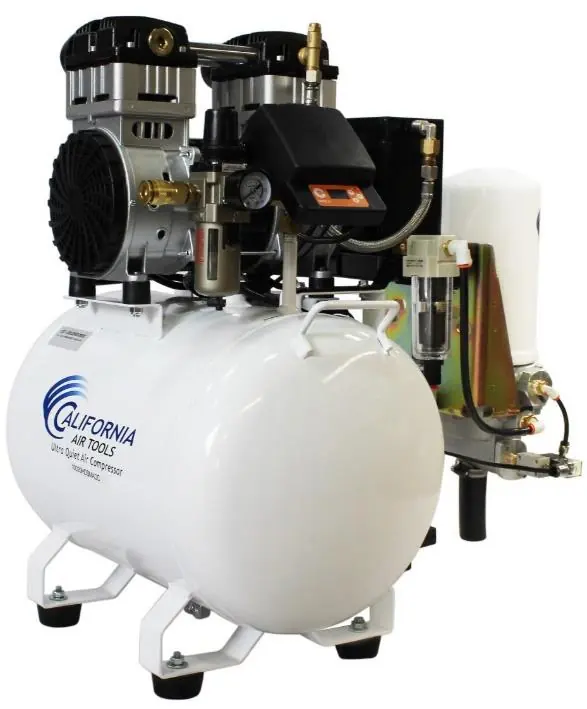
User Manual for California Air Tools 10020HDSMADC Air Compressor
Quick guide for the California Air Tools 10020HDSMADC air compressor. Includes assembly, operation, maintenance, troubleshooting, and safety instructions.
Table of contents
Manual images
Click an image to enlargeQuick guide from the manual
This manual provides essential instructions for the California Air Tools 10020HDSMADC air compressor. Key procedures include assembling the air filters, starting and shutting down the unit using the SMART controller, and performing routine maintenance like draining the tank and cleaning the air filter. Always read the full safety instructions before operation.
Safety Instructions
The air compressor is designed for intermediate usage and should not run continuously for more than 60 minutes. Follow these safety guidelines:
- Always wear approved eye and head protection.
- Operate in a well-ventilated, clean area.
- Do not touch hot surfaces, such as the cylinder head, during or immediately after operation.
- Ensure the compressor is on a flat surface with at least 2 feet of clearance for airflow.
- Never leave the compressor unattended while pressurized.
- Use only 3-wire extension cords with a 3-blade grounding plug, maximum 25 feet long and at least 14 gauge.
Assembly
Before first use, install the air filters:


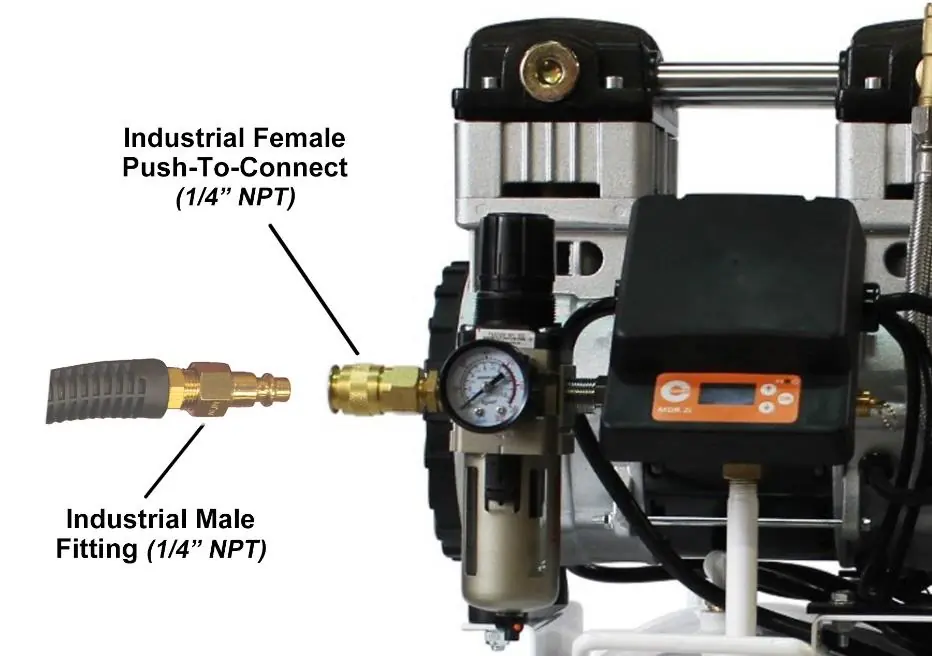
- Attach the air filters to the top rear left and right side of the motor head's threaded ports.
- Screw the air filters clockwise until secure (hand tighten only).
- Push the 4-inch air filter intake tubes into the air filter ports.
Operating the Air Compressor
Starting:
- Plug the power cord into a 110V, 60Hz, 15A outlet.
- Press and hold the SMART switch OK button for 4 seconds to turn the compressor ON.
- The motor/pump will start and fill the tank until it reaches the cut-off pressure.
Shutting Down:
- Press and hold the SMART switch OK button for 4 seconds to turn the compressor OFF.
- Unplug the power cord.
- Release pressure from the tank using an air hose gun or the safety relief valve.
Maintenance
Regular maintenance ensures longevity and performance:
- Drain Tank: Drain the air tank daily or after each use to prevent moisture buildup and rust.
- Air Filter: Clean or replace the air filter element regularly if it becomes clogged.
- Leaks: Test connections for leaks using soapy water. Tighten if necessary.
- Cleaning: Clean the unit with a soft brush or moistened cloth using a biodegradable solvent. Do not use flammable liquids.
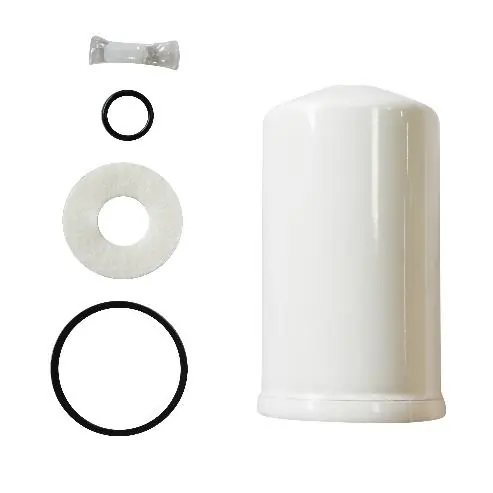
- Air Dryer Cannister: Replace the 98% Dry Air Cannister (P/N 619003) every 4000 motor operating hours or every 1-2 years.
Troubleshooting
If the compressor fails to start, check for thermal protector trips due to overheating, low voltage, or incorrect extension cord usage. If the motor hums but does not start, check for head pressure or low voltage. If the compressor is noisy or fails to reach maximum pressure, contact customer support for service.
Specifications
The 10020HDSMADC features a 2.0 HP motor, a 10-gallon steel tank, and a smart controller. It delivers 6.40 CFM at 40 PSI and 5.30 CFM at 90 PSI. The unit includes an automatic drain valve and a 98% dry air system.
Practical help
Common problems
Pressure drop in the tank
Check for air leaks at connections using soapy water and tighten if necessary.
Compressor stopped and does not start
Allow the motor to cool down (thermal protector may have tripped). Check for low voltage or incorrect extension cord usage.
Motor hums but does not start
Check for head pressure or low voltage supply. Ensure the compressor is plugged into a functional outlet.
Compressor does not reach maximum pressure
Stop the compressor and contact customer support; the head gasket or reed valve may be faulty.
Before use
- Inspect the air tank for damage.
- Ensure all pipes are firmly connected.
- Attach air filters to the motor head.
- Place on a flat surface (incline no greater than 15 degrees).
- Ensure at least 2 feet of obstacle-free space around the unit.
- Verify power supply is 110V, 60Hz, 15A.
Specs in practice
- 6.40 CFM @ 40 PSI
- Airflow performance at 40 PSI.
- 5.30 CFM @ 90 PSI
- Airflow performance at 90 PSI.
Images and diagrams
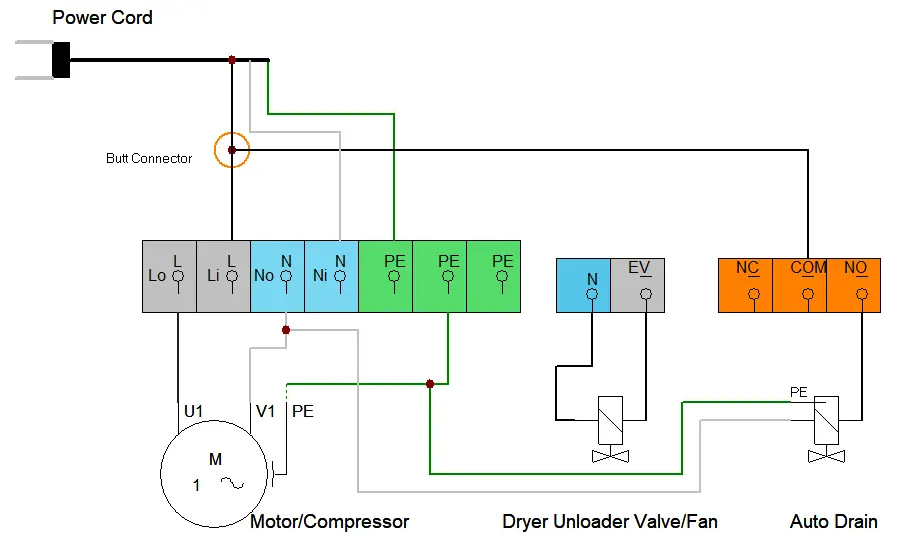
- Wiring diagram illustrates connections for the motor, pressure switch, and valves.
- Air passage drawing shows the flow path from the compressor through the tank to the regulator.
Model compatibility
- Use only 3-wire extension cords with a 3-blade grounding plug.
- Extension cords must be no more than 25 feet long and at least 14 gauge.
- Do not use adapters with this product.

Manual page author
Michael Turner
Technical manual editor
Reviews PDF manuals for structure, safety notes, and practical product details so readers can find the right information quickly.