Tools / Air Compressors & Pneumatics
User Manual for California Air Tools 10020HDSPCADC Air Compressor
Quick guide for the California Air Tools 10020HDSPCADC air compressor. Includes setup, operation, maintenance, troubleshooting, and safety instructions.
Table of contents
Manual images
Click an image to enlargeQuick guide from the manual
The California Air Tools 10020HDSPCADC is an ultra-quiet, oil-free smart air compressor designed for intermediate usage. It features a 10-gallon steel tank and a 98% dry air system. This manual provides essential instructions for safe operation, assembly, and maintenance to ensure the longevity of the unit.
Safety Instructions
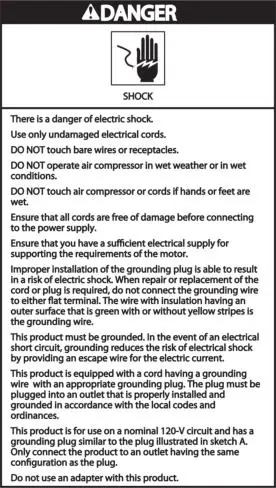
DANGER: Indicates an immediate hazardous situation that will result in death or serious injury if not avoided.
- Electrical Safety: Use only undamaged 3-wire extension cords with a 3-blade grounding plug. Do not use adapters. Ensure the power supply is 110V, 60Hz, 15A.
- Environment: Do not operate in wet conditions. Keep the compressor on a flat surface (incline no greater than 15 degrees).
- Breathing: Always use in a well-ventilated area. Do not breathe air directly from the compressor or hose.
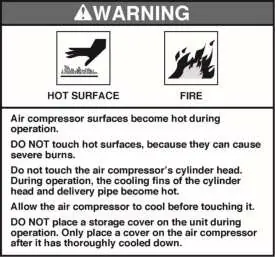
- Hot Surfaces: Cylinder heads and delivery pipes become hot during operation. Allow to cool before touching.
Assembly and Setup
Before operating, ensure the unit is inspected for damage and all pipes are firmly connected.

- Drain Tubing: Connect the 8mm tubing to the Automatic Drain Valve and Pre-Filtered Drain. Route the tubing into a tray, floor drain, or collection reservoir.
- Dryer Drain: Connect the large black 4' hose (3/4") to the 3/4" NPT male port and route to a drain.
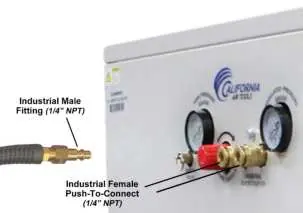
- Air Supply: Connect an air supply hose (not supplied) featuring an Industrial Male (1/4" NPT) adapter to the Industrial Female (1/4" NPT) quick coupler on the front panel.
- Clearance: Maintain at least 2 feet of obstacle-free space surrounding and above the compressor for adequate airflow.
Operating the Compressor
Starting the Compressor:
- Ensure the power switch is OFF.
- Connect your air hose or tool.
- Plug the power cord into a 110V, 60Hz, 15A outlet.
- Turn the power switch ON. The motor will run until the tank reaches 120 PSI (+/- 5 PSI), at which point the pressure switch will automatically turn the motor off.
Regulating Air Flow:
- While the compressor is running, turn on your tool and adjust the regulator knob to the right to increase pressure until the desired level is reached.
Shutting Down:
- Turn the power switch OFF.
- Unplug the power cord.
- Release pressure from the tank using an air hose or pneumatic tool.
Maintenance
- Automatic Drain Valve: Designed to eliminate water. Ensure the 8mm drain tube is routed to a container.
- Air Filter: Clean or replace regularly. Open the lid, remove the element, and blow off dirt/dust. Replace if clogged.
- Leaks: Test connections with soapy water. If bubbles appear, tighten or replace the part.
- 98% Air Dryer Cannister: Replace every 4000 motor operating hours or approximately every 1-2 years. Use a belt or strap to turn counter-clockwise to remove.
Troubleshooting
- Pressure drop in tank: Check for air leaks at connections.
- Compressor stopped/won't start: Check for overheating (thermal protector). Allow the motor to cool. Ensure the extension cord is not too thin or long.
- Motor hums but won't start: Check for head pressure or low voltage.
- Compressor noisy/metallic clangs: Stop immediately and contact customer support.
Specifications
The unit operates on a 110V, 60Hz, 15A circuit. It is designed for intermediate usage; do not run continuously for more than 60 minutes. A 70/30 operating duty cycle is recommended.
For service or parts, contact California Air Tools at 1-866-409-4581 or visit WWW.CALIFORNIAAIRTOOLS.COM.
Official resources from the manual
Practical help
Common problems
Pressure drop in the tank
Check for air leaks at connections using soapy water. Tighten leaky connections.
Compressor stopped and does not start
Motor may be overheated. Allow to cool. Check that the extension cord is not too thin or long, which causes voltage drops.
Motor does not start and makes a humming noise
Check for head pressure or low voltage supply. Ensure the compressor is plugged into a fully functional outlet.
Compressor does not reach maximum pressure
Compressor head gasket or reed valve may be faulty. Stop and contact customer support.
Before use
- Inspect the air tank and all parts for damage.
- Ensure all pipes are firmly connected.
- Place on a flat surface (incline < 15 degrees).
- Maintain 2 feet of clearance around the unit.
- Connect drain tubing to a collection tray or floor drain.
- Verify power supply is 110V, 60Hz, 15A.
Specs in practice
- Working Pressure
- 90-120 PSI (+/- 5 PSI).
- Power Requirements
- 110V, 60Hz, 15A dedicated outlet or 5500W running generator.
Images and diagrams
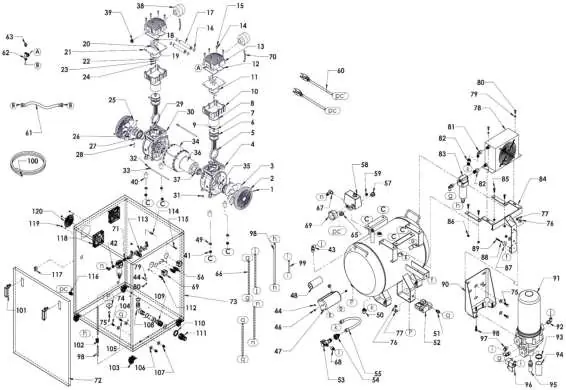
- The manual includes a comprehensive parts diagram on page 7.
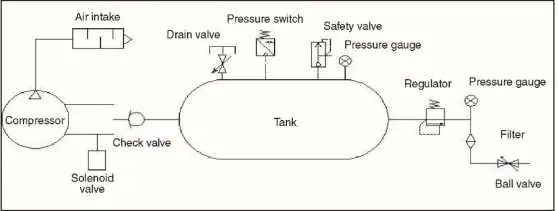
- Electrical circuit and air passage schematics are provided on page 16.
Model compatibility
- Use only 3-wire extension cords, max 25 feet, 14 gauge.
- Do not use adapters.
- Not recommended for continuous operations longer than 10 minutes at a time.

Manual page author
David Miller
Documentation analyst
Organizes user manual content into clear summaries, with attention to model details, product context, and everyday usability.