Electronics / Audio
User Manual for Cambridge Audio DacMagic 200M
Comprehensive user guide for the Cambridge Audio DacMagic 200M Hi-Res DAC. Includes setup instructions, connection diagrams, Bluetooth pairing, advanced settings, and troubleshooting.
Quick answers from the manual
Quick answer
- The DacMagic 200M is a high-resolution DAC. Connect your digital sources (USB, Co-axial, Optical, Bluetooth) to the rear inputs and your amplifier to the balanced or unbalanced outputs. p. 2, 3
Key actions
- Pairing Bluetooth: Turn on unit, select BT source, activate BT on source device, scan and select 'DacMagic200M'. p. 8
- Factory Reset: Ensure unit is in Standby, then perform reset (erases all user settings). p. 9
First start
- Connect power, connect audio outputs to amplifier, connect digital sources, then power on. p. 4, 5, 6
Show 4 more answers Show less
Problems and fixes
No power
Ensure the supplied AC adaptor is connected securely to the PSU socket.
p. 12
No sound
Ensure that the amplifier is set correctly and the correct digital input is selected.
p. 12Maintenance and reset
- Factory reset: All user-stored settings (input, volume and output mode) will be erased and replaced by the unit’s default settings. p. 9
Technical specifications
| Parameter | Value | Meaning | Pages |
|---|---|---|---|
| Digital to Analogue Converters | Dual ESS ES9028Q2M DACs | Core conversion hardware. | p. 10 |
| Max Power Consumption | 12W | Power usage. | p. 11 |
Where to find it in the PDF
- Front panel controls p. 2
- Rear panel connections p. 3
- Technical specifications p. 11
Table of contents
Manual images
Click an image to enlargeQuick guide from the manual
The Cambridge Audio DacMagic 200M is a high-resolution digital-to-analogue converter. This guide covers the essential setup, including connecting digital sources, configuring audio outputs, and utilizing advanced features like MQA and Bluetooth. Always ensure the unit is in Standby mode before changing settings or performing resets.
Front panel controls
The front panel allows for direct interaction with the device:
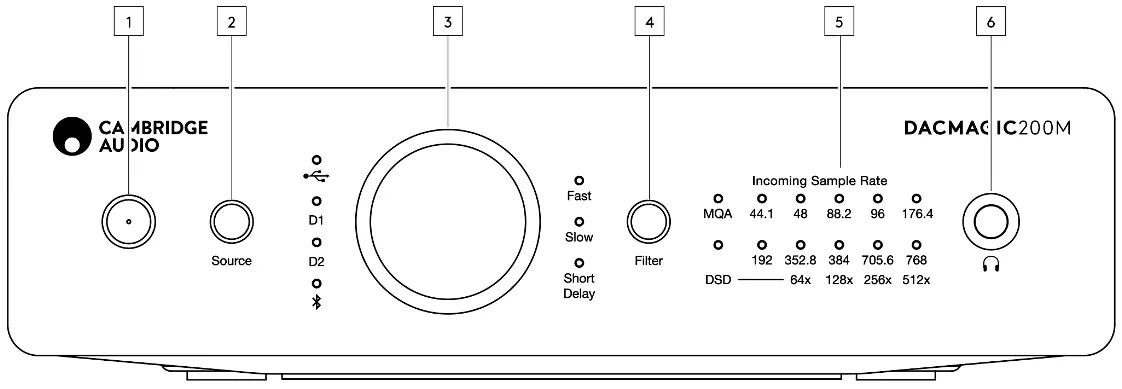
- Standby/On: Toggles power.
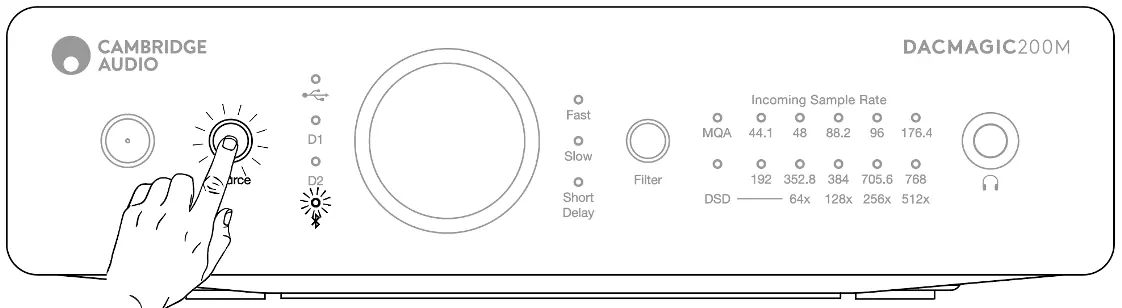
- Source: Cycles between USB, Digital Inputs 1 and 2, and Bluetooth.
- Filter: Selects between Fast, Slow, or Short Delay filter modes.
- Volume: Digital volume control.
- Headphone connection: Dedicated output for headphones.
- Incoming Sample Rate: LEDs indicate the frequency of the incoming digital stream and MQA/DSD status.
Rear panel connections
The rear panel provides all necessary inputs and outputs:
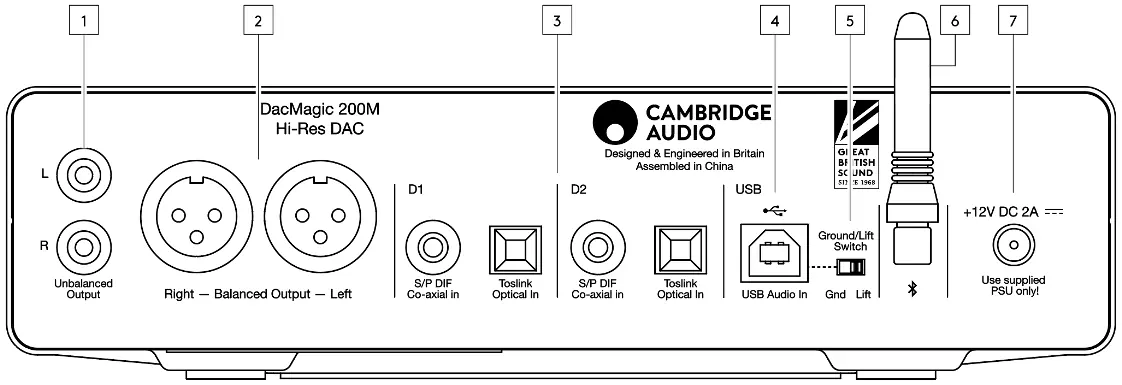
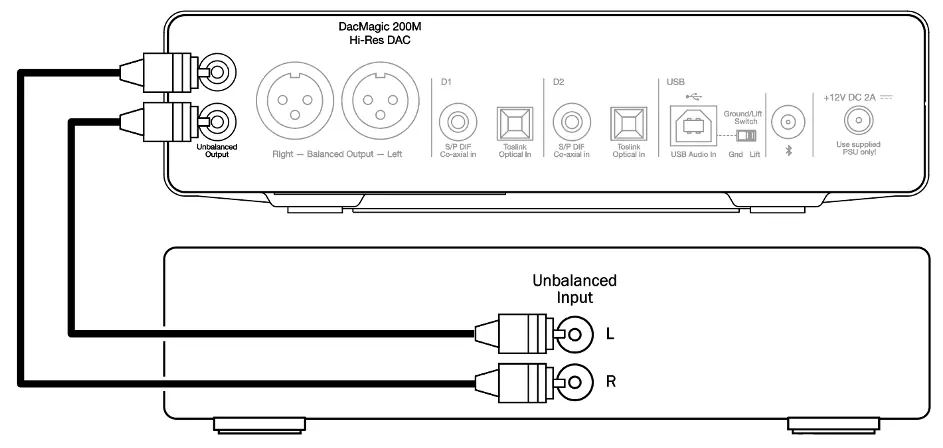
- Unbalanced/Balanced Outputs: Connect to your amplifier using RCA or XLR cables.
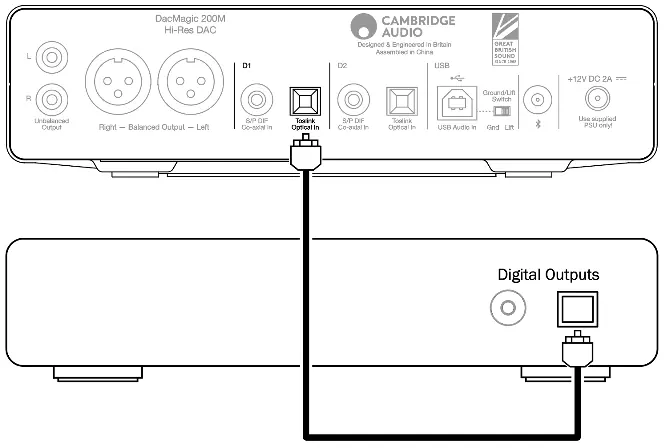
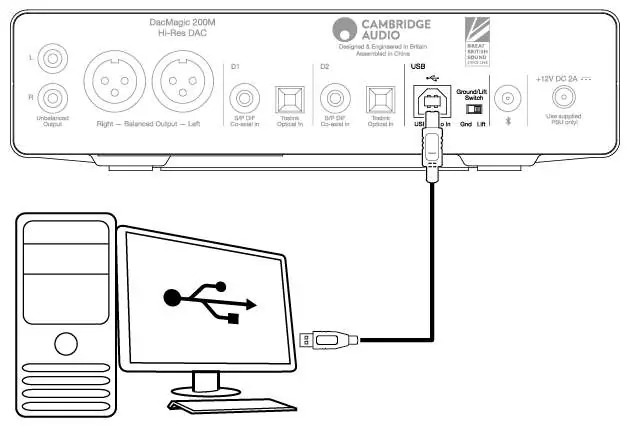
- Digital Inputs 1 & 2: Supports S/P DIF Co-axial and TOSLINK Optical connections.
- USB Audio In: Connects to PC/MAC computers. Note: Windows PCs require the Cambridge Audio USB driver.
- Ground/Lift Switch: Use the 'Lift' position if you experience electronic hum or ground loop noise.
- Bluetooth Antenna: For wireless streaming.
- Power: 12V DC 2.0A input.
Setup and connections
Do not turn on the unit until all connections are made. For USB connections, use a certified high-speed USB 2.0 'A–B' cable. The XLR output is recommended for long cable runs to better reject noise. You can use both RCA and XLR outputs simultaneously.
Bluetooth operation
To pair a new device:
- Ensure any previously paired device is turned off.
- Turn on the DacMagic 200M and select 'BT' as the source.
- Activate Bluetooth on your source device.
- Scan for available devices and select 'DacMagic200M'.
Advanced settings
Ensure the unit is in Standby before performing these actions:
- Auto Power Down (APD): Press and hold the Volume knob for 5 seconds (APD OFF) or 10 seconds (APD ON).
- Factory Reset: Erases all user-stored settings.
- Output Mode: Toggle between Fixed and Variable output by short-pressing the Volume knob and Filter button simultaneously.
Troubleshooting
If you encounter issues, check the following:
- No power: Verify the AC adaptor is secure and the mains supply is active.
- No sound: Ensure the amplifier is set correctly and the correct digital input is selected.
- Hum/Buzzing: Check for interference from power cords or lighting, ensure analogue inputs are secure, or toggle the Ground/Lift switch.
Practical help
Common problems
No power
Ensure the supplied AC adaptor is connected securely to the PSU socket and the mains plug is fully inserted.
No sound
Check that the amplifier is set correctly, interconnects are inserted properly, and the correct digital input is selected.
Low hum or buzzing sound
Check for power cords or lighting near the product, ensure analogue inputs are secure, or try moving the Ground/Lift switch to 'Lift'.
Before use
- Ensure the unit is in Standby state before changing settings.
- Do not turn on the unit until all connections are made.
- Use a certified high-speed USB 2.0 'A–B' cable for USB connections.
- Install the Cambridge Audio USB driver for Windows-based PCs.
Show more Show less
Specs in practice
- Digital Filter
- Selectable modes (Fast, Slow, Short Delay) to adjust audio characteristics.
- Ground/Lift Switch
- Helps eliminate electronic hum or ground loop noise when using USB.
Images and diagrams
- Front panel shows source selection, filter modes, and sample rate indicators.
- Rear panel details balanced/unbalanced outputs, digital inputs, and USB connection.
Model compatibility
- Class 2 USB Audio only.
- Windows PCs require a specific driver.
- Bluetooth v4.2 with A2DP profile.

Manual page author
Michael Turner
Technical manual editor