Home / Pet Supplies
Instruction Manual for Carlson 1210PW Maxi Walk-Through Pet Gate
Quick guide for the Carlson 1210PW and 1210HPW Maxi Walk-Through Pet Gate. Includes assembly steps, installation instructions, door latch operation, and safety warnings.
Table of contents
Manual images
Click an image to enlargeQuick Guide from the Manual
The Carlson Maxi Walk-Through Gate is designed for openings between 34.5 and 58.5 inches. It is essential to read all instructions before assembly. The gate is intended for use with pets, and if used with children, the small pet door must remain closed and securely latched. Always ensure the gate is resting against the floor before installation.
Parts List
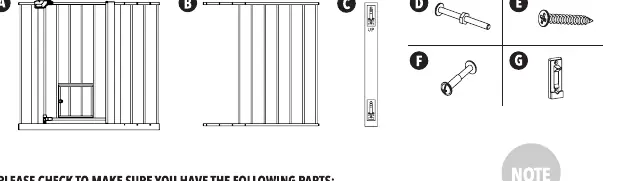
- A: Maxi Gate Main Panel (1)
- B: Maxi Gate Extension Panel (1)
- C: Paper Wall Mounting Template (1)
- D: Maxi Threaded Rods (4)
- E: 1" Screws (8)
- F: Double-Ended Screws (4)
- G: Maxi Mounting Brackets (4)
Assembling and Installing Your Gate

- Determine Width: Measure your doorway. If the opening is between 34.5" and 37.5", skip to Step 3. If between 46.5" and 58.5", proceed to Step 2.
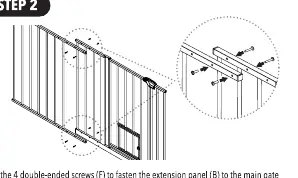
- Attach Extension: Use the 4 double-ended screws (F) to fasten the extension panel (B) to the main gate panel (A).
- Insert Rods: Insert the 4 threaded rods (D) into the four corners of the assembled gate. Do not fully screw them in yet.
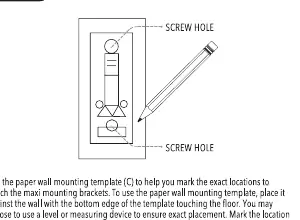
- Mark Holes: Use the paper wall mounting template (C) to mark the exact locations for the mounting brackets on the wall.
- Attach Brackets: Use the 8 screws (E) to attach the 4 mounting brackets (G) to the wall at the marked locations.
- Mount Gate: Insert the flat ends of the threaded rods into the semi-circle slots on the mounting brackets. Install one side completely before the other.
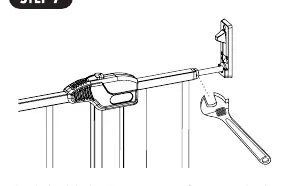
- Final Adjustment: Adjust the threaded rods so spacing is equal on all 4 corners. Use a wrench to tighten the locking nuts. Ensure the exposed threaded rods do not exceed 2.5 inches.
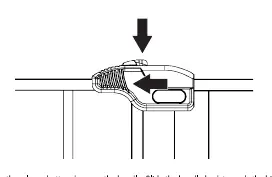
Operating the Door Latch
To open the gate, press the release button down on the handle and slide the handle back towards the hinge. This operation is the same for closing the gate.
Care and Maintenance
Periodically check the gate for signs of damage, wear, or missing components. Do not use the gate if any part is missing, worn, or damaged. Ensure all hardware and mountings are tightened. Clean by sponging with warm water and a mild detergent; do not use abrasive cleaners or bleach.
Safety Warnings
- The gap between the gate and the wall should not exceed 2.5 inches.
- Not recommended for use with children. If used with children, it is intended for ages 6 to 24 months.
- Never use at the top of stairs.
- Never stack gates on top of each other.
- Always ensure the gate is resting against the floor.
- Adult assembly is required.
Manufacturer information
Carlson Pet Products
Practical help
Common problems
Gate is unstable or dislodged
Ensure the extension panel is securely attached and all hardware/mountings are tightened.
Gap between gate and wall is too wide
The gap should not exceed 2.5 inches. Adjust the threaded rods to ensure the gate is properly positioned.
Door will not latch
Ensure the gate is installed level and the threaded rods are adjusted so the gate frame is square.
Before use
- Verify all parts (A-G) are present.
- Measure the doorway width (must be between 34.5" and 58.5").
- Ensure the mounting surface is drywall or wood.
- Have a Phillips screwdriver and a wrench ready.
- Check that the gate is resting firmly on the floor.
Specs in practice
- 1210 PW Height
- 30 inches (76 cm)
- 1210 HPW Height
- 38 inches (97 cm)
- Max Threaded Rod Extension
- 2.5 inches (6.3 cm)
Images and diagrams
- Step 2 shows how to attach the extension panel using double-ended screws.
- Step 4 illustrates using the paper template to mark screw holes on the wall.
- Step 7 demonstrates using a wrench to tighten the locking nuts on the threaded rods.
Model compatibility
- Not recommended for use with children.
- If used with children, intended for ages 6-24 months.
- Not for use at the top of stairs.
- Requires mounting to drywall or wood; consult a professional for other surfaces.

Manual page author
Michael Turner
Technical manual editor
Reviews PDF manuals for structure, safety notes, and practical product details so readers can find the right information quickly.