Automotive / Car Audio
Cerwin-Vega XED Series Speakers User Manual
Comprehensive user guide for Cerwin-Vega XED Series speakers. Includes installation instructions for speakers, tweeters, and crossovers, along with detailed technical specifications and dimensions for models XED693, XED650C, XED62, XEDS7...
Quick answers from the manual
Quick answer
- The Cerwin-Vega XED Series manual provides installation instructions for speakers, tweeters, and crossovers, along with technical specifications and dimensions for models XED693, XED650C, XED62, XEDS7, XEDS2, XEDS2SC, XED46, and XED42. p. 2, 6, 7
Key actions
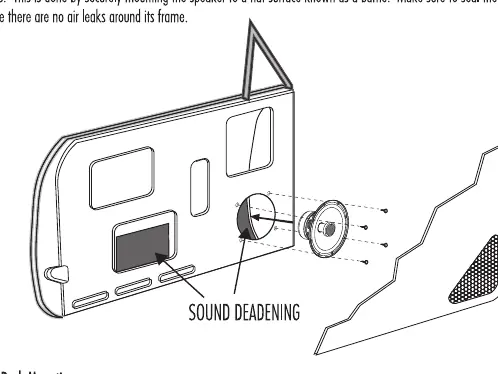
- Mount speakers to a flat surface and seal the frame to prevent air leaks. p. 6
- Install crossovers in a well-ventilated area, away from factory wiring looms. p. 7
Technical specifications
| Parameter | Value | Meaning | Pages |
|---|---|---|---|
| XED 693 | 45W RMS / 350W MAX | Power handling | p. 2 |
| XED 650C | 35W RMS / 300W MAX | Power handling | p. 2 |
Where to find it in the PDF
- Introduction and Features p. 2
- Specifications and Dimensions p. 3, 4, 5
- Installation p. 6, 7
- Warranty p. 10
Table of contents
Manual images
Click an image to enlargeQuick Guide
The Cerwin-Vega XED Series speakers are designed for high-quality sound reproduction in vehicle audio systems. This manual provides installation procedures for speakers, tweeters, and crossovers, as well as technical specifications for the entire series. For optimal performance, professional installation by an authorized dealer is recommended.

Installation
To ensure the best performance, speakers must be securely mounted to a flat surface (baffle). It is critical to seal the speaker frame to prevent air leaks around the edges, which can negatively impact sound quality. For rear deck mounting, there are two primary methods: top mounting (dropping speakers through the deck from the interior) and bottom mounting (securing from underneath in the trunk).
Tweeter Installation
Tweeters can be flush or surface mounted. When performing a flush mount:

- Ensure the desired location can accommodate the hole size and depth.
- Use the provided hardware and cut a 1.75" (45mm) round opening.
- Ensure there is at least 1 inch (25.4mm) of clearance behind the panel.
- Route speaker wires through the tweeter cup, connect the wires, and snap the tweeter into the cup by aligning the notches.
- Avoid pushing on the center of the tweeter grill.
Crossover Installation
Install passive crossovers in a well-ventilated area, preferably behind the door panel rather than inside the door cavity to avoid water damage. Avoid placing them near factory wiring looms to prevent radiated noise. Connect the input side labeled "AMP" to the amplifier output, the middle terminals labeled "MID" to the midrange speaker, and the end terminals labeled "TWT" to the tweeter. Always observe correct polarity for positive and negative terminals.
Specifications
The XED series includes various models with different power handling and design features, such as Curvilinear Poly Cones and Butyl Rubber Surrounds. Detailed dimensions for all models (XED693, XED650C, XED62, XEDS7, XEDS2, XEDS2SC, XED46, XED42) are provided in the technical diagrams section of the manual.
Warranty
The product includes a one-year warranty for the original purchaser, provided it was purchased from an authorized Cerwin-Vega retailer within the United States. The warranty does not cover damage caused by abuse, improper use, product modification, or unauthorized repair attempts.
Practical help
Common problems
Poor sound quality or lack of bass
Ensure the speaker is securely mounted to a flat surface and the frame is properly sealed to prevent air leaks.
Water damage to crossovers
Install crossovers in a well-ventilated area behind the door panel, not inside the door cavity.
Radiated noise
Avoid placing crossovers near factory wiring looms.
Before use
- Verify the mounting surface is flat.
- Ensure at least 1 inch (25.4mm) of clearance behind the panel for tweeter installation.
- Check polarity for all positive and negative terminal connections.
- Ensure crossovers are installed in a well-ventilated, dry area.
Images and diagrams
- The manual provides detailed dimension diagrams for each model, showing depth and diameter in both inches and millimeters.
- Installation diagrams illustrate the correct mounting of speakers to a baffle and the assembly of tweeter flush mounts.
Model compatibility
- Designed for vehicle audio systems.
- Warranty applies only to products purchased from authorized retailers within the United States.

Manual page author
Michael Turner
Technical manual editor
Reviews PDF manuals for structure, safety notes, and practical product details so readers can find the right information quickly.