Garden / Watering Equipment
User Manual for Chapin 15L Backpack Sprayer
Quick guide for the Chapin 15L Backpack Sprayer. Includes assembly instructions, operation, maintenance, cleaning procedures, and troubleshooting steps.
Table of contents
Manual images
Click an image to enlargeQuick Guide
This manual provides essential instructions for the safe and effective use of the Chapin 15L Backpack Sprayer. Always read the safety warnings before use. Do not leave the sprayer pressurized in direct sunlight, and never use flammable, caustic, or corrosive chemicals.
Safety Warnings
- Explosion Hazard: Do not leave pressurized sprayer in hot sun.
- Chemical Safety: Never spray flammable, caustic, acidic, chlorine, bleach, or other corrosive solutions. Always follow chemical manufacturer instructions.
- Protective Gear: Always wear goggles, gloves, long sleeves, long pants, and full foot protection.
Assembly
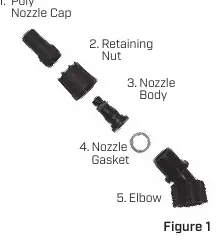
Nozzle Assembly
Unscrew the nozzle cap from the nozzle body. Ensure the nozzle gasket is properly seated. Reassemble by reversing the steps.
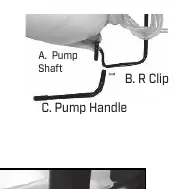
Pump Handle Installation
The pump handle can be mounted on either side of the pump shaft. Place the handle over the shaft, align the holes, and secure it using the provided R-clip.
Shoulder Straps
Attach the top of the straps to the tank. Clip the lower strap hooks to the metal frame where it exits the tank.
Operation
Filling the Sprayer
Ensure the filter basket is in place. Add water and the required amount of chemical. Stir the mixture with a clean utensil. Do not exceed the 15.1L (4-gallon) capacity.
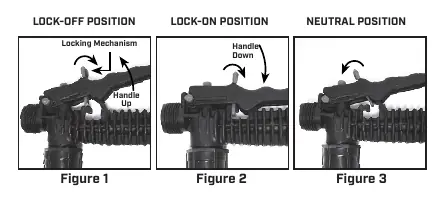
Spraying
Use rapid pump strokes to prime the pump until firm resistance is felt. Use the hand lever on the shut-off valve to spray. Use the red locking mechanism for continuous spraying (lock-on) or to prevent spraying (lock-off).
Maintenance and Cleaning
3-Stage Filtering System
- Stage 1: Filter basket at the tank opening.
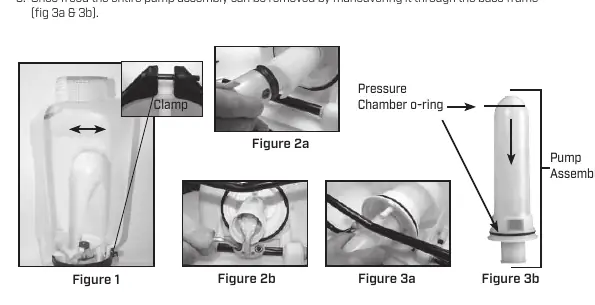
- Stage 2: Removable filter in the pressure chamber.
- Stage 3: Removable filter in the shut-off assembly.
Periodic cleaning of these filters is recommended to ensure consistent fluid flow.
Cleaning Procedure
- Empty the sprayer and clean the tank thoroughly after each use.
- Pump the handle until all contents and air exit through the nozzle (minimum 30 strokes).
- Fill the tank halfway with water and pump it out; repeat as necessary.
Troubleshooting
If you experience issues, refer to the following:
- Difficulty actuating pump: Clean or replace the valve plate; check for clogs in the piston cylinder outlet.
- No pressure/resistance: Clean or replace the valve plate; check for worn O-rings on the piston.
- Leaks at piston cylinder: Clean or replace the piston collar; check for damage to the piston cylinder.
- Shut-off leaks: Tighten connections or rebuild/replace the shut-off valve.
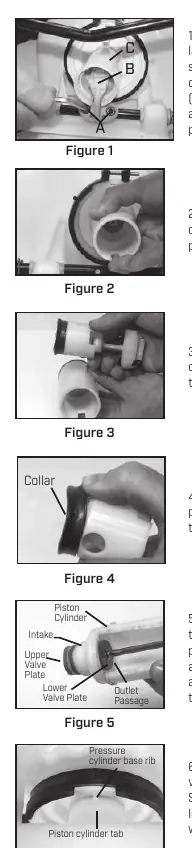
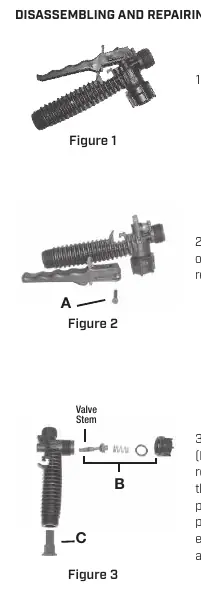
Repair Procedures
The manual provides detailed steps for disassembling and repairing the Piston Pump, Pump Assembly, and Shut-off Valve. Always release pressure from the sprayer and remove all liquid before performing repairs. Use petroleum jelly to lubricate O-rings during reassembly.
Practical help
Common problems
Difficulty actuating the pump lever
Clean or replace the valve plate; check for obstructions in the piston cylinder outlet passage.
Little or no resistance during pumping
Clean or replace the valve plate; replace worn upper O-ring on the piston; replace worn piston collar.
Leaks at the piston cylinder
Clean or replace the piston collar; replace the piston cylinder or piston if damaged.
Shut-off valve leaks
Tighten connections; rebuild or replace the shut-off valve.
Before use
- Check tightness of the hose nut.
- Ensure the hose is securely attached to the tank.
- Verify all nozzle and wand connections are tight.
- Ensure the large pump clamp is tight.
- Check that the 2 bolts attaching the pump lever to the pump shaft are tight.
Specs in practice
- Tank Capacity
- 4 Gallons / 15.1 Liters.
- Max Solution Temperature
- 120°F / 49°C.
- Nominal Operating Pressure
- 40 psi (at 0.4 gpm).
Images and diagrams
- Figure 1 (Page 3): Nozzle assembly components.
- Figure 1 (Page 5): Spraying lock-off/lock-on positions.
- Figure 1 (Page 8): Pump assembly removal and clamp location.
Model compatibility
- Do not use with flammable, caustic, acidic, chlorine, or bleach solutions.
- Clean sprayer thoroughly after using herbicides before using for plant food.

Manual page author
Emily Carter
User documentation editor
Prepares concise manual descriptions and highlights the most useful setup, operation, and maintenance information for readers.