Garden / Watering Equipment
Chapin Mixes On Exit 15L Backpack Sprayer
Quick guide for the Chapin Mixes On Exit 15L backpack sprayer. Includes setup, calibration, maintenance, troubleshooting, and repair instructions.
Table of contents
Manual images
Click an image to enlargeQuick Guide
The Chapin Mixes On Exit backpack sprayer is designed for precise chemical application. Before use, perform a pre-use check to ensure all connections are tight, including the hose nut, nozzle, wand, pump clamp, and pump lever bolts. Always wear protective gear (goggles, gloves, long sleeves, pants, and full foot protection) when spraying. Do not exceed a solution temperature of 120°F (49°C).
Safety Warnings
- Explosion Hazard: Do not leave a pressurized sprayer in the hot sun. Never pressurize the sprayer using any means other than the original pump.
- Chemical Safety: Never spray flammable, caustic, acidic, chlorine, bleach, or other corrosive solutions. Always follow the chemical manufacturer's instructions.
- Cleaning: If the sprayer has been used for herbicides, clean it thoroughly before using it for plant feeding or general household use.
Assembly
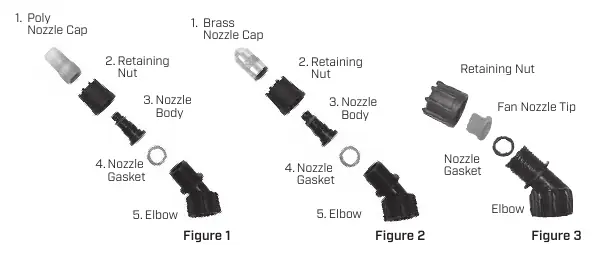
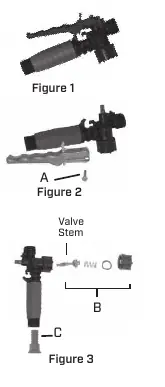
Nozzle Assembly
To disassemble, unscrew the nozzle cap from the nozzle body while the retaining nut is fastened to the elbow. Unscrew the retaining nut and push the nozzle body and gasket out. Reverse these steps to reinstall.
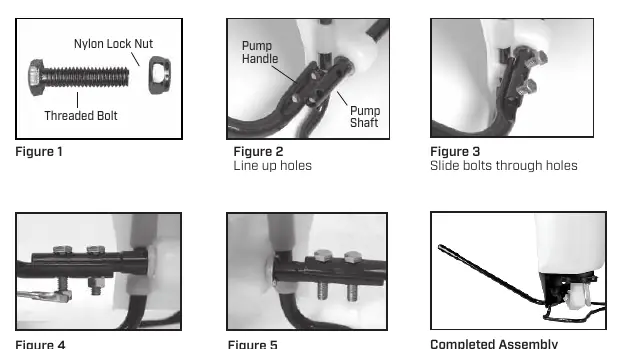
Pump Handle Installation
The pump handle can be mounted on either the left or right side of the pump shaft. Align the handle holes with the shaft holes, slide the bolts through, and tighten the nuts.
Shoulder Strap Installation
The backpack features a shoulder strap, chest strap, waist belt, and lumbar support. The top of the shoulder strap attaches to the top of the tank, and the lumbar support hook attaches to the base tube at the bottom of the tank.
Operation
Filling the Tank
Ensure the filter basket is in place to prevent debris from entering the tank. Fill the sprayer tank with water. For the chemical tank, push it up to remove, fill it on a flat surface, and snap it back onto the sprayer.
Mixes On Exit Adjustment
Set the sprayer knob to the desired concentration. The setting controls how quickly the chemical is delivered per gallon. For calibration, fill both tanks with water, weigh the concentrate tank, spray 1 gallon of water, and weigh the concentrate tank again to calculate the mix ratio.
Spraying
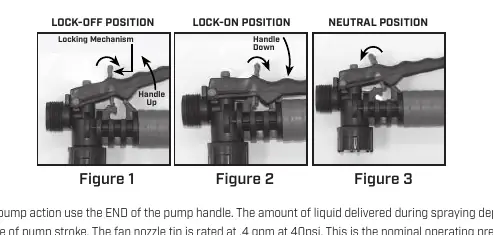
Use rapid pump strokes to prime the pump. For continuous spraying, push down on the handle and move the red locking mechanism to the lock-on position. To stop, move the mechanism to the neutral position.
Maintenance and Cleaning
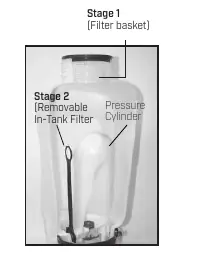
The sprayer features a 3-stage filtering system: a filter basket in the tank opening, an in-tank filter at the pressure cylinder inlet, and a removable filter in the shut-off assembly. Clean these filters periodically to ensure consistent flow.
Cleaning Procedure:
- Empty the sprayer and clean the tank thoroughly after each use.
- Pump the handle until all contents and air exit through the nozzle (minimum 30 strokes).
- Fill the tank halfway with water and repeat the pumping process.
Troubleshooting
If you experience a rapid drop in pressure, drain the sprayer completely and pump the handle with an empty tank to refill the pressure chamber with air. For other issues, such as leaks or difficulty pumping, refer to the troubleshooting table in the manual for specific component checks, such as valve plates, O-rings, and hose clamps.
Repair
The manual provides detailed steps for disassembling and repairing the piston pump and the shut-off valve. Always release pressure before performing repairs. When replacing parts, use only manufacturer-original components.

Practical help
Common problems
Difficulty actuating the pump lever or handle moves itself back up
Clean or replace the valve plate; check for a clogged piston cylinder outlet passage.
Little or no resistance during pumping (no pressure)
Clean or replace the valve plate; replace the damaged/worn upper piston O-ring or piston collar.
Shut-off valve leaks
Tighten connections; rebuild or replace the shut-off valve.
Chemical tank does not stay in place
Tighten the spring tension bolt.
Before use
- Check tightness of the hose nut at the shut-off assembly.
- Ensure the hose is securely attached to the tank.
- Verify all nozzle and wand connections are tight.
- Ensure the large pump clamp is tight.
- Check that the 2 bolts attaching the pump lever to the pump shaft are tight.
Specs in practice
- Tank Capacity
- 15 Liters (4 Gallons).
- Max Solution Temperature
- 120°F / 49°C.
- Fan Nozzle Rating
- 0.4 GPM at 40 PSI.
Images and diagrams
- Nozzle Assembly: Shows the sequence of the nozzle cap, retaining nut, nozzle body, gasket, and elbow.
- Pump Handle Installation: Illustrates aligning the pump handle with the shaft and securing it with bolts and nuts.
- 3-Stage Filtering System: Identifies the filter basket (stage 1), in-tank filter (stage 2), and shut-off filter (stage 3).
Model compatibility
- Do not use with flammable, caustic, acidic, chlorine, or bleach solutions.
- Clean thoroughly after using herbicides before using for plant feeding.

Manual page author
David Miller
Documentation analyst
Organizes user manual content into clear summaries, with attention to model details, product context, and everyday usability.