Garden / Outdoor Furniture
Assembly and Care Guide for George Oliver 2-Drawer Nightstand
Quick assembly and care guide for the George Oliver 2-Drawer Nightstand. Includes hardware list, step-by-step assembly instructions, and maintenance tips.
Quick answers from the manual
Quick answer
- This manual provides assembly instructions and care guidelines for the George Oliver 2-Drawer Nightstand. p. 2, 3, 4
Key actions
- Assemble on a soft, clean surface to avoid scratching. p. 2
First start
- Identify and count all parts before beginning assembly. p. 1, 2
Problems and fixes
Unstable nightstand
Ensure it is on a level surface, feet are correctly distributed, and hardware is tightened.
p. 2Maintenance and reset
- Clean with a mild cleanser and soft damp cloth. Avoid harsh cleaners, direct sunlight, and heat sources. p. 2
Where to find it in the PDF
- Hardware List p. 2
- Assembly Steps p. 3, 4
Table of contents
Manual images
Click an image to enlargeQuick Guide from the Manual
This guide provides essential instructions for assembling and maintaining your George Oliver 2-Drawer Nightstand. Before beginning, ensure you have a soft, clean surface to prevent scratching the finish. Adult assembly is required. Always check all packing materials for small parts that may have come loose during shipping.
Hardware List
Before starting assembly, identify and count all parts against the following list:
- Bolt M6x35: 8 pieces
- Camlock M6x30: 16 pieces
- Screw M7x40: 14 pieces
- Flat Washer: 8 pieces
- Spring Washer: 8 pieces
- Allen Key M4: 1 piece
- Wooden Dowel: 4 pieces
Assembly Instructions
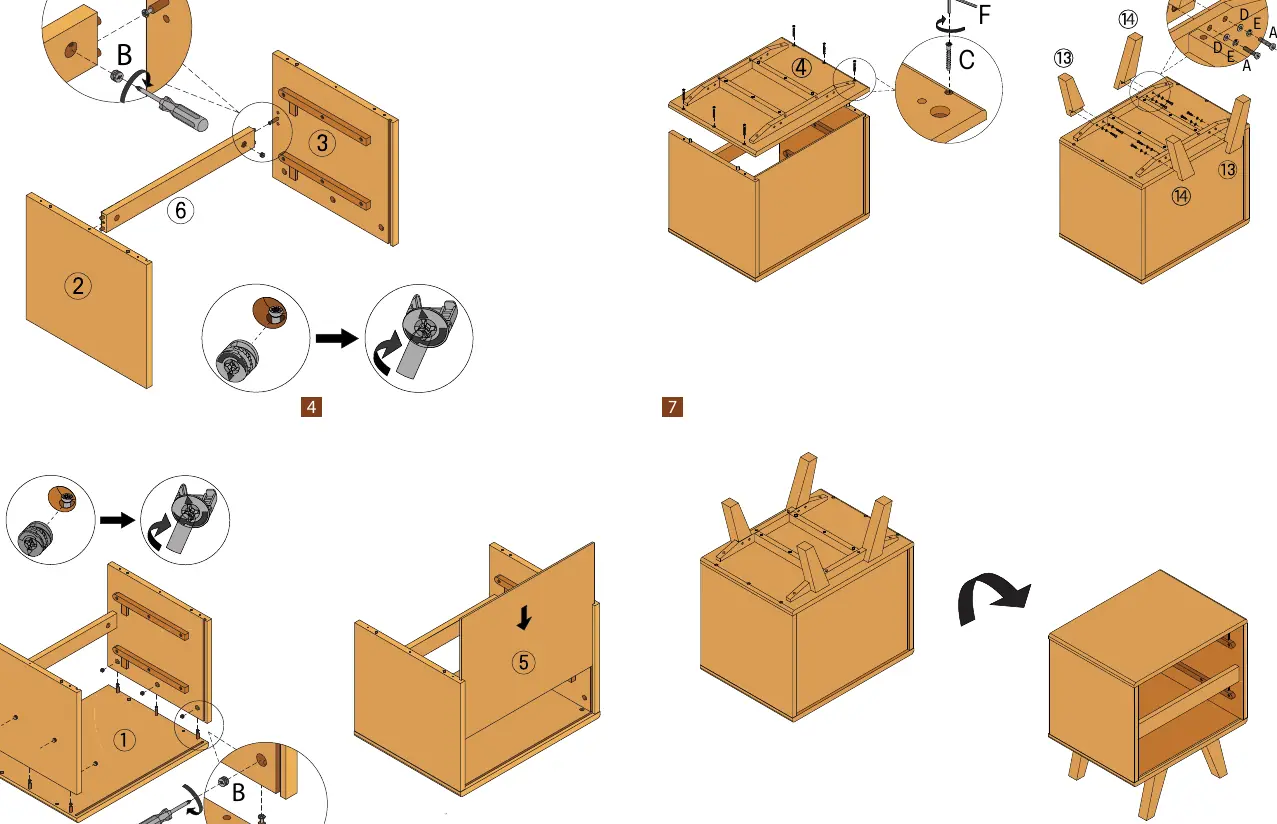
Follow the steps provided in the diagrams to assemble the nightstand:
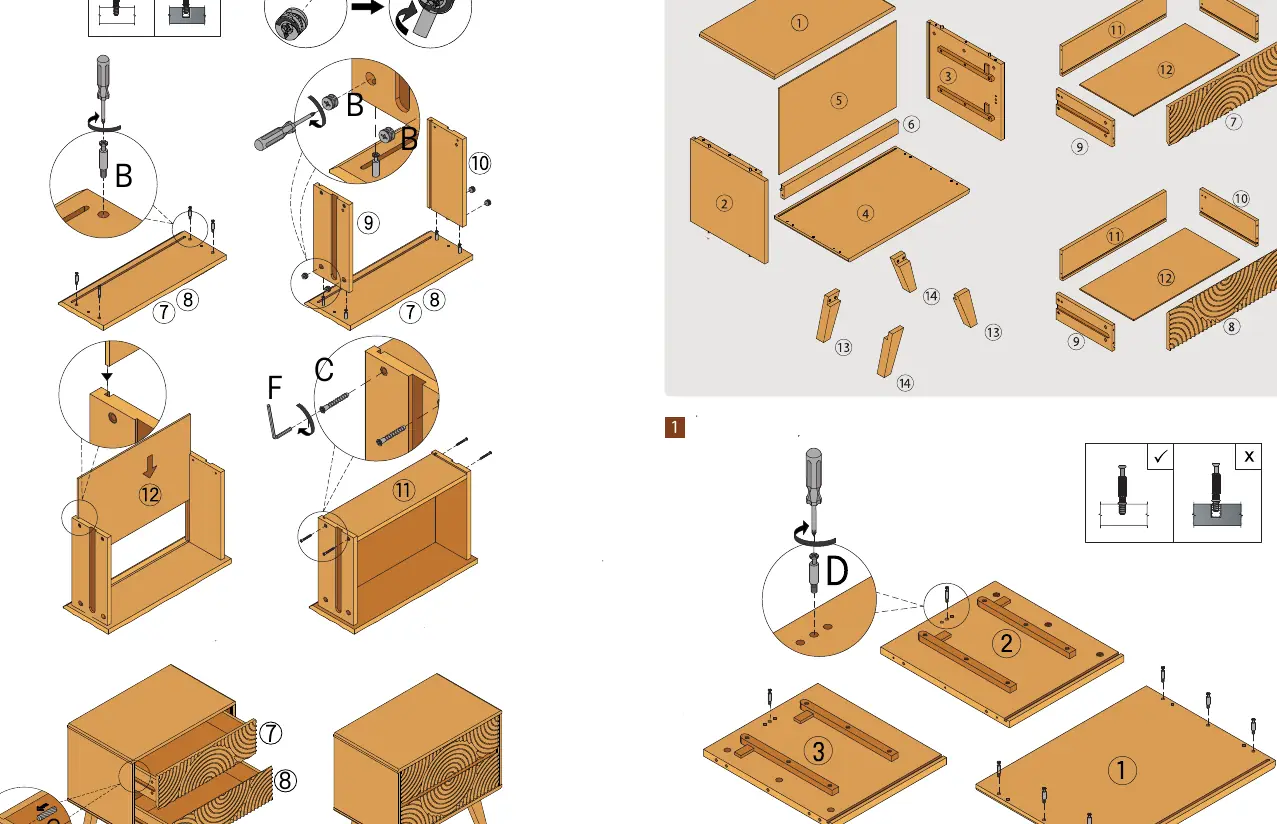
- Step 1: Prepare the side panels using the provided screws and dowels.
- Steps 2-4: Connect the main frame components using camlocks. Ensure camlocks are oriented correctly as shown in the diagrams.
- Step 5: Attach the top panel.
- Step 6: Attach the legs using bolts, spring washers, and flat washers.
- Step 7: Final assembly and uprighting the unit.
- Steps 8-9: Drawer assembly and final installation.
Use and Care
To prolong the life of your nightstand, follow these maintenance tips:
- Clean the product with a mild cleanser using a soft, damp cloth.
- Do not use harsh or abrasive cleaners.
- Avoid dragging sharp or rough objects across the surface.
- Avoid direct sunlight exposure.
- Do not place the unit near heating units or vents.
- Promptly wipe up any spills or moisture.
Troubleshooting
If the nightstand feels unstable, ensure it is placed on a level surface and the feet are correctly distributed. Verify that all components are assembled correctly and that all hardware is securely tightened.
Warranty Information
The product is covered by a 05-year limited warranty. The warranty does not cover normal wear and tear, commercial use, or failures caused by accidents, abuse, alteration, or improper care. Proof of purchase and photos of defects are required for warranty claims.
Practical help
Common problems
Nightstand feels unstable
Ensure it is on a level surface, the feet are correctly distributed, and all hardware is securely tightened.
Before use
- Check all packing material for small parts
- Identify and count all parts against the hardware list
- Prepare a soft, clean surface for assembly
- Ensure you have the included Allen Key M4
Specs in practice
- Camlock M6x30
- 16 pieces required for assembly
Images and diagrams
- The manual provides exploded views and step-by-step assembly diagrams.
- Steps 1-7 detail the connection of panels and hardware.
- Ensure camlocks are oriented correctly as shown in the diagrams.
Model compatibility
- Adult assembly is required.
- Do not use harsh or abrasive cleaners.

Manual page author
Michael Turner
Technical manual editor
Reviews PDF manuals for structure, safety notes, and practical product details so readers can find the right information quickly.