Lighting / LED Strips
Commercial Electric 16ft LED White Color Selectable Tape Light with Remote
A comprehensive guide for the Commercial Electric 16ft LED White Color Selectable Tape Light (TAPE192/CCT/HD), covering installation, remote operation, pairing, and troubleshooting.
Quick answers from the manual
Quick answer
- The Commercial Electric 16ft LED Tape Light is a 24V system controlled by an RF remote. It can be cut to size, direct-wired or plugged in, and supports pairing multiple kits to a single remote. p. 1, 7
Key actions
- Cutting the tape p. 4
- Pairing the remote p. 7
First start
- Install batteries in the remote, connect the power supply to the tape light, and plug into a live outlet. p. 6, 7
Problems and fixes
LED strip will not light
Check power supply, verify polarity, ensure remote batteries are installed, and check remote range.
p. 8Maintenance and reset
- Unpair remote: Unplug power, wait 5 seconds, restore power, and within 10 seconds press and hold power ON button until lights flash 7 times. p. 7
Technical specifications
| Parameter | Value | Meaning | Pages |
|---|---|---|---|
| Voltage | 24V | Operating voltage for the LED strip. | p. 2, 6 |
| Cut Interval | 12.7 cm (approx. 5 in.) | Minimum length segment. | p. 4 |
Where to find it in the PDF
- Safety Information p. 2
- Installation p. 4, 5, 6
- Operation p. 7
- Troubleshooting p. 8
Table of contents
Manual images
Click an image to enlargeQuick guide from the manual
This guide provides instructions for the Commercial Electric 16ft LED White Color Selectable Tape Light. Key safety requirements include using only the provided 24V power supply, indoor/dry location use only, and ensuring correct polarity (+ to + and - to -) during any wiring or cutting procedures. Do not power the LED tape while it is coiled on the reel.
Installation
Cutting the tape light
The tape light can be cut every three LEDs at 12.7 cm (approx. 5 in.) intervals. Cut only at the designated copper pads or silver solder joints. If using the included snap connectors, cut at the center of the copper pads.
Using included connectors
The wire lead connectors (DD) are used to join two sections of LED tape:
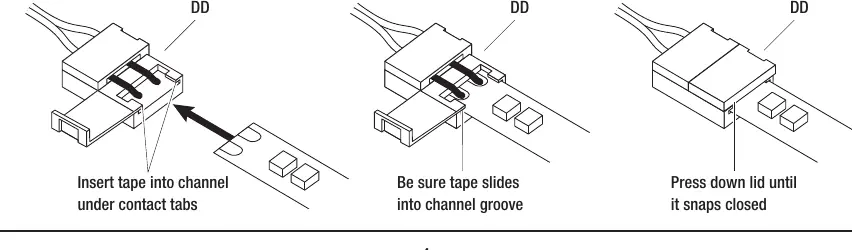
- Open the lid of the connector.
- Peel about 1/4 inch of the paper backing from the LED strip.
- Slide the strip into the connector, ensuring it slides under the internal contact points.
- Close the connector door firmly.
- Perform a power test to ensure the connection is secure.
Mounting the LED strip
Before permanent installation, power the tape and hold it in position to check for desired illumination. Ensure the mounting surface is clean, dry, and dust-free. Install when temperatures are above 60°F (15°C). Remove the adhesive backing and press the tape firmly into place. Secure power cables with the included wire support clips.
Power supply connection
The unit can be plugged into a live outlet or direct-wired. For direct wiring, remove the AC input cable/plug and connect the black live wire to the line side (L) and the white neutral wire to the neutral side (N) of the terminal block. Ensure all connections are tight and endcaps are reinstalled.
Operation
Remote control
The remote (CC) allows for turning lights on/off, adjusting brightness, and changing color temperature. It does not require line-of-sight and has a range of up to 50 feet depending on the environment.
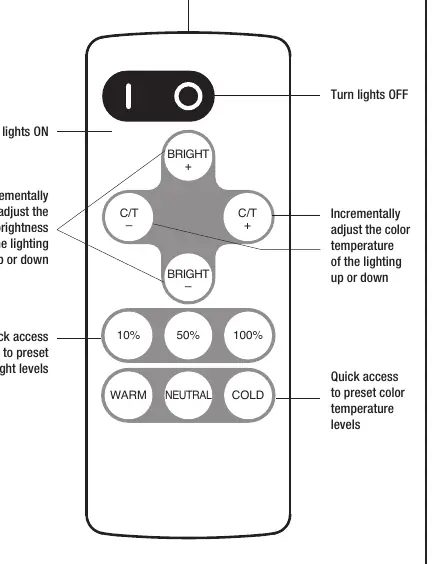
Pairing multiple kits
To pair a remote to a kit:
- Unplug the power adapter and wait 5 seconds.
- Restore power.
- Within 10 seconds, press and hold the power ON button on the remote.
- The lights will flash 3 times to indicate successful pairing.
To unpair, follow the same steps but press and hold the power ON button until the lights flash 7 times.
Care and Cleaning
Clean the light using a clean, dry, or slightly damp cloth. Do not use chemicals, solvents, or harsh abrasives.
Troubleshooting
If the LED strip does not light, check that the plug is fully inserted into a live 120V outlet, ensure the battery protective strip is removed from the remote, and verify that the polarity is correct if direct-wired. If only part of the strip lights, check for faulty connection points.
Manufacturer information
Commercial Electric
Practical help
Common problems
LED strip will not light
Check power supply connection, ensure remote battery protector is removed, and verify correct polarity if direct-wired.
Only part of the LED strip lights
Check for faulty connection points and ensure polarity is consistent between segments.
Fuse blows or circuit breaker trips
Check for exposed wires, discontinue use, unplug the unit, and contact a qualified electrician.
Before use
- Ensure you are using the provided 24V power supply adapter.
- Check that the mounting surface is clean, dry, and dust-free.
- Verify the remote battery protective strip is removed.
- Ensure the installation environment is indoors and dry.
- Confirm that the tape is not coiled on the reel while powered.
Specs in practice
- Cut interval
- The tape can be cut every 12.7 cm (approx. 5 in.) at designated points.
- Remote range
- Up to 50 feet in optimal conditions; does not require line-of-sight.
Images and diagrams
- Cutting diagram shows correct cut points at copper pads vs. silver solder joints.
- Connector diagram illustrates how to insert the tape into the snap connector.
- Wiring diagram shows how to connect the power supply for direct wiring.
- Remote diagram identifies buttons for brightness, color temperature, and power.
Model compatibility
- Do not use standard 120-volt AC dimmers with this power supply; use the included RF remote.
- Not recommended for mounting on brick or concrete using the included adhesive.

Manual page author
David Miller
Documentation analyst
Organizes user manual content into clear summaries, with attention to model details, product context, and everyday usability.