Lighting / LED Strips
User Manual for Commercial Electric Linkable LED Strip Lights
Quick guide for installing and using Commercial Electric Linkable LED Strip Lights. Includes instructions for surface and suspension mounting, wiring, linking multiple fixtures, and adjusting color temperature settings.
Quick answers from the manual
Quick answer
- This fixture is a linkable LED strip light with selectable color temperature (3000K/4000K/5000K). It can be surface or suspension mounted and supports up to 300W of total interconnected lighting. p. 1, 12, 13
Key actions
- Adjusting color temperature p. 13
- Linking multiple fixtures p. 12
First start
- The factory setting for the correlated color temperature (CCT) is 3000K. p. 13
Problems and fixes
The fixture will not light.
Ensure power is on, circuit breaker is on, check wire connections, or check for a defective switch.
p. 13Maintenance and reset
- Clean the fixture with a soft, dry cloth. Do not use cleaners with chemicals, solvents, or harsh abrasives. p. 13
Technical specifications
| Parameter | Value | Meaning | Pages |
|---|---|---|---|
| Max Wattage | 300W | Maximum total wattage for interconnected lights. | p. 2, 12 |
| Max Units (54263211) | 30 | Maximum number of 2 ft. fixtures that can be linked. | p. 12 |
| Max Units (54261211) | 15 | Maximum number of 4 ft. fixtures that can be linked. | p. 12 |
Where to find it in the PDF
- Safety Information p. 2
- Surface Mounting p. 5, 6, 7, 8
- Suspension Mounting p. 9, 10, 11
- Linking Feature p. 12
Table of contents
Manual images
Click an image to enlargeQuick guide from the manual
This guide provides instructions for the Commercial Electric Linkable LED Strip Lights. These fixtures feature selectable color temperatures (3000K, 4000K, 5000K) and can be installed via surface or suspension mounting. They are linkable up to a maximum of 30 units (Model 54263211) or 15 units (Model 54261211), with a total limit of 300 watts for interconnected lights.
Important Safety Warnings:
- Always turn off electricity at the fuse or circuit breaker before installation or maintenance.
- Do not use this fixture with a dimmer switch.
- Linked strip lights can be installed as plug-in or direct wire, but never combined.
- Ensure the mounting surface can support the weight of the fixture.
Installation
Surface Mounting:
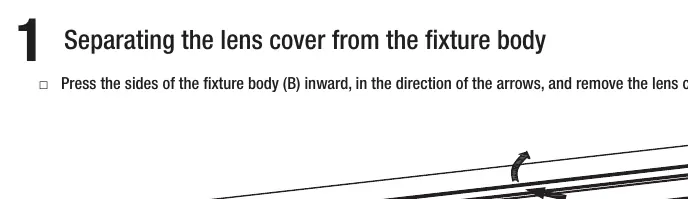
- Separate the lens cover from the fixture body by pressing the sides inward.
- Disconnect the internal wire connector.
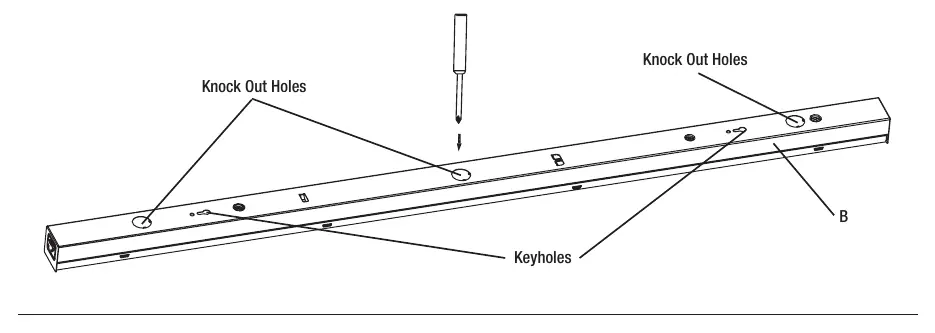
- Determine the wiring location, mark keyhole positions on the ceiling, and punch out the appropriate knockout hole on the fixture body.
- Install drywall anchors and mounting screws into the ceiling.
- Secure the electrical box plate (if applicable) and feed wires through the knockout hole.
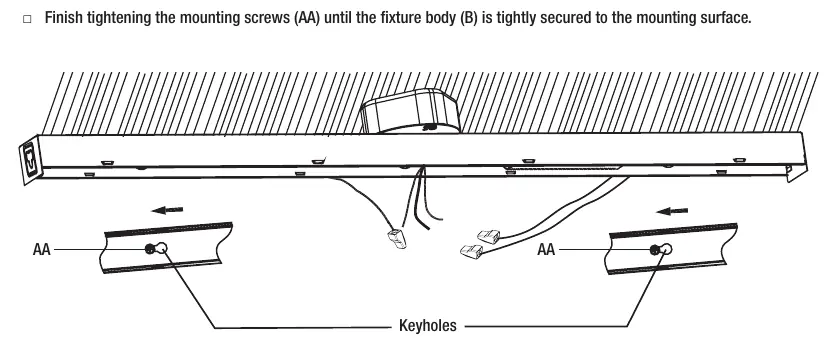
- Align the fixture keyholes with the mounting screws, slide to lock, and tighten.
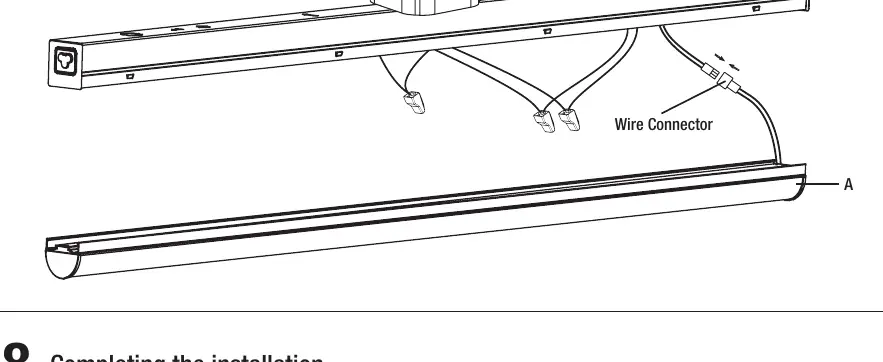
- Make electrical connections (hot, neutral, and ground) using the provided wire connectors.
- Snap the lens cover back onto the fixture body and restore power.
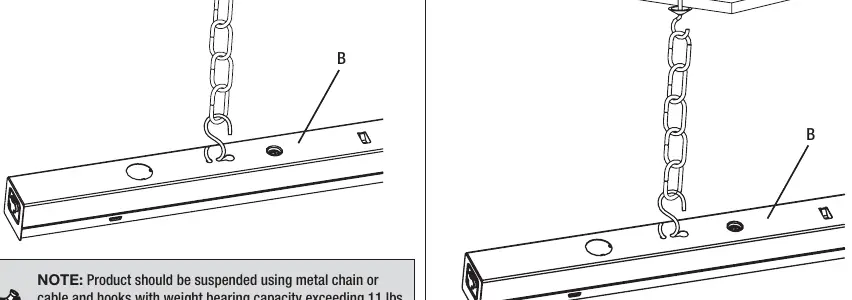
Suspension Mounting:
- Install toggle bolts (for drywall) or hook screws (for wood) into the ceiling.
- Attach the mounting chain to the fixture body using S hooks.
- Hang the fixture by placing the chains over the ceiling hooks and adjust for level.
- Plug the power cord into the fixture and an electrical outlet. Secure the cord to the ceiling using clips or cable ties.
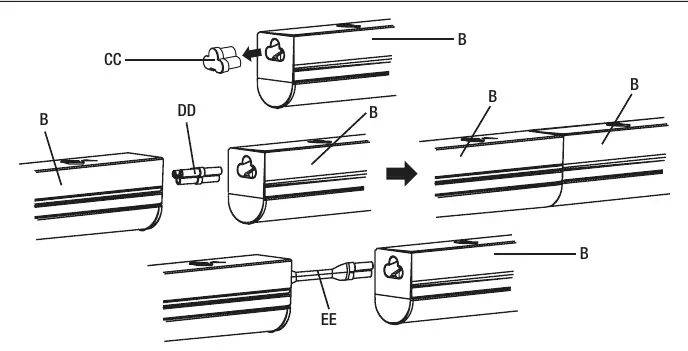
Linking Feature
Multiple fixtures can be connected together. Remove the end cover from the ends to be linked and insert the end-to-end connector or linking cable. Ensure the total wattage of all interconnected lights does not exceed 300 watts.
Adjusting the Color Temperature
The fixture allows you to customize the light output. Use the toggle switch on the fixture body to select between 3000K (Soft White), 4000K (Bright White), or 5000K (Daylight). The factory default setting is 3000K.
Care and Cleaning
Always disconnect power before cleaning. Use a soft, dry cloth. Do not use chemicals, solvents, or harsh abrasives. Avoid using liquid cleaners on the LEDs, driver, or internal wiring.
Troubleshooting
If the fixture fails to light, ensure the power supply is on and the circuit breaker is in the 'on' position. Check for bad wire connections or a defective switch. If the fuse blows or the breaker trips, check for crossed wires or grounding issues.
Manufacturer information
Commercial Electric
Practical help
Common problems
The fixture will not light.
Ensure the power supply is on, the circuit breaker is in the 'on' position, and check for proper wire connections or a defective switch.
The fuse blows or the circuit breaker trips when the light is turned on.
Check for crossed wires or a power wire that is grounding out.
Before use
- Turn off electricity at the fuse or circuit breaker before starting.
- Verify the mounting surface can support the weight of the fixture.
- Do not use with a dimmer switch.
- Ensure total wattage of interconnected lights does not exceed 300W.
- If using the plug-in method, ensure the fixture is directly below the outlet and within 5 ft.
Specs in practice
- Color Temperature
- Selectable: 3000K (Soft White), 4000K (Bright White), 5000K (Daylight).
- Max Interconnected Lights
- Up to 30 units for Model 54263211; up to 15 units for Model 54261211.
Images and diagrams
- Keyholes on the fixture body are used for surface mounting.
- Knockout holes are provided for wiring access.
- The toggle switch on the fixture body controls color temperature.
Model compatibility
- Not compatible with dimmer switches.
- Plug-in and direct wire installation methods cannot be combined.

Manual page author
Michael Turner
Technical manual editor
Reviews PDF manuals for structure, safety notes, and practical product details so readers can find the right information quickly.