Home Appliances / Fans
Commercial Electric 3-Way Socket 540 691 User Manual
Quick guide for the Commercial Electric 3-Way Socket (540 691). Includes installation steps, wiring instructions, and safety warnings for replacing lamp sockets.
Quick answers from the manual
Quick answer
- This manual provides instructions for installing the Commercial Electric 3-Way Socket (540 691). It covers safety precautions, wiring procedures, and assembly steps. p. 1
Key actions
- Turn off power at the circuit breaker before starting. p. 1
- Tie an underwriter's knot in the wires. p. 1
First start
- Follow the 8-step installation process, ensuring the cardboard liner is intact and wires are secured clockwise. p. 1
Technical specifications
| Parameter | Value | Meaning | Pages |
|---|---|---|---|
| Rating | 250W - 250V | Electrical capacity | p. 1 |
Where to find it in the PDF
- Installation Instructions p. 1
Table of contents
Important Information
This manual provides instructions for the Commercial Electric 3-Way Socket (Model 540 691). Before beginning any installation, ensure the power is turned off at the circuit breaker. Warning: Do not remove the cardboard liner from the shell or cap. If the cardboard liner is missing, do not use the lamp holder, as this poses a risk of electrical shock or fire.
Installation Instructions
- Turn off the power supply before installation.
- Disassemble the shell from the cap by pressing where indicated on the shell. Remove wires from the interior mechanism and loosen the set screw on the bushing of the cap. Unscrew the cap from the pipe while holding the pipe to prevent it from turning.
- Pass the wire through the bushing on the new cap. Screw the cap onto the pipe and tighten the set screw on the bushing securely. Ensure the insulating disk is in the bottom of the cap.
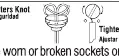
- Tie an underwriter's knot in the wires (refer to the diagram). Pull the knot tight.
- Strip the insulation to expose 1/2 to 5/8 inch of bare copper strands. Be careful not to damage the wire strands or insulation beyond the stripped length.
- Twist the copper strands of each wire tightly together. Firmly tighten the screws over the wire loops. Connect the white or ribbed wire (or the wire with a tracer or silver strands) to the silver terminal screw and the remaining wire to the brass terminal screw. Cut off any loose strands that do not secure under the screw heads.
- Slide the metal shell (with the insulating liner inside) over the mechanism so the switch is seated in the slot(s) on the shell and push the shell firmly into the cap until it locks securely and evenly into position. To assure locking, push on the metal shell only.
- Plug in the lamp or restore power.
Technical Specifications
- Rating: 250W - 250V
- Base: Medium Base
- Compatibility: For use with #18 or Stranded Copper Wire only.
Manufacturer information
Commercial Electric
Practical help
Common problems
Socket does not lock into place
Ensure the switch is properly seated in the slot(s) on the shell and push on the metal shell only to lock it into the cap.
Unsure about wiring safety
Always tie an underwriter's knot to provide strain relief and ensure wires are wrapped clockwise around terminal screws.
Before use
- Turn off power at the circuit breaker
- Verify the cardboard liner is present inside the shell and cap
- Use only #18 or Stranded Copper Wire
- Ensure you have a screwdriver for terminal screws
Images and diagrams
- The underwriter's knot diagram shows how to loop the wires to prevent strain on the terminal connections.
Model compatibility
- Compatible with #18 or Stranded Copper Wire only.

Manual page author
Emily Carter
User documentation editor
Prepares concise manual descriptions and highlights the most useful setup, operation, and maintenance information for readers.