Lighting / Fixtures
Installation Manual for Commercial Electric 1x4 Trimless LED Flat Panel Fixture
Quick guide for installing and configuring the Commercial Electric 1x4 Trimless LED Flat Panel Fixture. Includes wiring steps, color temperature settings, and safety precautions.
Quick answers from the manual
Quick answer
- The Commercial Electric 1x4 Trimless LED Flat Panel Fixture is installed by mounting a plate to the junction box, securing it with toggle bolts, and attaching the fixture via swing arms. Color temperature can be adjusted via a switch on the back or by toggling the wall switch. p. 4, 5, 6
Key actions
- Install the mounting plate using toggle bolts. p. 4
- Connect fixture wires to junction box wires. p. 5
- Change color temperature using the wall switch. p. 6
First start
- Select the desired color temperature on the back of the fixture before mounting. p. 5, 6
Problems and fixes
Fixtures out of sync (different colors).
Toggle wall switch ON/OFF 7 times quickly.
p. 6Maintenance and reset
- Reset color synchronization by toggling the wall switch ON and OFF 7 times quickly within 5-10 seconds. p. 6
Technical specifications
| Parameter | Value | Meaning | Pages |
|---|---|---|---|
| Voltage | 120VAC | Operating voltage | p. 2 |
| Power | 50W | Power consumption | p. 2 |
| Frequency | 60Hz | Operating frequency | p. 2 |
Where to find it in the PDF
- Safety Information p. 2
- Installation p. 4, 5
- Color Settings p. 6
Table of contents
Manual images
Click an image to enlargeQuick guide from the manual
This document provides installation and configuration instructions for the Commercial Electric 1x4 Trimless LED Flat Panel Fixture. The fixture is designed for use in a circuit protected by a fuse or circuit breaker and is suitable for damp locations. Always turn off the power supply at the circuit breaker before beginning any installation work.
Pre-Installation
Before starting, ensure you have the necessary tools and that all hardware is present.
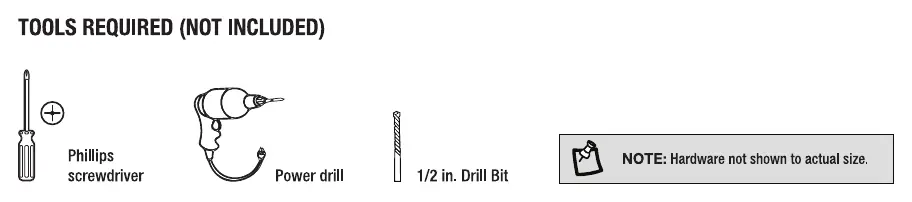
Tools Required
- Phillips screwdriver
- Power drill
- 1/2 in. drill bit
Hardware Included
- 1x4 Fixture
- Mounting Plate
- 3/16 in. Toggle Bolts (4)
- Wire Nuts (3)
- Junction Box Mounting Screws (2)
Installation
- Turn Off the Power: Switch off the power at the circuit breaker.
- Identify Wires: Locate the Black (Line Voltage), White (Neutral), and Green/Bare Copper (Ground) wires.
- Attach Mounting Plate: Secure the mounting plate to the junction box using the provided screws. Note that once toggle bolts are installed, the orientation cannot be changed.
- Position Toggle Bolts: Use the mounting plate as a guide to mark the ceiling or wall for the toggle bolts.
- Install Toggle Bolts: Drill four 1/2 in. holes, insert the toggle bolts through the mounting plate, and reattach the plate to the ceiling.
- Secure Mounting Plate: Feed junction box wires through the center hole and pull the toggle bolts downward to engage and tighten.
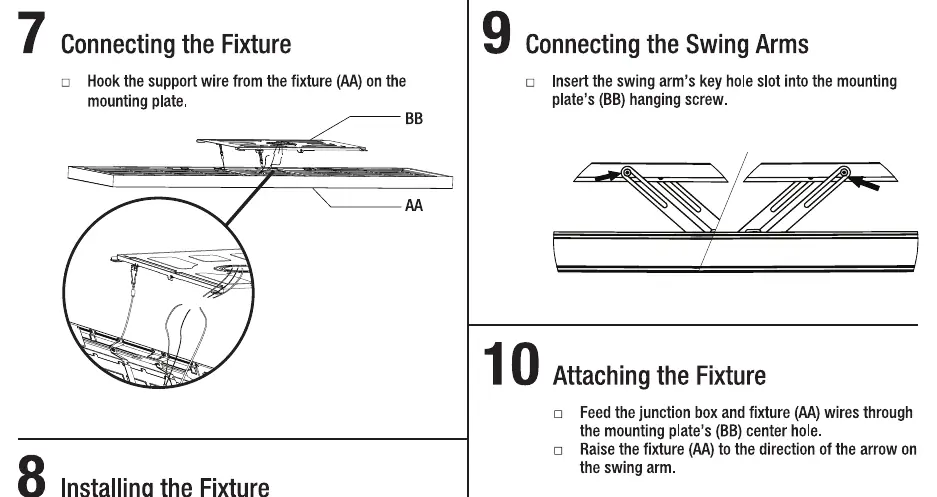
- Connect Fixture: Hook the support wire from the fixture onto the mounting plate.
- Wiring: Connect the fixture wires to the junction box wires (Black to Line, White to Neutral, Green to Ground). Ensure no wires are pinched outside the junction box.
- Connect Swing Arms: Insert the swing arm's key hole slot into the mounting plate's hanging screw.
- Attach Fixture: Feed wires through the center hole and raise the fixture toward the swing arm.
- Secure Fixture: Once flush to the ceiling, lock the fixture by moving it in the opposite direction it was raised.
Color Settings
The fixture features selectable color temperatures: 3000K (Soft White), 3500K (Neutral White), 4000K (Bright White), 5000K (Daylight), and 6500K (Daylight Deluxe).
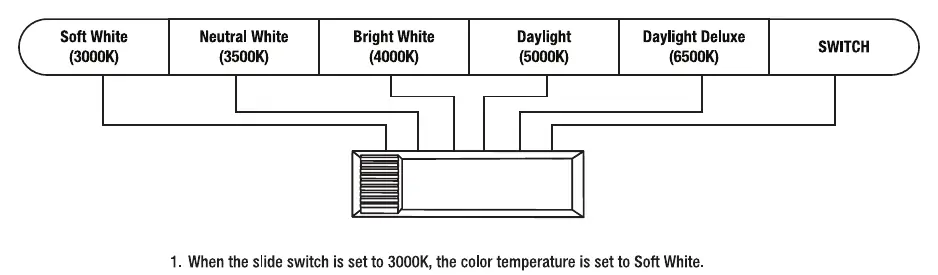
To change color temperatures using your existing light switch:
- Set the slide switch on the back of the fixture to SWITCH.
- Toggle your light switch ON and OFF within 0.5-3 seconds to cycle through the 5 color temperatures.
- The fixture will remember the last color temperature selected after it has been on for 10 seconds.
- To reset multiple fixtures to the same color, toggle the wall switch ON and OFF 7 times quickly within 5-10 seconds.
Care and Cleaning
To clean the fixture, disconnect the power at the circuit breaker or fuse box. Use a slightly dampened, clean cloth (water only, never use solvents) to wipe the surface. Allow the fixture to dry completely before restoring power.
Manufacturer information
Commercial Electric
Practical help
Common problems
Multiple fixtures are not displaying the same color temperature.
Toggle the wall switch ON and OFF 7 times quickly within 5-10 seconds to reset the fixtures.
Potential electrical hazard during installation.
Ensure no excess wires are left outside the junction box to avoid pinching wires.
Before use
- Turn off the power supply at the fuse or circuit breaker.
- Wear rubber-soled shoes and use a sturdy wooden ladder.
- Verify all hardware (toggle bolts, wire nuts, screws) is present.
- Ensure the installation surface is suitable for the fixture.
- Select the preferred color temperature on the back of the fixture before final installation.
Specs in practice
- Damp Location
- The fixture is rated for use in areas with some moisture, but not direct water exposure.
- Color Temperature
- Adjustable range from 3000K (warm) to 6500K (cool daylight).
Images and diagrams
- The installation process involves mounting a plate to the junction box, securing it with toggle bolts, and then attaching the fixture via swing arms.
- The color temperature switch is located on the back of the fixture.
Model compatibility
- Wall Dimmable.
- Suitable for Damp Locations.

Manual page author
David Miller
Documentation analyst
Organizes user manual content into clear summaries, with attention to model details, product context, and everyday usability.