Automotive / Portable Coolers
User Guide for Compass 2024-V2 Personal Current and Voltage Detector
Comprehensive user guide for the Compass 2024-V2 personal current and voltage detector. Learn about device positioning, operating instructions, sensitivity settings, Smart Adaptive Mode, and troubleshooting.
Quick answers from the manual
Quick answer
- The Compass 2024-V2 is a personal non-contact voltage and current detector. It alerts users to energized sources via audio and visual signals, with features like Smart Adaptive Mode and directional notification. p. 2
Key actions
- Charging the device p. 6
- Changing sensitivity p. 6
First start
- Confirming device is working p. 5
Problems and fixes
Device unresponsive
Charge for 90 minutes or reset by holding button for 8-10 seconds.
p. 10Maintenance and reset
- Resetting the device p. 6
Technical specifications
| Parameter | Value | Meaning | Pages |
|---|---|---|---|
| Battery | 3.7V, 250mAh LiPo | Rechargeable Lithium-Polymer battery. | p. 3 |
| Water Resistance | IP-67 | Rated for water resistance. | p. 3 |
Where to find it in the PDF
- Device Positioning p. 4, 5
- Operating Instructions p. 6
- Troubleshooting p. 10
Table of contents
Manual images
Click an image to enlargeQuick Guide
The Compass 2024-V2 is a personal non-contact voltage and current detector designed to warn users of energized sources. Before field use, always confirm the device is powered on (center light blinking green every 5 seconds) and test it with a known source of voltage or current.
Device Positioning
The device can be used in several configurations:

- Hard Hat Mounting: Wear on the underside brim of a hard hat, directly in front of the user's face, ensuring it is within the peripheral vision.
- Handheld Operation: Use for low voltage sources (120-2400 VAC). Do not obstruct the front of the device, as this will reduce detection capabilities.
- Alternate Positions: Can be used on a wrist strap, clipped on a lanyard, or mounted on a hot stick.
Operating Instructions
The device is controlled via a single button:
- Charge: Plug into a Micro USB port. Red LED indicates charging; Green LED indicates fully charged.
- Power On: Press the button to see the orange start-up animation.
- Mute Alerts: Press the button quickly. Green LEDs indicate audible alerts ON; Red LEDs indicate audible alerts MUTED.
- Change Sensitivity: Hold the button until corner LEDs turn BLUE. Press to cycle through sensitivity levels (1-7). Hold until LEDs turn GREEN to select.
- Power Down: Hold the button until corner LEDs turn ORANGE.
- Reset Device: Hold the button as corner LEDs cycle from WHITE to BLUE to ORANGE.
Alerts and Detection
The device provides both audio and visual alerts:
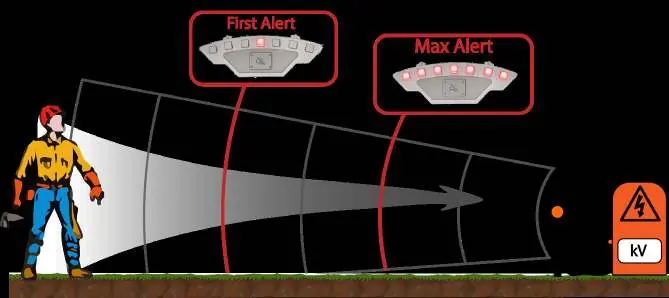
- Proximity Alerts: Red LEDs indicate voltage; Blue LEDs indicate current. Alerts increase as the user approaches the source.
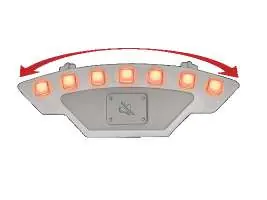
- Directional Alerts: In directional mode, LEDs perform a sweeping animation to guide the user toward the source (240° active bearing range).
- Priority: If both voltage and current are detected, voltage alerts take priority.
Smart Adaptive Mode
This mode is designed for environments where electric and magnetic fields are known to be present. The device will automatically pause alerts if the user is not moving closer to a detected source. It will re-adjust if the user moves away and the field strength reduces.
Troubleshooting
If the device is unresponsive:
- Try charging on a micro USB power source for at least 90 minutes.
- Reset the device by holding the button for 8-10 seconds.
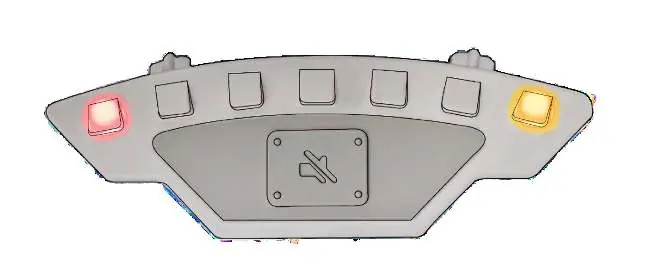
- If the device flashes RED and YELLOW, it indicates a self-test error. Stop using immediately and contact support.
Safety Information
- Use only by trained and qualified personnel.
- Always adhere to high voltage electrical safety practices.
- Extreme humidity may decrease detection range.
- Some materials may shield electromagnetic fields.
- Always verify a potential voltage source is de-energized before making contact.
Device Specifications
- Power: Rechargeable LiPo Battery (3.7V, 250mAh).
- Charging: 1.5 hours via USB 2.0 Micro B.
- Water Resistance: IP-67.
- Operating Conditions: -20°C to 60°C (-4°F to 140°F).
- Voltage Ranges: High Voltage Model (2400VAC-35kVAC); Low Voltage Model (120 VAC – 2400VAC).
Practical help
Common problems
Device is unresponsive (center green LED not flashing)
Charge for at least 90 minutes or reset by holding the button for 8-10 seconds.
Corner LEDs flashing RED and YELLOW
This is a self-test error. Stop using the device immediately and contact customer service.
Low battery
If RED corner LEDs blink periodically, charge the device immediately.
Before use
- Confirm device is powered on (center light blinks green every 5 seconds).
- Test device with a known source of voltage/current.
- Ensure sensitivity settings are appropriate for the workspace.
- Wear voltage-appropriate protective equipment.
- Verify the device is within peripheral vision if hard hat mounted.
Specs in practice
- Smart Adaptive Mode
- Automatically pauses alerts when the user is not moving closer to a source to reduce nuisance alarms.
- Directional Accuracy
- Approximately ±20° accuracy in directional mode.
Images and diagrams
- Hard hat mounting: Attach the device to the underside brim of the hard hat.
- Handheld operation: Hold the device without obstructing the front sensor area.
- Alerts: Red LEDs indicate voltage, Blue LEDs indicate current.
Model compatibility
- High Voltage Model: 2400VAC-35kVAC RMS Line to Neutral.
- Low Voltage Model: 120 VAC – 2400VAC RMS Line to Neutral.
- Do not charge if temperature is below 0°C (32°F).

Manual page author
Emily Carter
User documentation editor
Prepares concise manual descriptions and highlights the most useful setup, operation, and maintenance information for readers.