Tools / Measuring Tools
User Guide for AEMC 6292 Micro-Ohmmeter
Quick start guide for the AEMC 6292 Micro-Ohmmeter. Learn how to set up, configure, perform tests, use DataView software, and maintain your device.
Table of contents
Manual images
Click an image to enlargeQuick Start Guide
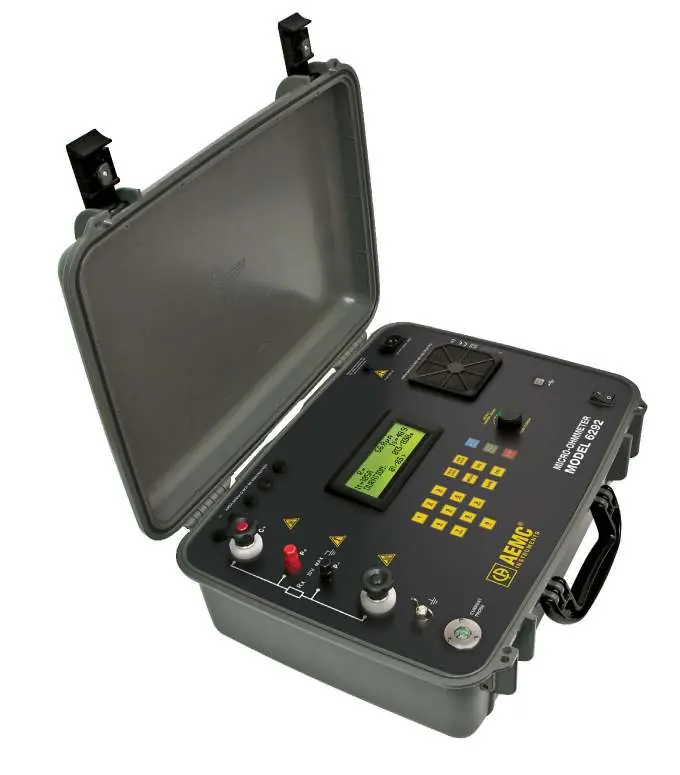
The AEMC 6292 is a programmable 200A micro-ohmmeter designed for low resistance measurements. This guide provides essential information for setup, operation, and maintenance. Always refer to the full user manual on the provided USB drive for advanced features and detailed technical specifications.
Safety Precautions
- Qualified Users Only: This instrument must be used by trained personnel.
- De-energized Circuits: Tests must be performed on de-energized circuits only. Never connect to a live circuit.
- Grounding: Always connect the instrument to an earth/ground point using the ground terminal or power cord.
- Ventilation: Do not obstruct intake vents or the fan to prevent overheating.
- Cable Handling: Never connect or disconnect test leads during a measurement. Press the STOP button first.
- Explosive Environments: Do not use in explosive environments, including poorly ventilated battery rooms.
Control Features
The front panel includes the following key components:
- LCD Display: Shows test results and menu options.
- Terminals: C+ and C- (Current output), P+ and P- (Potential), and Ground terminal.
- Keypad: Alphanumeric keys and function buttons (MENU, START, STOP, SAVE, MODE, etc.).
- Rotary Knob: Used for navigating menus and adjusting test current.
- Communication: USB port for PC connection.
- Power: ON/OFF switch and power cord connector.
Getting Started
- Connect the instrument to a 120/240V 50/60Hz AC power supply.
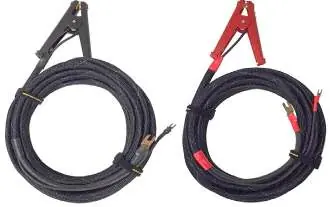
- Connect the test probes to the device under test and the appropriate front panel terminals.
- Turn on the instrument.
- Perform a test with leads shorted to verify the current reaches the preset level.
Configuring the Instrument
You can configure the instrument via the DataView software on a PC:
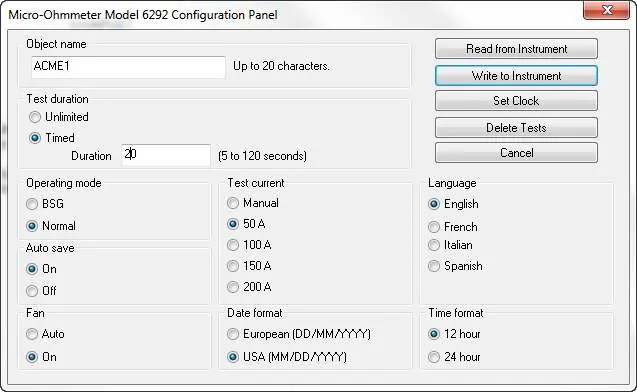
- Object Name: Assign a name up to 20 characters.
- Test Duration: Choose Unlimited or Timed (5 to 120 seconds).
- Operating Mode: Select Normal or BSG (Both Sides Grounded).
- Test Current: Select 50A, 100A, 150A, 200A, or Manual.
Maintenance and Repair
To ensure factory specifications, the instrument should be recalibrated at one-year intervals. Contact the AEMC Service Center to obtain a Customer Service Authorization Number (CSA#) before returning the unit for repair or calibration.
Practical help
Common problems
Current does not reach preset level
Check connections, ensure leads are shorted properly, or contact technical assistance.
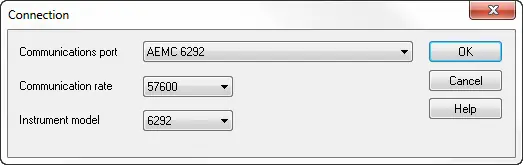
Instrument not connecting to PC
Ensure drivers are installed, check USB cable, and verify communication settings (57600 rate) in DataView.
Before use
- Read the user manual and safety warnings.
- Ensure circuits are de-energized.
- Connect the instrument to earth/ground.
- Inspect test leads for damage (insulation split, burnt, etc.).
- Connect test probes to the device before turning on.
Specs in practice
- Test Current
- Available settings: 50A, 100A, 150A, 200A, or Manual control.
- Operating Modes
- Normal or BSG (Both Sides Grounded) for specific testing scenarios.
- Test Duration
- Unlimited or Timed (5 to 120 seconds).
Images and diagrams
- Front Panel: Includes LCD, keypad, rotary knob, and terminals (C+, P+, P-, C-, Ground).
- Current Probe Connector: Pinout for positive/negative supply and signal.
Model compatibility
- Requires 120/240V 50/60Hz AC power supply.
- DataView software requires PC connection.

Manual page author
David Miller
Documentation analyst
Organizes user manual content into clear summaries, with attention to model details, product context, and everyday usability.