Tools / Electronic Test Equipment
User Manual for HTC 15S Smart Digital Clamp Meter
Quick guide for the HTC 15S Smart Digital Clamp Meter. Learn how to use smart measurement modes, perform voltage and continuity tests, and maintain your device safely.
Table of contents
Quick Guide
The HTC 15S is an intelligent True RMS digital clamp meter designed for various electrical measurements. It defaults to an 'Auto' measurement mode upon power-up, which automatically detects DC voltage, AC voltage, resistance, and continuity. Always perform a test on a known voltage source before using the meter to ensure it is in good working condition.
Safety Instructions
- The meter conforms to IEC61010-1 CAT.III 600V safety standards.
- Do not measure voltages higher than 600V.
- Inspect the meter shell and probes for cracks or damage before use. If damaged, do not use.
- When measuring, connect the null or ground wire first, then the live wire. Disconnect in reverse order.
- Wear personal protective equipment (rubber gloves, masks, flame retardant clothing) when working near exposed live conductors.
- Do not use the meter in explosive, humid, or steamy environments.
- Keep fingers behind the probe finger guard during use.
Device Overview
The meter features the following components:
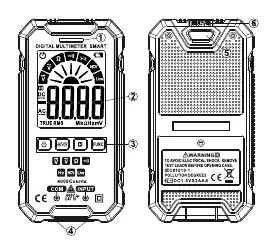
- Warning indicator: Alerts to potential hazards.
- Display: Shows measurement results and status icons.
- Keys: Power, Flashlight, Data Hold, and Function (FUNC) selection.
- Input jacks: Connection points for probes (COM and INPUT).
- Flashlight: Built-in light for dark environments.
- NCV Sensor area: Used for non-contact AC voltage detection.
Basic Operation
Power On/Off: Press and hold the power button for approximately 2 seconds.
Auto Power Off: The meter automatically shuts down after 15 minutes of inactivity to save battery. To disable this, press and hold the 'FUNC' key while turning on the meter.
Gear Selection: Press the 'FUNC' key to switch to manual mode and select specific measurement shifts. Press and hold 'FUNC' for 2 seconds to return to the intelligent (AUTO) measurement mode.
Data Hold: Press the 'H' key to freeze the current reading on the display. Note that this function is invalid in NCV/Live modes.
Measurement Modes
Smart (AUTO) Measurement: This is the default mode. Insert the red probe into the 'INPUT' jack and the black probe into the 'COM' jack. Contact the probes with the measured power supply or resistance; the meter will automatically identify the signal.
Professional Measurement: Use the 'FUNC' key to manually select specific modes like AC/DC voltage, resistance, or frequency if the auto mode is not required.
Continuity Test: Select the continuity gear. If the resistance is less than 50 Ohms, the buzzer will sound and the alarm indicator will turn on.
Non-contact AC Voltage Detection (NCV): Select the NCV gear and bring the sensor area close to the conductor. The meter will display '---L' (weak signal, green light) or '---H' (strong signal, red light) with corresponding buzzer sounds.
Live Wire Detecting: Select the 'Live' gear. Insert the red probe into the 'INPUT' jack (remove the black probe). Contact the conductor with the red probe. The meter will indicate signal strength similarly to NCV mode.
Maintenance
Cleaning: Turn off the meter and remove probes. Wipe the case with a damp cloth and mild detergent. Do not use abrasives or solvents. Clean input socket contacts with a swab soaked in alcohol.
Battery Replacement: Turn off the meter and remove probes. Unscrew the battery cover, remove the old batteries, and replace them with new 1.5V AAA batteries, ensuring correct polarity. Secure the cover back in place.
Technical Specifications
- Environment: CAT.III 600V, Pollution level 2, Altitude < 2000m.
- Operating Temperature: 0 to 40 degrees Celsius (<80% RH).
- Display: 4000 counts.
- Sampling Rate: Approx. 3 times/second.
- Power Requirement: 2 x 1.5V AAA batteries.
Official resources from the manual
Practical help
Common problems
Meter does not turn on
Check if batteries are installed correctly or if they need replacement.
Measurement error
If the 'a' symbol is displayed, replace the battery immediately.
Meter damaged or shell cracked
Do not use the meter; it may pose a safety risk.
Before use
- Inspect the meter shell for cracks or damage.
- Check probes for damage; replace if necessary.
- Verify battery level.
- Test the meter on a known voltage source to confirm it is working correctly.
- Ensure probes are inserted into the correct jacks (Red to INPUT, Black to COM).
Specs in practice
- CAT III 600V
- Safety rating suitable for measurements in distribution level circuits up to 600V.
- Auto power off
- Automatically turns off the meter after 15 minutes of inactivity to conserve battery.
Images and diagrams
- 1: Warning indicator
- 2: Display screen
- 3: Function keys
- 4: Input jacks
- 5: Flashlight
Model compatibility
- Use only with the provided probe or one with identical electrical specifications to maintain safety standards.

Manual page author
David Miller
Documentation analyst
Organizes user manual content into clear summaries, with attention to model details, product context, and everyday usability.