Computers / Cooling Systems
User Manual for Corsair Hydro Series H75 Liquid CPU Cooler
Quick start guide for the Corsair Hydro Series H75 liquid CPU cooler. Includes installation steps for Intel and AMD sockets, wiring instructions, and FAQ.
Table of contents
Manual images
Click an image to enlargeQuick Guide from the Manual
The Corsair Hydro Series H75 is a high-performance 120mm liquid CPU cooler. Before beginning installation, verify that your PC case has a CPU cutout to allow access to the bottom of the motherboard. If your case does not have this cutout, you must remove the motherboard from the case first. For re-installation, always clean off the pre-applied thermal paste and apply new aftermarket paste.
Included Hardware
The package includes the following components:
- Long fan screws (x8)
- LGA 115X/1366 standoffs (x4)
- LGA 2011/2011-3/2066 standoffs (x4)
- Washers (x8)
- Thumbscrews (x4)
- Intel backplate (x1)
- Intel mounting bracket (pre-installed)
- AMD screw clips (x2)
- AMD mounting bracket (x1)
- SP120 PWM fans (x2)
- Fan Y-header cable (x1)
Intel Installation
1. Installing the Intel Backplate: For LGA 115X, slide the backplate pins inside. For LGA 1366, slide the backplate pins outside. Install the assembled backplate. Note: Intel LGA 2011 and LGA 2066 do not require backplate installation.
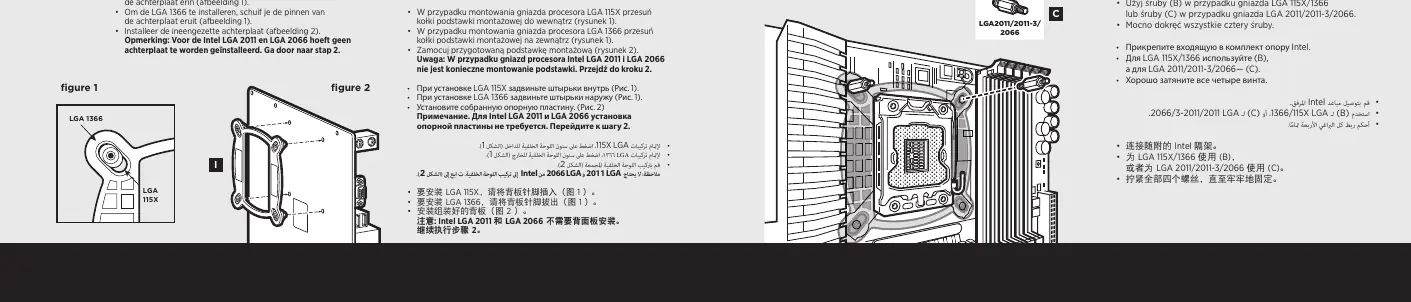
2. Installing the Intel Standoff Screws: Attach the provided Intel standoffs. Use (B) for LGA 115X/1366, or (C) for LGA 2011/2011-3/2066. Tighten all four screws until secure.
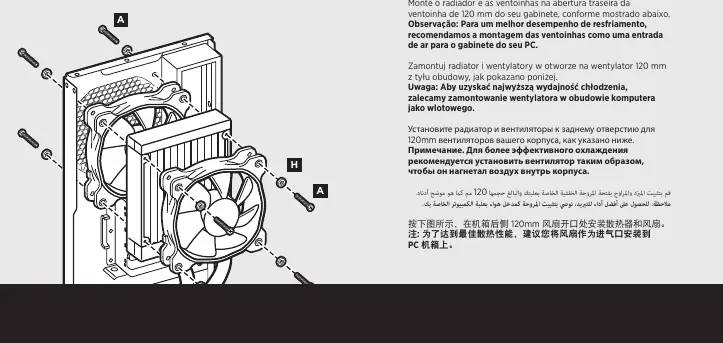
3. Installing the Fans and Radiator: Mount the radiator and fans to your case's rear 120mm fan opening. For best cooling performance, it is recommended to mount the fan as an air intake.
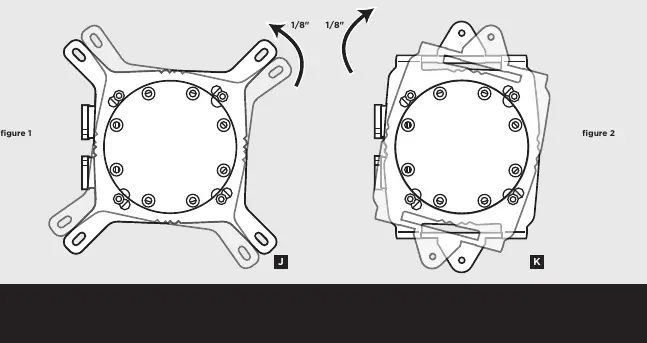
4. Installing the Pump Unit: Align the bracket and pump over the standoff screws. Tighten the thumbscrews until all four corners are firmly secured.
AMD Installation
1. Installing the AMD Mounting Bracket: Remove the integrated Intel mounting bracket by turning it and pulling it away from the copper coldplate. Install the AMD bracket by aligning the twist lock, pushing in, and turning in the opposite direction to secure.

2. Installing the Fans and Radiator: Mount the radiator and fans to the rear 120mm fan opening of your case.
3. Preparing the Mounting Bracket: Insert the AMD screw clips and secure with the screws. Do not tighten the thumbscrews all the way yet.
4. Installing the Pump Unit: Align the bracket with the stock AMD mounting clips. Tighten the thumbscrews until secure.
Power Connection
Follow these steps to connect the fans and pump:
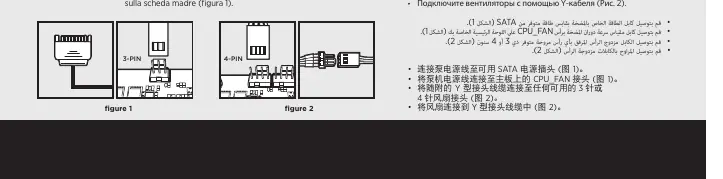
- Connect the pump power cable to an available SATA power plug.
- Connect the pump tach cable to the CPU_FAN header on your motherboard.
- Connect the included Y-header cable to any available 3-pin or 4-pin fan header.
- Connect the fans into the Y-header cables.
FAQ
How do I know the direction of the air flow of the fan? An arrow located on the side of the fan indicates the direction of air flow.
Can I reuse the pre-applied thermal paste? Re-installation of the H75 cooler requires you to clean off the pre-applied thermal paste and apply new aftermarket paste.
Manufacturer information
Corsair Memory, Inc.
Practical help
Common problems
Re-installation of the cooler
You must clean off the pre-applied thermal paste and apply new aftermarket paste.
Airflow direction
Check the arrow located on the side of the fan to determine the direction of air flow.
Case compatibility
If your PC case does not have a CPU cutout, you must remove the motherboard from the case before installation.
Before use
- Verify your PC case has a CPU cutout for motherboard access.
- Identify if you are using an Intel or AMD socket.
- Ensure you have aftermarket thermal paste if you are re-installing the cooler.
- Check that you have the correct standoffs for your specific Intel socket (LGA 115X/1366 vs 2011/2066).
Specs in practice
- CPU_FAN header
- The motherboard header required for the pump tachometer signal.
Images and diagrams
- Intel Backplate: Pins slide inward for LGA 115X and outward for LGA 1366.
- Pump Unit: Align the bracket over the standoffs and tighten the thumbscrews in a cross pattern for even pressure.
Model compatibility
- Intel LGA 2011 and LGA 2066 do not require backplate installation.
- The H75 comes with the Intel mounting bracket pre-installed.

Manual page author
Emily Carter
User documentation editor
Prepares concise manual descriptions and highlights the most useful setup, operation, and maintenance information for readers.