Smart Home / Smart Switches
Corston Harrow and Taylor Picture Lights Installation Guide
Comprehensive installation and maintenance guide for Corston Harrow and Taylor picture lights. Includes step-by-step mounting instructions, driver connection procedures, and LED strip replacement steps.
Quick answers from the manual
Quick answer
- This manual provides installation instructions for Corston Harrow and Taylor picture lights, including mounting, wiring, and LED replacement procedures. p. 1
Key actions
- Install Harrow Picture Light p. 3, 4
- Install Taylor Picture Light p. 7, 8
- Replace LED Strip p. 9, 10
Maintenance and reset
- LED strip replacement p. 9, 10
Show 2 more answers Show less
Technical specifications
| Parameter | Value | Meaning | Pages |
|---|---|---|---|
| Max wattage | 8W | Maximum power consumption | p. 2, 6 |
| IP rating | IP20 | Ingress protection rating | p. 2, 6 |
Where to find it in the PDF
- Harrow Installation p. 2, 3, 4
- Taylor Installation p. 5, 6, 7, 8
- LED Replacement p. 9, 10
Table of contents
Manual images
Click an image to enlargeImportant Information
Warning: Never plug a picture light into the mains electricity without a driver. Doing so could cause irreparable damage to your product. The driver is supplied with the product.
Harrow Picture Light Installation
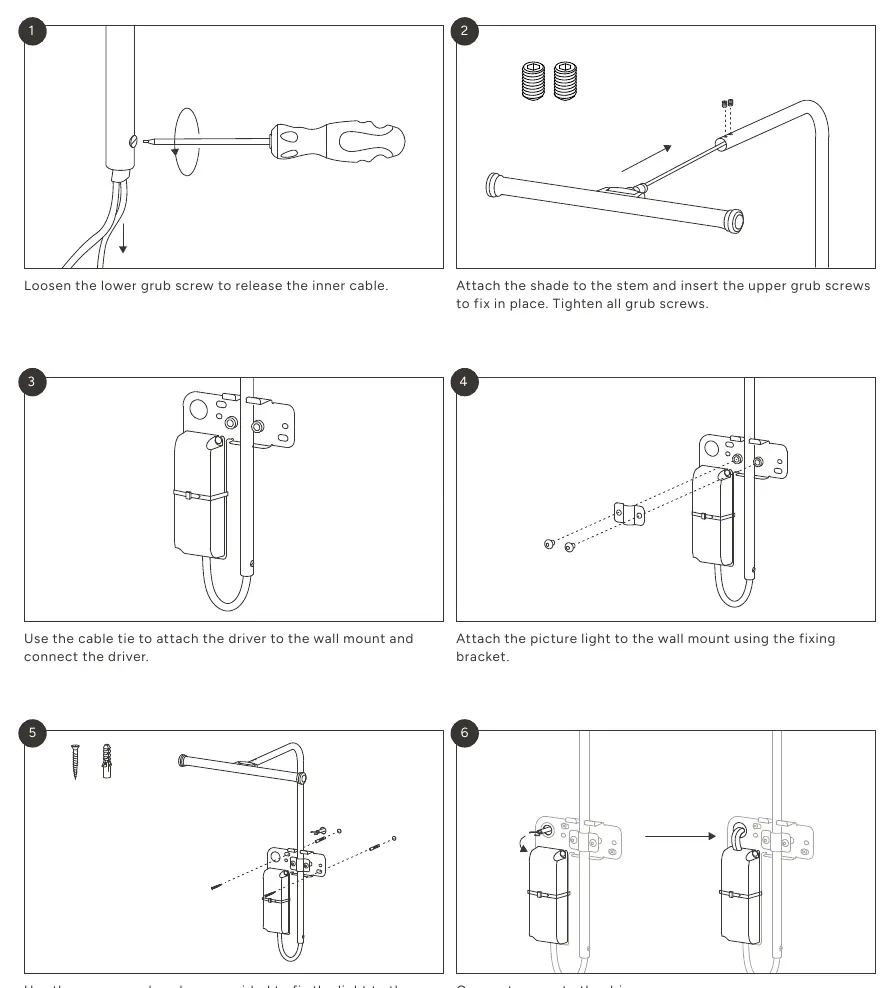
- Loosen the lower grub screw to release the inner cable.
- Attach the shade to the stem and insert the upper grub screws to fix in place. Tighten all grub screws.
- Use the cable tie to attach the driver to the wall mount and connect the driver.
- Attach the picture light to the wall mount using the fixing bracket.
- Use the screws and anchors provided to fix the light to the wall.
- Connect power to the driver.
- Loosen the fixing bracket screws to adjust the light’s height.
- Optional: Add foam raisers to the rear bottom corners of the frame.
- Hang your chosen frame on the built-in hook on the wall mount.
Taylor Picture Light Installation
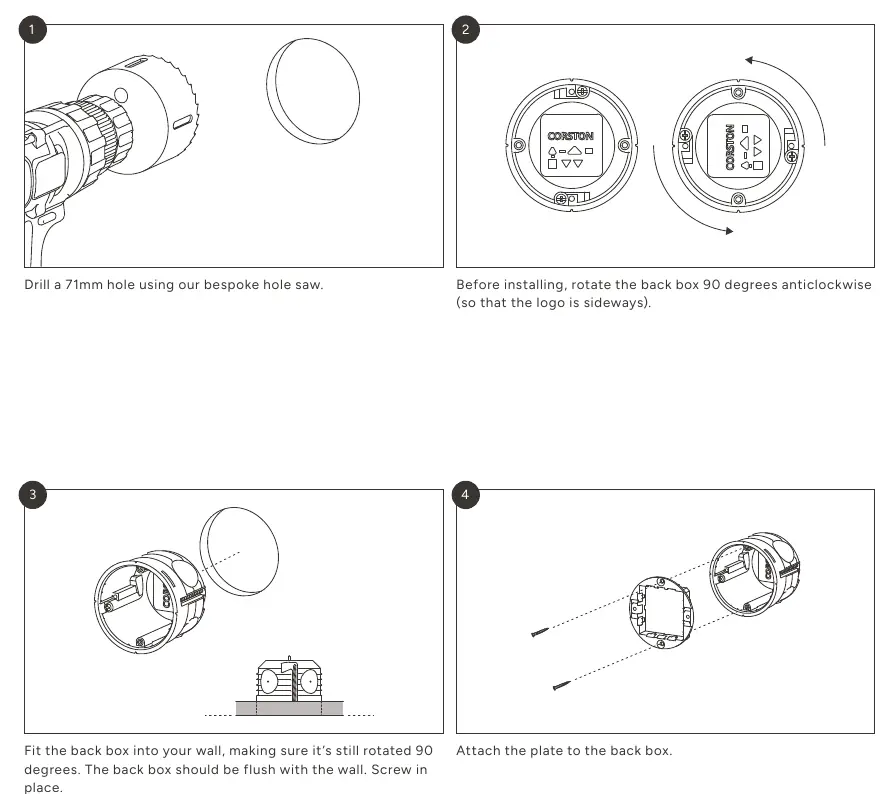
- Drill a 71mm hole using the bespoke hole saw.
- Before installing, rotate the back box 90 degrees anticlockwise (so that the logo is sideways).
- Fit the back box into your wall, making sure it is still rotated 90 degrees. The back box should be flush with the wall. Screw in place.
- Attach the plate to the back box.
- Attach the shade to the stem using the grub screws.
- Connect the driver to the power supply.
- Mount the light onto the back plate.
Picture Light LED Replacement
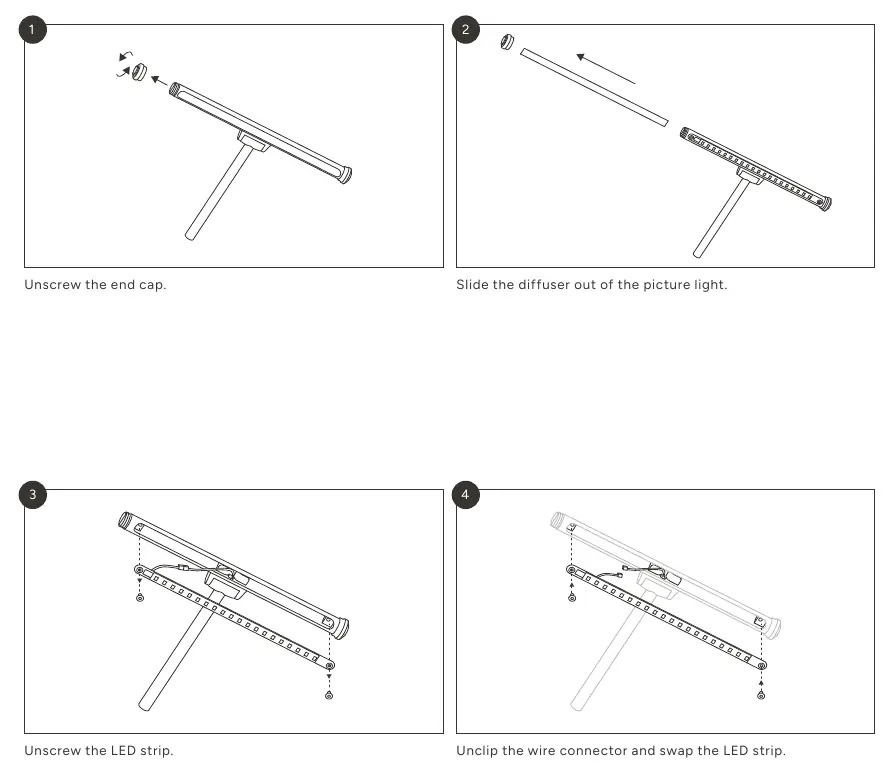
- Unscrew the end cap.
- Slide the diffuser out of the picture light.
- Unscrew the LED strip.
- Unclip the wire connector and swap the LED strip.
- Slide the diffuser back in and screw on the end cap.
Technical Specifications
- Location: Interior
- Class: Class III
- IP Rating: IP20
- Bulb Type: LED strip
- Max Wattage: 8W
- Rated Voltage (Light): 12V or 24V
- Rated Voltage (Driver): 230V-250V
- Rated Frequency: 50-60Hz
Practical help
Common problems
Light not working or damaged
Ensure the driver is connected. Never plug the light directly into mains electricity without the driver.
LED strip failure
Follow the LED replacement procedure: unscrew end cap, slide out diffuser, unclip wire connector, and replace the strip.
Before use
- 6mm drill bit
- Flathead screwdriver
- Crosshead screwdriver
Show more Show less
Images and diagrams
- Harrow installation involves mounting the driver to the wall mount and fixing the light to the wall.
- Taylor installation requires drilling a 71mm hole and rotating the back box 90 degrees.
- LED replacement involves removing the end cap and sliding out the diffuser.
Model compatibility
- Dimmable only if used with a compatible third-party dimmable driver.
- For interior use only.

Manual page author
Emily Carter
User documentation editor