Home / Garage Door Openers
Craftsman 139.53960SRT Series Garage Door Opener Owner's Manual
Quick guide for the Craftsman 139.53960SRT series garage door opener. Includes installation steps, safety sensor alignment, travel limit adjustments, and programming instructions.
Table of contents
Manual images
Click an image to enlargeQuick guide from the manual
This manual provides instructions for the Craftsman 1/2 HP Garage Door Opener. Before installation, ensure your garage door is balanced, does not bind, and has no ropes or locks attached. The opener requires a 120V, 60Hz grounded outlet. Safety sensors must be installed no higher than 6 inches above the floor to ensure the safety reversal system functions correctly.
Before you begin
- Disable all locks and remove any ropes connected to the garage door.
- Test the door: Lift the door halfway; it should stay in place supported by its springs. If it binds or sticks, call a trained door systems technician.
- Check the floor gap: The gap between the floor and the bottom of the door must not exceed 1/4 inch.
Assembly
The opener is assembled in several steps:
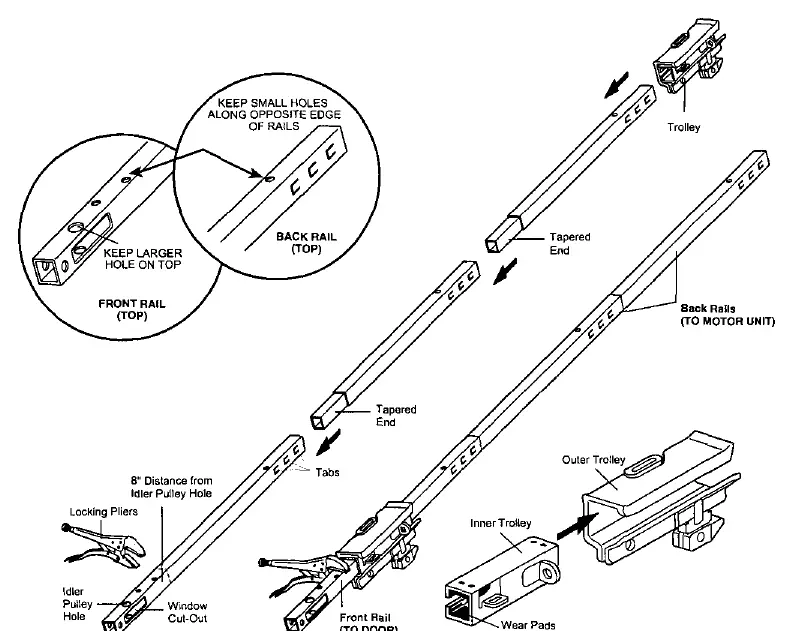
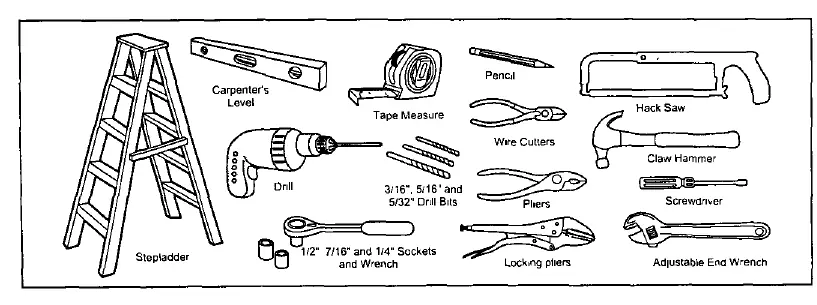
- Rail and Trolley: Assemble the rail sections and install the trolley. Use locking pliers as a temporary stop 8 inches from the idler pulley hole.
- Motor Unit: Fasten the rail to the motor unit using the U-bracket.
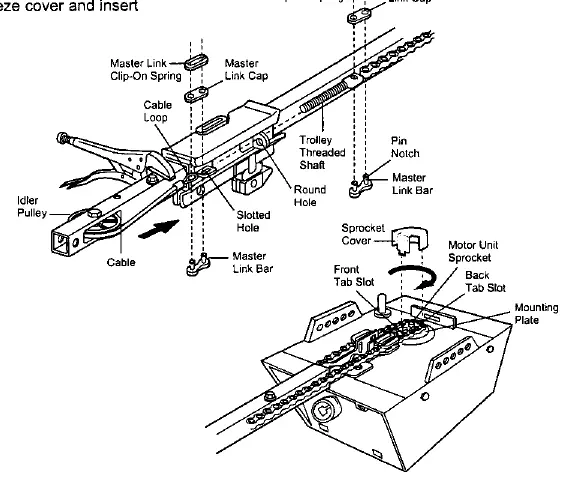
- Chain/Cable: Install the idler pulley and thread the chain/cable. Ensure the chain is not twisted and engage it with the sprocket.
- Tension: Tighten the chain until it is approximately 1/2 inch above the base of the rail at its midpoint.
Installation
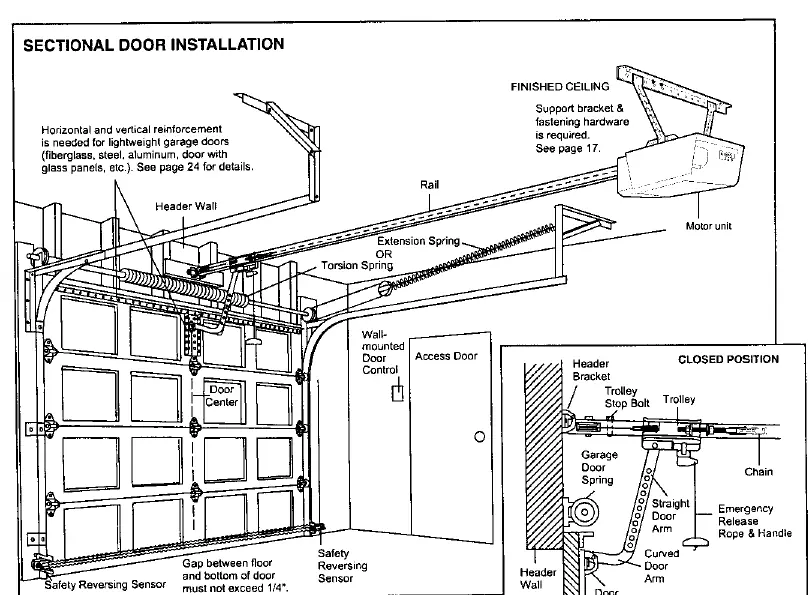
- Header Bracket: Must be rigidly fastened to structural supports on the header wall or ceiling.
- Opener Positioning: Place the opener on a stepladder. For sectional doors, a 2x4 laid flat is convenient for setting the door-to-rail distance.
- Hanging: Fasten the opener securely to structural supports using hanging brackets.
- Door Control: Install within sight of the door, at least 5 feet above the floor, out of reach of children.
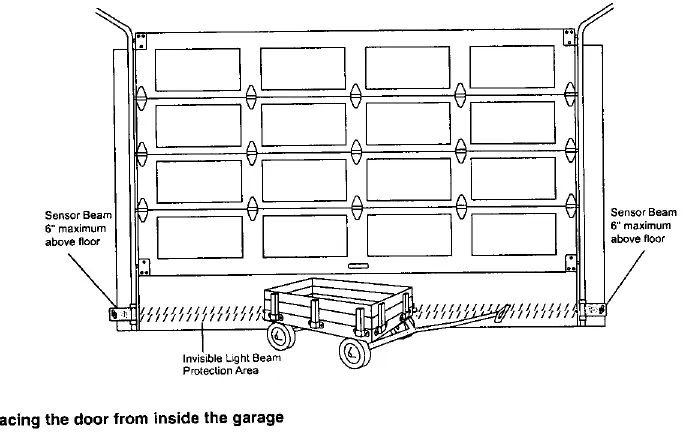
- Safety Sensors: Mount the sending and receiving eyes no higher than 6 inches above the floor. Align them so the invisible light beam is unobstructed.
- Emergency Release: Attach the rope and handle 6 feet above the floor.
Adjustment
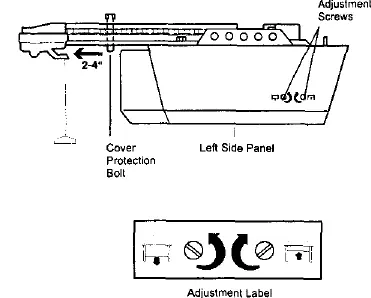
- Travel Limits: Regulate the points where the door stops. Increase or decrease UP/DOWN travel using the adjustment screws on the motor unit.
- Force: Adjust the force required to open and close the door. Do not increase force to compensate for a binding door.
- Safety Reversal System: Test monthly by placing a 1-inch board (or 2x4 laid flat) on the floor under the door. The door must reverse upon contact.
Programming
- Remote Controls: Press the 'Learn' button on the motor unit, then press the button on the remote control within 30 seconds.
- Keyless Entry: Press the 'Learn' button, enter a 4-digit PIN on the keypad, and press and hold the ENTER button.
Maintenance
- Monthly: Manually operate the door, check for balance, and test the safety reversal system.
- Twice a Year: Check chain tension.
- Yearly: Oil door rollers, bearings, and hinges.
Manufacturer information
CRAFTSMAN
Practical help
Common problems
Opener does not operate from door control or remote
Check for electric power, ensure door locks are disabled, and check for broken springs or ice/snow obstructions.
Remote control has short range
Change the location of the remote in the car and ensure the antenna on the motor unit extends fully downward.
Door reverses for no apparent reason
Check safety sensors for obstructions or misalignment. Ensure the door is not binding or unbalanced.
Chain sags
It is normal for the chain to droop slightly in the closed position. Only adjust if the chain is excessively loose.
Before use
- Disable all garage door locks.
- Remove all ropes connected to the garage door.
- Ensure the garage door is balanced and does not bind.
- Ensure the gap between the floor and the door is no more than 1/4 inch.
- Verify the garage door opener is installed 7 feet or more above the floor.
Images and diagrams
- Assembly diagrams show rail, trolley, and chain installation steps.
- Installation diagrams detail header bracket and safety sensor placement.
- Adjustment diagrams show the location of limit and force control screws on the motor unit.
Model compatibility
- Compatible with sectional and one-piece garage doors.
- Requires a 120V grounded electrical outlet.
- Safety sensors are required for operation.

Manual page author
Michael Turner
Technical manual editor
Reviews PDF manuals for structure, safety notes, and practical product details so readers can find the right information quickly.