Home / Garage Door Openers
Owner's Manual for Craftsman 139.53965SRT Garage Door Opener
Quick guide and setup manual for the Craftsman 139.53965SRT garage door opener. Includes installation steps, safety sensor alignment, programming remotes, and troubleshooting.
Table of contents
Manual images
Click an image to enlargeQuick guide from the manual
This manual provides instructions for the installation, operation, and maintenance of the Craftsman 139.53965SRT garage door opener. Before beginning, ensure your garage door is balanced and does not bind. The opener is designed for residential use only and requires a 120V, 60 Hz power supply. Always follow the safety warnings provided, as improper installation can lead to serious injury or death.
Safety information
Warning: To prevent serious injury or death, always keep remote controls out of reach of children. Never permit children to operate or play with door control push buttons or remote controls. Only activate the garage door when it can be seen clearly, is properly adjusted, and there are no obstructions to door travel. Always keep the garage door in sight until completely closed.
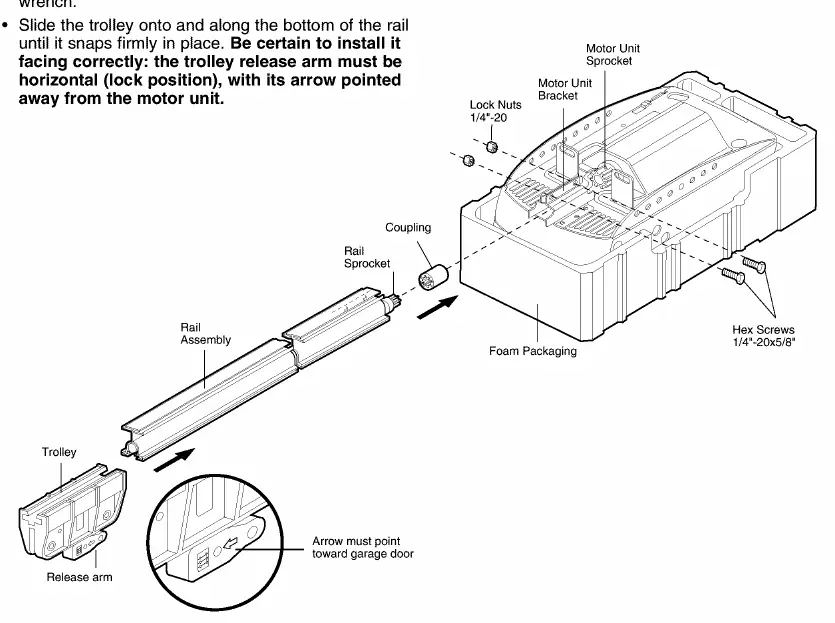
Assembly
The opener is packaged in two cartons. Follow these steps for assembly:
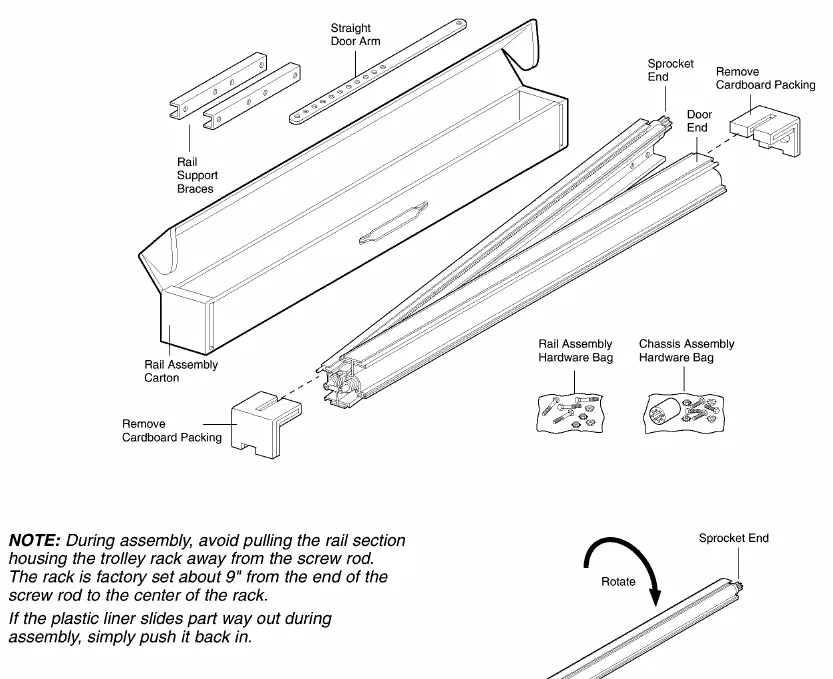
- Assemble the rail: Unfold the rails and rotate them so the flat side is down and the screw side is up. Align the rail sections and secure them with the provided rail support braces and hardware.
- Fasten rail to motor unit: Slide the rail through the motor unit bracket and secure it with hex screws and lock nuts.
- Install the trolley: Slide the trolley onto the rail until it snaps into place. Ensure the release arm is horizontal (lock position) and the arrow points away from the motor unit.
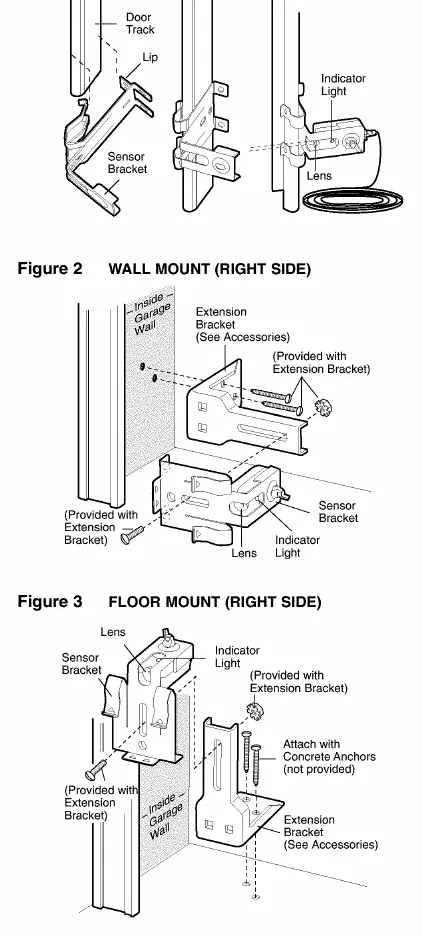
Installation
Installation involves several critical steps:
- Header bracket: Must be rigidly fastened to a structural support on the header wall or ceiling. Do not install over drywall.
- Safety reversing sensor: This is a required safety device. Install the sensors no higher than 6 inches above the floor. The sending eye (orange light) and receiving eye (green light) must be aligned so the invisible beam is unobstructed.
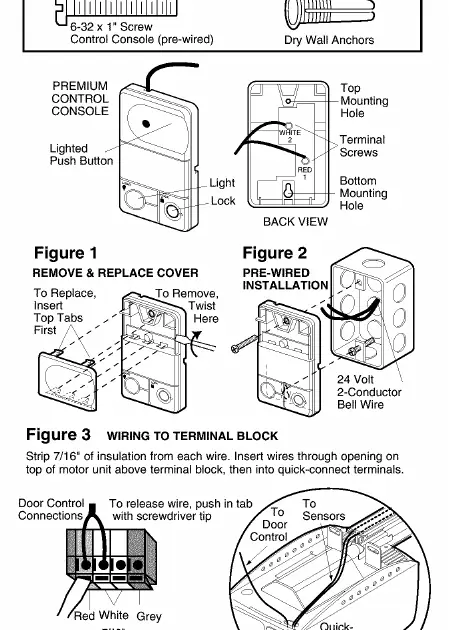
- Door control: Install within sight of the door, at least 5 feet above the floor, and away from moving parts.
- Door bracket: Center the bracket on the door and secure it with the provided hardware. Reinforce the door if necessary.
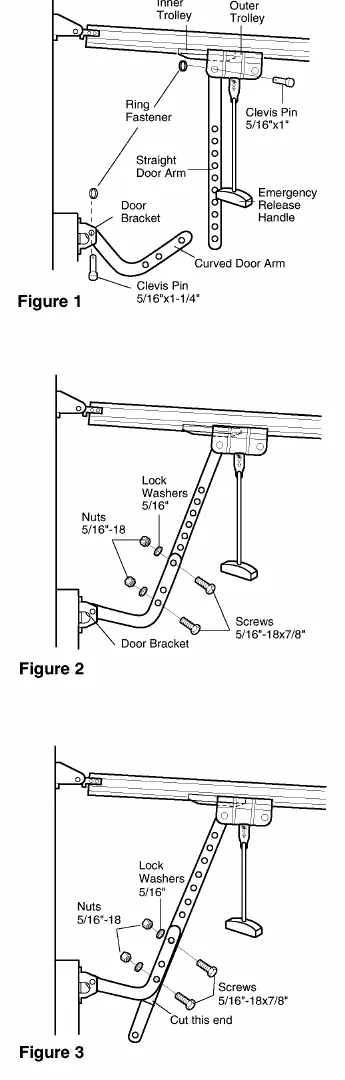
- Door arm: Connect the door arm to the trolley and the door bracket.
Adjustment
After installation, you must adjust the travel limits and force:
- Travel limits: Regulate the points at which the door stops when moving up or down. Use the adjustment screws on the side panel.
- Force: Regulate the amount of power required to open and close the door. Use the adjustment controls on the back panel.
- Safety reversal test: This test is mandatory. Place a one-inch high object (or a 2x4 laid flat) on the floor. The door must reverse upon striking the obstruction.
Operation and programming
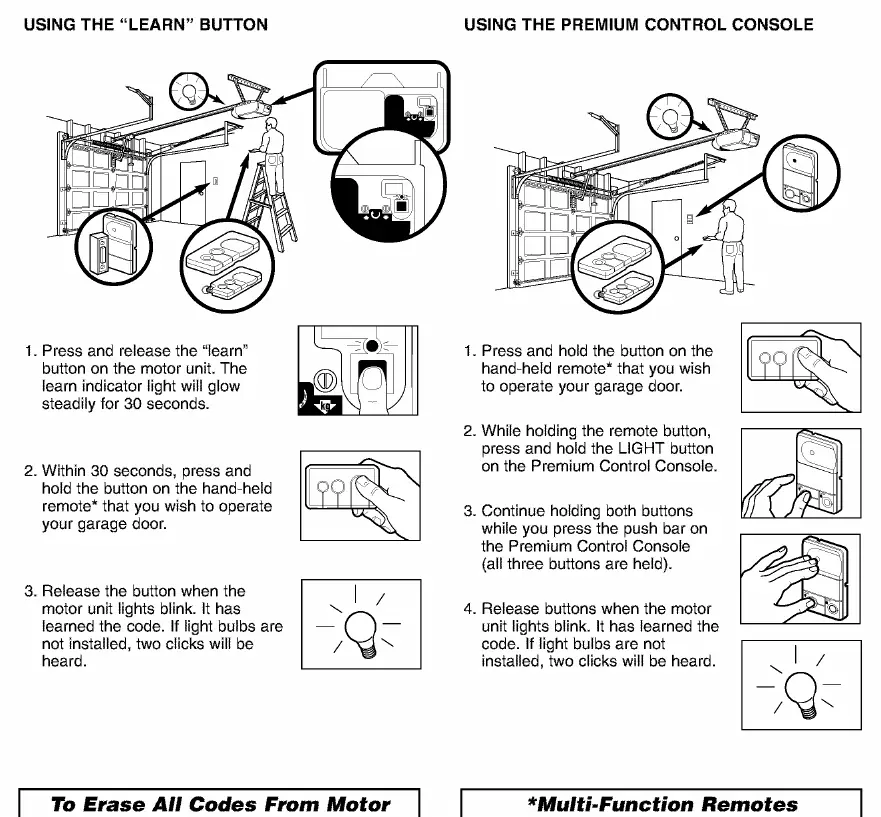
The opener can be activated via the hand-held remote control, the wall-mounted door control, or an optional keyless entry system. To program additional remotes, press the 'learn' button on the motor unit and then press the button on the remote you wish to program.
Maintenance
- Monthly: Manually operate the door to check for binding or imbalance. Repeat the safety reversal test.
- Yearly: Oil door rollers, bearings, and hinges. Do not grease the door tracks.
Troubleshooting
If the opener does not operate, check for electric power, ensure all door locks are disabled, and verify that the garage door spring is not broken. If the door reverses for no apparent reason, check the safety sensors for alignment and obstructions.
Manufacturer information
CRAFTSMAN
Practical help
Common problems
Opener does not operate from door control or remote
Check for electric power, ensure all door locks are disabled, check for ice/snow under the door, or check if the motor overload protector has tripped (wait 15 minutes).
Door reverses for no apparent reason
Check safety sensors for alignment or obstructions, clear ice/snow from the floor, or adjust the force/travel limits.
Remote control has short range
Change the location of the remote in your car or ensure the antenna on the motor unit is fully extended downward.
Before use
- Disable all door locks.
- Remove all ropes connected to the garage door.
- Ensure the door is balanced and does not bind.
- Verify the door closes on the floor all the way across.
- Ensure the garage door opener is connected to a 120V, 60 Hz outlet.
Specs in practice
- 100 watts maximum
- Maximum wattage for light bulbs.
Images and diagrams
- Rail assembly: Shows how to connect rail sections and attach to the motor unit.
- Safety sensor installation: Shows how to mount sensors on the door track, wall, or floor.
- Door arm connection: Shows how to connect the door arm to the trolley and door bracket.
Model compatibility
- For residential use only.
- Compatible with Security+ remote controls.
- Requires 120V, 60 Hz power.

Manual page author
Michael Turner
Technical manual editor
Reviews PDF manuals for structure, safety notes, and practical product details so readers can find the right information quickly.