Home Appliances / Dehumidifiers
User Manual for CREATE Thera Retro Pro Espresso Machine
Quick guide for the CREATE Thera Retro Pro espresso machine. Includes setup, operation, cleaning, descaling, and troubleshooting steps.
Quick answers from the manual
Quick answer
- To use the CREATE Thera Retro Pro, fill the water and milk tanks, insert the desired filter into the portafilter, add ground coffee, lock the portafilter into the brew head, and select your beverage (Espresso, Cappuccino, or Latte) on the control panel. p. 9, 11, 13
Key actions
- Priming the unit p. 10
- Brewing coffee p. 12, 13
First start
- Remove protective piece from water tank, wash parts, and prime the unit. p. 9, 10
Problems and fixes
Coffee does not come out
Add water, use medium grind, fill with less coffee.
p. 18Maintenance and reset
- Descaling: Fill tank with 600ml water and descaler, press Espresso and Latte buttons simultaneously. p. 14, 17
Technical specifications
| Parameter | Value | Meaning | Pages |
|---|---|---|---|
| Espresso (Single) | 60 ml | Beverage ratio | p. 10 |
Where to find it in the PDF
- Parts List p. 8
- Control Panel p. 9
Table of contents
Manual images
Click an image to enlargeQuick guide from the manual
The CREATE Thera Retro Pro is a semi-automatic espresso machine designed for home use. Before first use, ensure you remove the protective piece from the bottom of the water tank. Wash all removable parts (water tank, milk tank, filters, portafilter) with mild detergent. Prime the unit by running a steam cycle for 90 seconds with water in both tanks.
Parts list
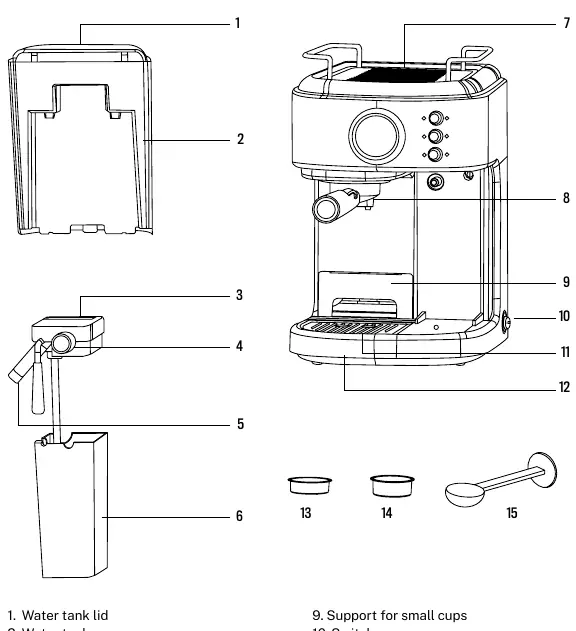
- Water tank and lid
- Milk tank and lid
- Control knob
- Steam nozzle
- Filter holder (portafilter)
- Drip tray and plate
- 1-cup and 2-cup filters
- Coffee measuring spoon and tamper
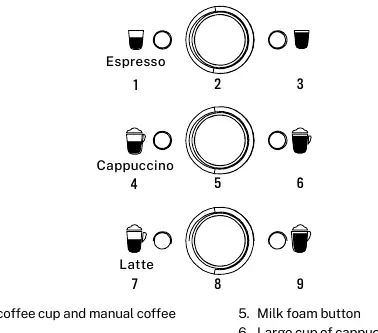
Control panel
The control panel features buttons for Espresso, Cappuccino, and Latte. Lights indicate the status of the machine. Blinking lights mean the unit is heating; solid lights mean it is ready.
Operating instructions
Filling the tanks
Fill the water tank between the MIN and MAX levels. Never use warm or hot water. Fill the milk tank with cold milk between the MIN and MAX levels.
Brewing coffee
- Choose the appropriate filter (1-cup or 2-cup).
- Insert the filter into the portafilter, aligning the notch with the groove.
- Fill the filter with fine-ground espresso coffee and tamp it firmly.
- Clean excess coffee from the rim.
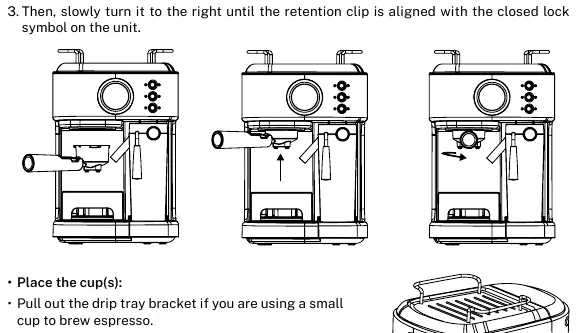
- Lock the portafilter into the brew head by turning it to the right until the retention clip aligns with the closed lock symbol.
- Place your cup on the drip tray.
- Turn the switch to the I position. Once the lights are solid, press the button for your desired beverage (Espresso, Cappuccino, or Latte).
Cleaning and maintenance
Clean the unit after every use. The milk tank and frothing tube should be cleaned regularly to prevent clogging. To clean the frothing tube, place a cup under it, turn the Froth Control Knob to the clean position, and hold the latte/clean button for 3 seconds.
Descaling
The machine will remind you to descale when the six indicators flash quickly. Fill the water tank with 600 ml of water and descaler. Press the Espresso and Latte buttons simultaneously to start the automatic descaling process. Follow the prompts to rinse the system with clean water afterward.
Troubleshooting
If coffee does not come out, check if the water tank is empty, the grind is too fine, or the filter is overfilled. If coffee leaks around the portafilter, ensure it is fully locked and the rim is clean. If milk is not foamy, ensure the milk is cold and the frothing tube is not blocked.
Manufacturer information
Create
Practical help
Common problems
Coffee does not come out
Check if the water tank is empty, the coffee grind is too fine, or the filter is overfilled. Ensure the unit is turned on.
Coffee leaks around the portafilter
Ensure the portafilter is fully locked into the brew head and the rim is clean of coffee grounds.
Milk is not foamy
Ensure the milk is cold, the water tank has enough water, and the frothing tube is clean.
Before use
- Remove the protective piece from the bottom of the water tank.
- Wash the water tank, milk tank, filters, and portafilter with mild detergent.
- Prime the unit by running a steam cycle for 90 seconds.
- Ensure the unit is on a hard, flat surface.
Specs in practice
- Espresso (Single)
- 60 ml
- Espresso (Double)
- 119 ml
- Cappuccino (Single)
- 178 ml
- Cappuccino (Double)
- 355 ml
- Latte (Single)
- 296 ml
- Latte (Double)
- 474 ml
Images and diagrams
- The parts list diagram identifies the water tank, milk tank, control knob, steam nozzle, and filter holder.
- The control panel diagram shows the buttons for Espresso, Cappuccino, and Latte functions.
- The portafilter installation diagram shows how to lock the handle into the brew head.
Model compatibility
- The 1-cup filter is compatible with ESE (44 mm) pods.

Manual page author
David Miller
Documentation analyst
Organizes user manual content into clear summaries, with attention to model details, product context, and everyday usability.