Lighting / Fixtures
Installation and Assembly Guide for Crystorama 1112-PB-CL-MWP Chandelier
A comprehensive installation and assembly guide for the Crystorama 1112-PB-CL-MWP chandelier. Includes step-by-step wiring instructions, crystal placement diagrams, parts list, and safety requirements.
Quick answers from the manual
Quick answer
- This manual provides assembly and installation instructions for the Crystorama 1112-PB-CL-MWP chandelier, including crystal placement, part identification, and wiring steps. p. 1, 2
Key actions
- Install arms p. 1
- Assemble bottom section p. 1
- Install mounting bar p. 1
- Adjust hanging height p. 1
- Wire and canopy installation p. 1
- Dress crystals p. 1
First start
- Preparation p. 1
- Electrical safety p. 1
Show 2 more answers Show less
Technical specifications
| Parameter | Value | Meaning | Pages |
|---|---|---|---|
| Bulb Type | 12- Candelabra Base | Recommended 40 Watts, 60 Watts Max | p. 1 |
| Rating | Damp rated | Suitable for damp locations | p. 1 |
Where to find it in the PDF
- Assembly instructions and crystal sets p. 1
- Part numbers and exploded view p. 2
Table of contents
Manual images
Click an image to enlargeImportant Information and Safety
This chandelier must be installed by a licensed electrician in accordance with the National Electric Code and local electrical codes. The fixture is damp-rated, making it suitable for areas with some moisture. Always turn off the power at the circuit breaker before beginning installation.
Bulb Requirements: You will need 12 Candelabra base bulbs. The recommended wattage is 40W, with a maximum of 60W per bulb. LED bulbs are recommended for extended use.
Installation Steps
- Prepare the workspace: Place all fixture parts on a soft, cloth-covered platform to prevent scratching.
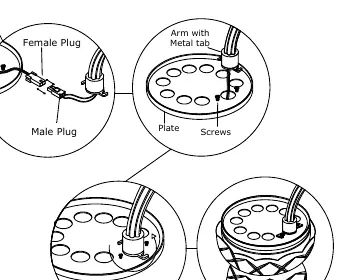
- Install the arms: Slightly loosen each screw on the metal plate. Pull a female plug through the hole in the upper metal plate. Connect the male plug at the end of the arm with the female plug. Push the arm end with the metal tab through the hole until it stops. Twist the metal tab counter-clockwise until both inserts lock onto the loose screws. Tighten the screw to secure the arm. Repeat for all arms.
- Assemble the center column: Place the bottom bowl, two metal washers, the bottom bobeche, and a metal washer over the distributor box in that order. Secure the assembly with the finial.
- Mounting: Attach the mounting bar onto the outlet box.
- Adjust height: Decide the desired hanging height and adjust the chain to the correct length.
- Wiring: Raise the fixture to the ceiling and perform the wire connections. Attach the canopy over the mounting bar and secure it with the collar ring.
Crystal Assembly
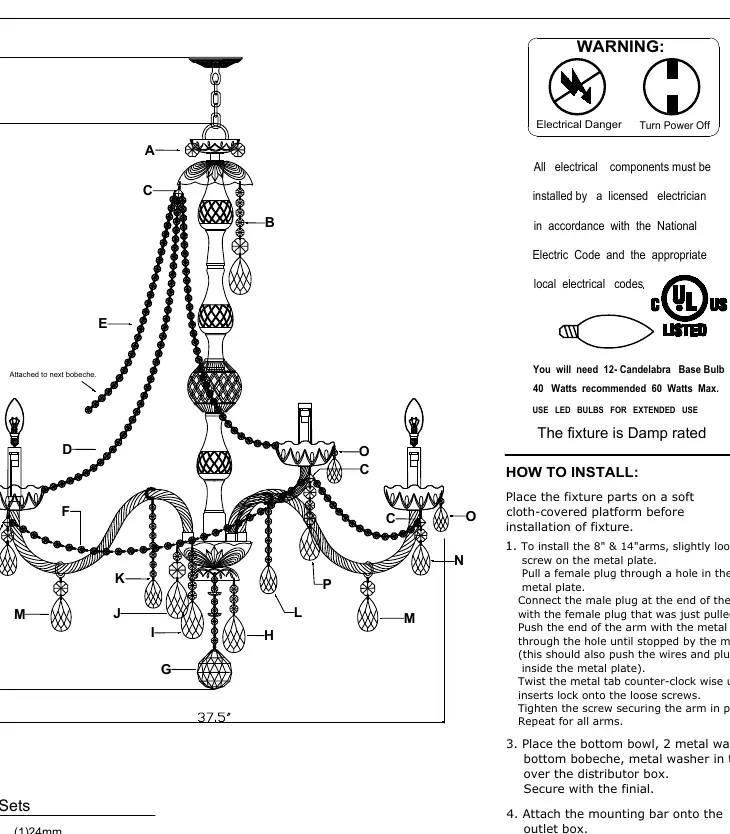
The fixture requires specific crystal sets to be attached as illustrated in the assembly diagram. The sets are labeled A through P:
- A-C: Various crystal strands and squares for the upper sections.
- D-F: Crystal strands for the main body.
- G-P: Decorative crystal sets, including rings of beads and specific ball/rosette combinations, to be dressed as illustrated on the fixture diagram.
Parts List
The fixture includes the following key components:
- Mounting Hardware: Mounting bar, lock washer, hex nut, nipple, canopy, collar ring, collar loop, and chain.
- Center Column: Includes top bobeche, top bowl, glass vases, glass balls, and metal covers.
- Arms: 14-inch arms (N) and 8-inch arms (O) with holders.
- Electrical: Wire connectors, male/female plugs, and distributor box.
- Finishing: Bottom bowl, bottom bobeche, metal washers, and finial.
Manufacturer information
Crystorama
Practical help
Common problems
Arm is loose or not secure
Ensure the metal tab on the arm is twisted counter-clockwise until both inserts lock onto the loose screws on the metal plate, then tighten the screw.
Wiring connection difficulty
Ensure the male plug at the end of the arm is firmly connected to the female plug pulled through the metal plate before pushing the wires back inside.
Before use
- Turn off power at the circuit breaker.
- Ensure you have 12 Candelabra base bulbs (max 60W).
- Verify all parts (A-V) are present according to the parts list.
- Prepare a soft, cloth-covered surface for assembly.
- Confirm the outlet box is capable of supporting the fixture weight.
Show more Show less
Specs in practice
- Candelabra Base
- Standard E12 bulb socket type.
Images and diagrams
- The assembly diagram shows the correct order for stacking the center column components (bowl, washers, bobeche).
- The arm detail diagram illustrates how to connect the male/female plugs and lock the arm into the metal plate.
Model compatibility
- LED bulbs are recommended for extended use.
- Fixture is not intended for outdoor use in direct rain.

Manual page author
Michael Turner
Technical manual editor