Lighting / Fixtures
Crystorama 1130-PB-CL-MWP Chandelier User Manual
Quick guide for the Crystorama 1130-PB-CL-MWP chandelier. Includes installation steps, wiring instructions, bulb requirements, and crystal assembly guide.
Quick answers from the manual
Quick answer
- This manual provides assembly and installation instructions for the Crystorama 1130-PB-CL-MWP chandelier, including wiring, crystal dressing, and part identification. p. 1, 2
Key actions
- Install arms by loosening screws on the metal plate, connecting plugs, pushing the arm through the hole, twisting the tab to lock, and tightening the screws. p. 1
- Assemble the center column by screwing the kit onto the distributor box, then stacking the bottom bowl, metal washer, bobeche, and metal washer, securing with the finial. p. 1
- Mount the fixture by attaching the mounting bar to the outlet box, adjusting the chain length, connecting wires, and securing the canopy. p. 1
- Dress the crystals according to the provided sets (A-F). p. 1
First start
- Prepare the installation area by placing parts on a soft cloth-covered platform. p. 1
- Install 10 Candelabra Base bulbs (40W recommended, 60W max). LED bulbs are recommended for extended use. p. 1
Show 2 more answers Show less
Technical specifications
| Parameter | Value | Meaning | Pages |
|---|---|---|---|
| Bulb Type | Candelabra Base | Required bulb base type | p. 1 |
| Bulb Wattage | 40W recommended, 60W max | Recommended and maximum wattage per bulb | p. 1 |
| Bulb Quantity | 10 | Number of bulbs required | p. 1 |
| Rating | Damp rated | Environmental suitability | p. 1 |
Where to find it in the PDF
- Assembly Instructions and Crystal Sets p. 1
- Part Numbers and Diagrams p. 2
Table of contents
Quick guide from the manual
This document provides assembly and installation instructions for the Crystorama 1130-PB-CL-MWP chandelier. Please note that all electrical components must be installed by a licensed electrician in accordance with the National Electric Code and local electrical codes. The fixture is damp-rated, making it suitable for areas with moisture.
Bulb requirements
The fixture requires 10 Candelabra base bulbs. The recommended wattage is 40W, with a maximum of 60W per bulb. It is highly recommended to use LED bulbs for extended use.
Installation instructions
Before beginning, place all fixture parts on a soft, cloth-covered platform to prevent damage or scratching.
Arm installation
- Slightly loosen each screw on the metal plate.
- Pull a female plug through a hole in the upper metal plate.
- Connect the male plug at the end of the upper arm with the female plug that was just pulled.
- Push the end of the arm with the metal tab through the hole until stopped by the metal tab (this should also push the wires and plugs back inside the metal plate).
- Twist the metal tab counter-clockwise until both inserts lock onto the loose screws.
- Tighten the screw to secure the arm in place.
- Repeat this process for all 6-inch and 10-inch arms.
Fixture assembly
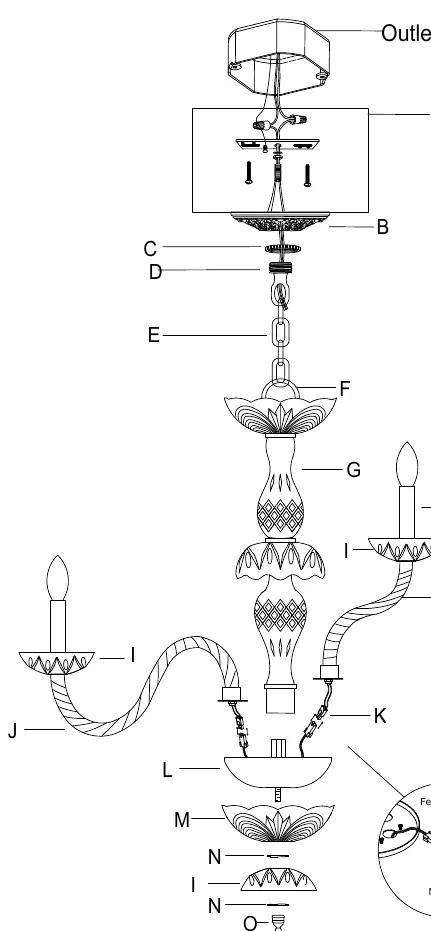
- Screw the center column kit onto the distributor box.
- Place the bottom bowl, metal washer, bobeche, and metal washer in that order over the distributor box. Secure with the finial.
- Attach the mounting bar onto the outlet box.
- Decide the desired hanging height and adjust the chain to the correct length.
- Raise the fixture up to perform the wire connection. Attach the canopy over the mounting bar and secure with the collar ring.
- Dress the crystals as illustrated in the crystal sets diagram.
Safety warnings
This product can expose you to lead, which is known to the State of California to cause cancer and/or birth defects or reproductive harm. Always turn off power at the circuit breaker before beginning installation.
Manufacturer information
Crystorama
Practical help
Common problems
Arm not locking securely
Ensure the metal tab is twisted counter-clockwise until both inserts lock onto the loose screws on the metal plate.
Wiring connection issues
Ensure the male plug from the arm is fully inserted and connected to the female plug inside the distributor box before pushing the wires back into the plate.
Before use
- Turn off power at the circuit breaker.
- Ensure you have 10 Candelabra base bulbs.
- Verify the ceiling outlet box can support the fixture weight.
- Place parts on a soft, cloth-covered surface to prevent scratching.
- Confirm you have a licensed electrician for installation.
Show more Show less
Images and diagrams
- The arm installation diagram illustrates the plug-in mechanism where the male plug connects to the female plug and the metal tab locks onto the plate screws.
Model compatibility
- Use LED bulbs for extended use.

Manual page author
Michael Turner
Technical manual editor