Lighting / Fixtures
Crystorama 130-MK_CEILING Three Light Ceiling Mount Installation Guide
Installation guide for the Crystorama 130-MK_CEILING light fixture. Includes step-by-step instructions for both hanging and flush ceiling mount configurations, parts list, and safety warnings.
Quick answers from the manual
Quick answer
- This manual provides installation instructions for the Crystorama 130-MK_CEILING fixture, covering both hanging and ceiling-mount configurations, including crystal placement and bulb requirements. p. 1
Key actions
- Install as a hanging fixture p. 1
- Install as a ceiling fixture p. 1
- Hang crystals p. 1
First start
- Ensure installation is performed by a licensed electrician. p. 1
- Install 3 Candelabra Base bulbs (40W recommended, 60W max). p. 1
Show 2 more answers Show less
Technical specifications
| Parameter | Value | Meaning | Pages |
|---|---|---|---|
| Bulb Type | Candelabra Base | Required bulb base type | p. 1 |
| Bulb Wattage | 40W recommended, 60W max | Recommended and maximum wattage per bulb | p. 1 |
| Fixture Rating | Damp rated | Suitable for damp locations | p. 1 |
Where to find it in the PDF
- Assembly Instructions p. 1
- Parts List and Diagrams p. 2
Table of contents
Manual images
Click an image to enlargeImportant Information
This fixture is damp rated and suitable for use in bathrooms or covered outdoor areas. All electrical components must be installed by a licensed electrician in accordance with the National Electric Code and appropriate local electrical codes. Ensure power is turned off at the circuit breaker before beginning installation.
Bulb Requirements: Use 3 Candelabra Base bulbs. 40 Watts is recommended, with a maximum of 60 Watts per bulb. LED bulbs are recommended for extended use.
Parts List
- A: Mounting hardware
- B: Canopy (W 5-7/8" x H 1-1/8")
- C: Finial
- D: Loop
- E: Chain (L 72", 4mm thick)
- F: Metal ring
- G: Bottom basket
- H: Socket
Installation - Hanging
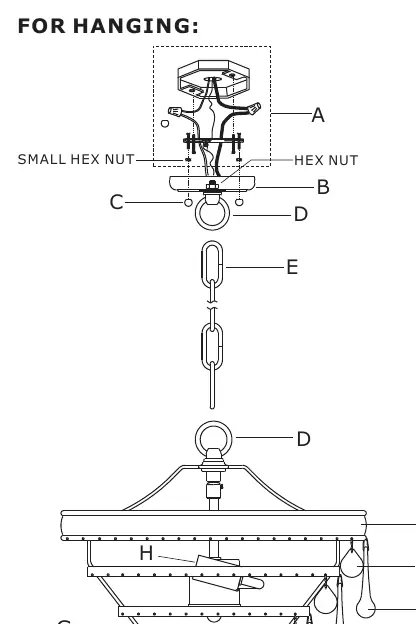
- Determine the preferred hanging height and adjust the chain as required.
- Open one link of the chain, connect it to the fixture loop, and close the link. Open the other end of the chain, connect it to the canopy loop, and close the link.
- Thread the mounting screws into the matching holes of the mounting bar and tighten with the small hex nut.
- Secure the mounting bar to the outlet box using the outlet box screws.
- Raise the canopy, allowing the mounting screws to protrude through the holes in the canopy, and secure with the ball nut.
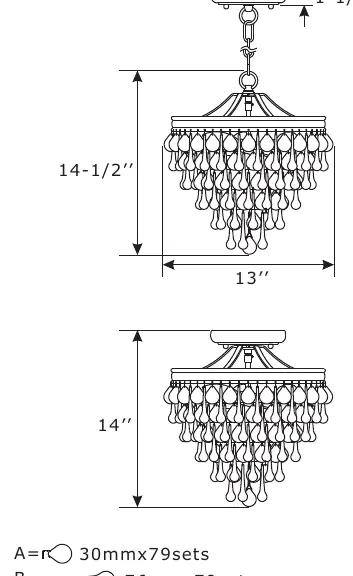
- Hang crystals to the metal ring and bottom basket, alternating between glass drop A and B.
- Hang glass drop C at the bottom of the bottom basket.
- Install the bulbs into the sockets.
Installation - Ceiling Mount
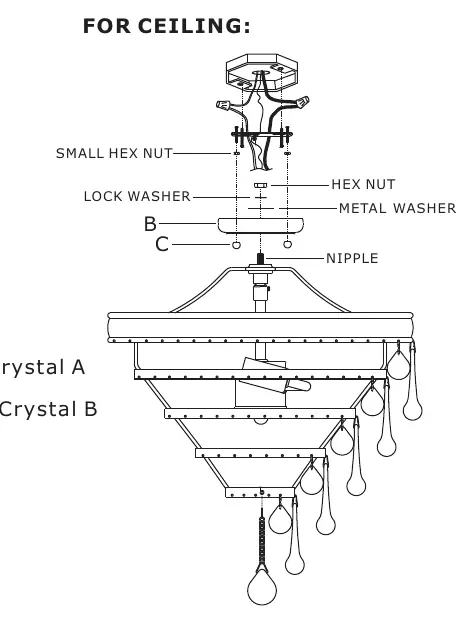
- Loosen the hex nut of the canopy and disassemble the canopy.
- Remove the loop from the top of the fixture.
- Slip the canopy, metal washer, and lock washer over the nipple, then secure with the hex nut.
- Thread the mounting screws into the matching holes of the mounting bar and tighten with the small hex nut.
- Secure the mounting bar to the outlet box using the outlet box screws.
- Raise the canopy, allowing the mounting screws to protrude through the holes in the canopy, and secure with the ball nut.
- Install the bulbs into the sockets.
- Hang crystals to the metal ring and bottom basket, alternating between glass drop A and B.
- Hang glass drop C at the bottom of the bottom basket.
Crystal Assembly
The fixture requires specific crystal placement to achieve the correct look. Hang crystals on the rings alternating between crystals A and B. Finally, attach the single glass drop C to the very bottom of the bottom basket.
Manufacturer information
Crystorama
Practical help
Common problems
Fixture is not level
Ensure the mounting bar is securely and levelly attached to the outlet box. Adjust the ball nuts on the canopy to balance the fixture.
Bulb does not fit
Ensure you are using Candelabra Base bulbs. Standard medium base bulbs will not fit.
Missing hardware
Verify all parts listed in the Parts List (A-H) are present before starting installation.
Before use
- Turn off power at the circuit breaker.
- Verify you have 3 Candelabra Base bulbs (max 60W each).
- Confirm the outlet box is capable of supporting the fixture weight.
- Ensure all parts (A-H) are unpacked and identified.
- Have a licensed electrician available for installation.
Show more Show less
Specs in practice
- Candelabra Base
- The standard E12 bulb base size required for this fixture.
Images and diagrams
- The hanging configuration utilizes the chain (E) and loops (D) to suspend the fixture.
- The ceiling configuration removes the chain and loops, attaching the canopy directly to the fixture nipple.
Model compatibility
- Must be installed by a licensed electrician.
- Complies with National Electric Code.

Manual page author
Michael Turner
Technical manual editor