Lighting / Fixtures
Crystorama 1485-HB-CL-MWP Ceiling Light Installation Guide
Installation guide for the Crystorama 1485-HB-CL-MWP ceiling light. Includes assembly steps, crystal set configuration, bulb requirements, and parts identification.
Quick answers from the manual
Quick answer
- This manual provides assembly and installation instructions for the Crystorama 1485-HB-CL-MWP ceiling light, including crystal placement and bulb requirements. p. 1
Key actions
- Inventory all parts and components. p. 1
- Attach fixture to outlet box. p. 1
- Install bobeches and bulbs. p. 1
- Dress the fixture with crystals. p. 1
First start
- Inventory parts and attach fixture to outlet box. p. 1
Show 2 more answers Show less
Technical specifications
| Parameter | Value | Meaning | Pages |
|---|---|---|---|
| Bulb Type | 5 - Candelabra Base Bulb | Required bulb type | p. 1 |
| Wattage | 40 Watts recommended, 60 Watts Max | Recommended and maximum wattage per bulb | p. 1 |
| Dimensions | 21.5" x 19" | Fixture width and height | p. 2 |
| Rating | Dry rated | Environmental suitability | p. 1 |
Where to find it in the PDF
- Assembly Instructions p. 1
- Part Numbers and Diagram p. 2
Table of contents
Manual images
Click an image to enlargeImportant Information
This document provides assembly and installation instructions for the Crystorama 1485-HB-CL-MWP ceiling light. Please ensure all parts are accounted for before beginning installation. This fixture is dry-rated and must be installed by a licensed electrician in accordance with the National Electric Code and local electrical codes.
Safety Warnings
- Electrical Danger: Always turn off the power before starting installation.
- Professional Installation: All electrical components must be installed by a licensed electrician.
- Hazardous Materials: This product contains lead, which is known to the State of California to cause cancer and/or birth defects or reproductive harm.
Installation Instructions
- Perform a complete inventory of all parts and components before starting.
- Safely attach the fixture to the outlet box.
- Install the bobeches and bulbs.
- Connect the power.
- Dress the fixture with crystals, starting with the pocket labeled (A).
- Apply crystal sets in alphabetical order (A, B, C).
Crystal Assembly
The fixture requires specific crystal sets to be installed in the following order:
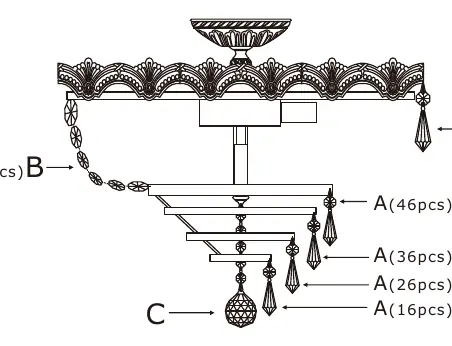
- Set A: 214 sets total. Each set consists of (1) 14mm crystal + AS2-1.5".
- Set B: 50 sets total. Each set consists of (1) 28mm + (1) 26mm + (1) 24mm + (1) 20mm + (1) 18mm + (1) 16mm.
- Set C: 1 piece. Consists of (5) 14mm crystals + AS8-40mm Ball.
Parts List
The fixture includes the following components:
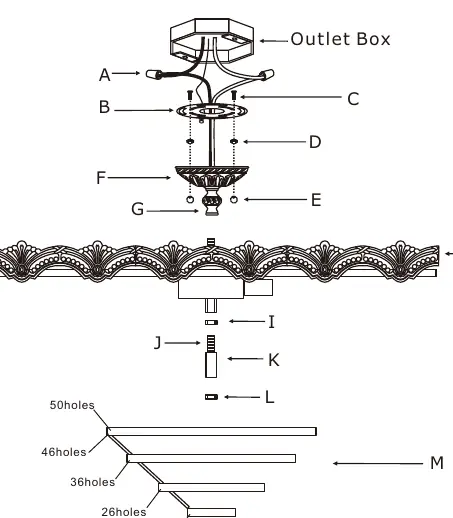
- Wire Connectors (2)
- Mounting Bar (1)
- Screw (1)
- Hex Nut (1)
- Ball Nut (1)
- Canopy (1)
- Vase (1)
- Banding Kit (1) - Includes decorative banding with 90 pin holes and inner metal ring with 50 pin holes.
- Nut (1)
- Thread (1)
- Metal Tube (1)
- Nut (1)
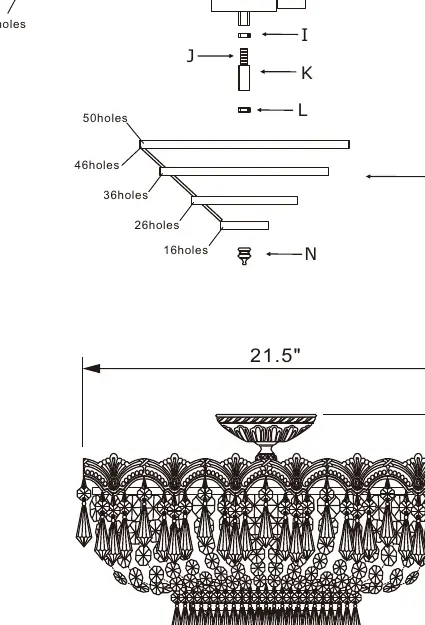
- 4-Tier Basket (1) - Includes pin holes for 50, 46, 36, 26, and 16 crystals.
- Finial (1)
Technical Specifications
- Bulb Requirements: 5 x Candelabra Base bulbs.
- Wattage: 40 Watts recommended, 60 Watts maximum. LED bulbs are recommended for extended use.
- Rating: Dry rated.
- Dimensions: 21.5" diameter x 19" height.
Manufacturer information
Crystorama
Practical help
Common problems
Fixture does not light up
Ensure the power is on, check that bulbs are properly seated, and verify that the bulbs used do not exceed the 60W maximum.
Crystal installation confusion
Ensure crystals are applied in alphabetical order (A, B, C) and verify the correct pin hole counts on the basket and banding.
Before use
- Turn off power at the circuit breaker.
- Verify all parts are present against the parts list.
- Ensure the outlet box is securely installed.
- Confirm you have 5 Candelabra Base bulbs (LED recommended).
- Ensure the installation area is dry (dry rated fixture).
Show more Show less
Images and diagrams
- The crystal diagram shows the specific pin hole locations for sets A and B on the fixture rings.
- The exploded view diagram illustrates the assembly sequence from the outlet box down to the finial.
Model compatibility
- Must be installed in accordance with National Electric Code.
- Not suitable for damp or wet locations.

Manual page author
Michael Turner
Technical manual editor