Lighting / Fixtures
Assembly Instructions for Crystorama 2112-AG Chandelier
A comprehensive assembly and installation guide for the Crystorama 2112-AG chandelier. Includes step-by-step instructions, glass handling precautions, bulb specifications, and a complete parts list.
Quick answers from the manual
Quick answer
- The Crystorama 2112-AG is a dry-rated chandelier. Assembly requires two people and should be performed by a licensed electrician. Use a medium base bulb (40W recommended, 60W max). p. 1
Key actions
- Place the glass shade horizontally on the EPS foam block during assembly to prevent breakage. p. 1
Technical specifications
| Parameter | Value | Meaning | Pages |
|---|---|---|---|
| Bulb Type | Medium Base | Standard medium base bulb | p. 1 |
| Max Wattage | 60W | Maximum allowed wattage | p. 1 |
Show 1 more answers Show less
Where to find it in the PDF
- Assembly Instructions p. 1
- Parts List p. 2
Table of contents
Quick guide from the manual
The Crystorama 2112-AG is a dry-rated chandelier. It is strongly recommended that two people complete the assembly of this item. All electrical components must be installed by a licensed electrician in accordance with the National Electric Code and appropriate local electrical codes.
Safety warnings
- Electrical Danger: Turn off power before starting installation.
- Lead Warning: This product can expose you to Lead, which is known to the State of California to cause cancer and/or birth defects or reproductive harm.
- Fragile Components: The glass shade is fragile. Handle with care and follow specific assembly instructions to avoid breakage.
How to install
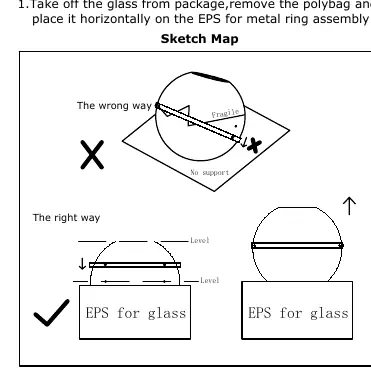
- Prepare the glass: Take the glass shade out of the package, remove the polybag, and place it horizontally on the provided EPS foam block for metal ring assembly.
- Install the metal band: Place the metal band onto the glass shade while resting the glass on the foam block. Hold the metal band straight while another person secures it on the glass using the provided screws.
- Prepare the fixture: Unscrew the decorative nut.
- Install bulbs: Install the light bulb into the socket.
- Assemble the caps: Attach the lower metal cap and socket cluster into the glass shade.
- Finalize: Attach the upper metal cap onto the glass shade and secure it using the decorative nut.
Bulb requirements
- Type: 1-Medium Base Bulb.
- Wattage: 40 Watts recommended, 60 Watts maximum.
- Recommendation: Use LED bulbs for extended use.
- Note: Bulb is not included.
Parts list
The following parts are included with the 2112-AG model:
- Mounting Hardware: Wire nuts, wall anchors, anchor screws, screws, mounting plate, green ground screw.
- Fixture Components: Canopy, rods (12" and 3"), decorative nut, upper metal cap, lower metal cap, socket, metal band, ball nuts, screws, and glass shade.
Manufacturer information
Crystorama
Practical help
Common problems
Glass shade breakage during assembly
Always place the glass shade horizontally on the provided EPS foam block for support when installing the metal ring.
Difficulty holding the metal band while securing
It is strongly recommended that two people perform the assembly to ensure the metal band is held straight while the other person secures it with screws.
Before use
- Ensure you have a licensed electrician available for installation.
- Verify you have two people to assist with the assembly.
- Confirm the installation location is dry (this fixture is DRY rated).
- Purchase a medium base bulb (40W recommended, 60W max).
Show more Show less
Specs in practice
- 40 Watts Recommended
- This is the optimal wattage for the fixture; do not exceed 60 Watts.
Images and diagrams
- The Sketch Map on page 1 illustrates the correct way to support the glass shade using the EPS foam block to prevent breakage during assembly.
Model compatibility
- Requires a medium base bulb.
- Not suitable for damp or wet locations.

Manual page author
David Miller
Documentation analyst