Lighting / Fixtures
Assembly Instructions for Crystorama 2263-PN Jennings Three Light Ceiling Mount
Quick assembly and installation guide for the Crystorama 2263-PN Jennings Three Light Ceiling Mount. Includes parts list, bulb replacement steps, and technical specifications.
Quick answers from the manual
Quick answer
- The Crystorama 2263-PN is a three-light ceiling mount fixture. It requires 3 Medium Base bulbs (40W recommended, 60W max) and is rated for dry indoor locations. p. 1
Key actions
- Install mounting bar to outlet box p. 1
- Attach ceiling pan p. 1
First start
- Install bulbs p. 1
Show 3 more answers Show less
Maintenance and reset
- Replace bulb p. 1
Technical specifications
| Parameter | Value | Meaning | Pages |
|---|---|---|---|
| Bulb | 3x Medium Base | Required bulb type | p. 1 |
| Max Wattage | 60W | Maximum wattage per bulb | p. 1 |
Where to find it in the PDF
- Assembly Instructions p. 1
- Parts List p. 2
Table of contents
Manual images
Click an image to enlargeImportant Information
The Crystorama 2263-PN Jennings is a three-light ceiling mount fixture designed for indoor use in dry locations. It requires three Medium Base bulbs. Please ensure all electrical work is performed by a licensed electrician in accordance with the National Electric Code and local electrical codes.
Safety Warnings
- Turn off power: Always turn off the power at the circuit breaker before beginning installation.
- Electrical Hazard: Ensure all electrical components are installed by a licensed professional.
- Lead Warning: This product may expose you to lead, which is known to the state of California to cause cancer and/or birth defects or reproductive harm.
Installation Steps
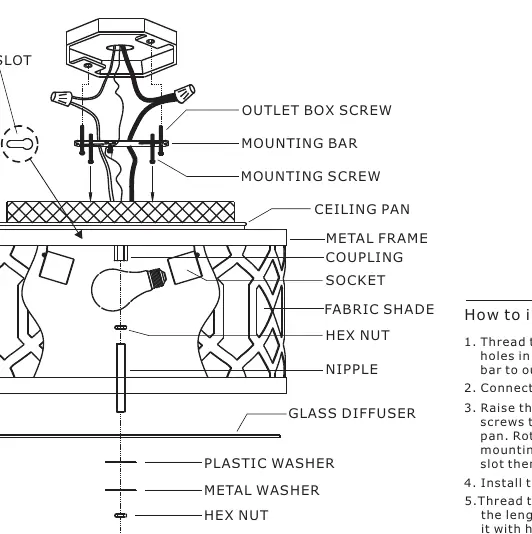
- Thread the mounting screws into the matching holes in the mounting bar.
- Secure the mounting bar to the outlet box using the outlet box screws.
- Connect the fixture wires to the supply wires in the outlet box.
- Raise the ceiling pan, allowing the mounting screws to protrude through the key slots on the ceiling pan.
- Rotate the ceiling pan clockwise until the mounting screws are in the narrow parts of the key slots, then tighten the screws with a screwdriver.
- Install three Medium Base bulbs (not included) into the sockets.
- Thread the nipple onto the coupling and adjust the length of the nipple to fit with the glass. Tighten it with the hex nut.
- Slide the glass diffuser, the plastic washer, and the metal washer over the nipple, then secure with the hex nut.
- Slide the cap over the nipple, then secure with the bottom finial.
Bulb Replacement
To replace the bulbs, remove the bottom finial and the glass diffuser to access the sockets. Replace the previous bulbs with new ones and reassemble the diffuser and finial.
Parts List
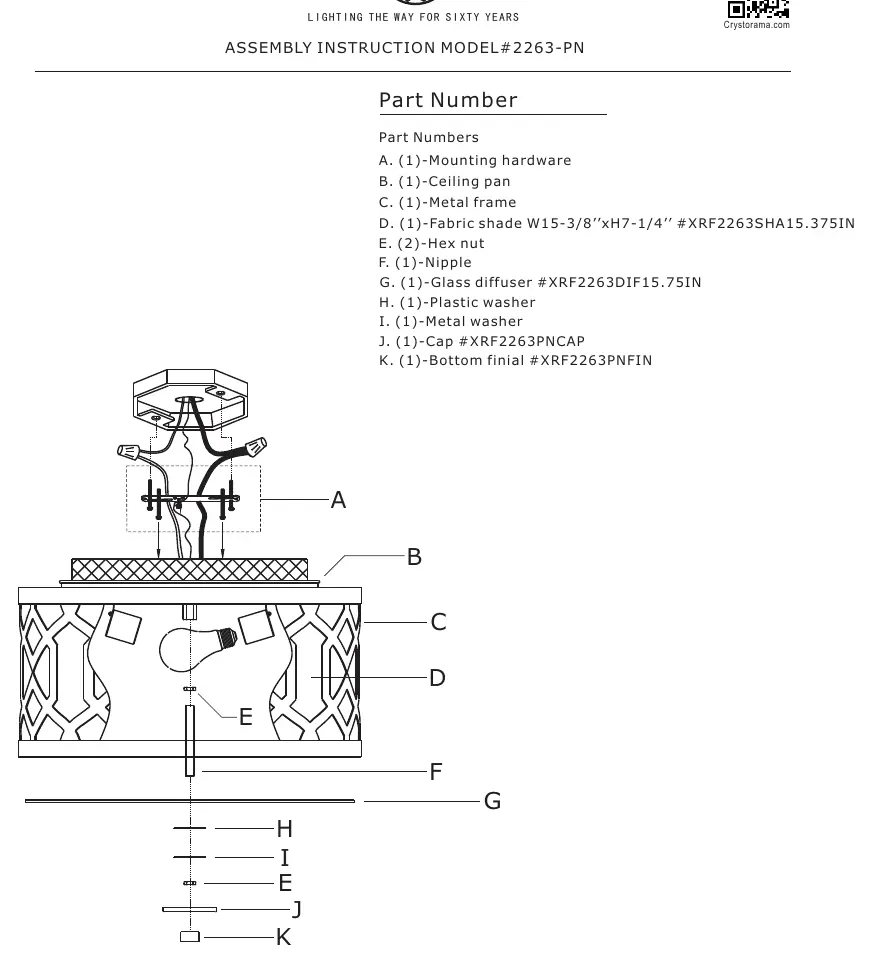
- Mounting hardware
- Ceiling pan
- Metal frame
- Fabric shade
- Hex nuts
- Nipple
- Glass diffuser
- Plastic washer
- Metal washer
- Cap
- Bottom finial
Manufacturer information
Crystorama
Practical help
Common problems
Fixture not working after installation
Verify that the power is turned on at the circuit breaker and that the bulbs are securely installed in the sockets.
Glass diffuser is loose
Ensure the hex nut securing the diffuser to the nipple is tightened properly.
Before use
- Ensure power is turned off at the circuit breaker.
- Verify you have 3 Medium Base bulbs (40W recommended, 60W max).
- Check that the outlet box is secure and capable of supporting the fixture.
- Confirm the installation location is dry (not suitable for damp/wet areas).
Show more Show less
Images and diagrams
- The assembly diagram illustrates the sequence of parts from the mounting bar at the ceiling down to the bottom finial.
- Key slots on the ceiling pan are designed to lock onto the mounting screws when rotated clockwise.
Model compatibility
- This fixture is dry rated only.
- Bulbs are not included.

Manual page author
Emily Carter
User documentation editor