Lighting / Fixtures
Assembly Instructions for Crystorama 2264-PN-LED Bathroom Vanity Light
Quick guide for installing the Crystorama 2264-PN-LED bathroom vanity light. Includes mounting instructions, electrical safety, and parts list.
Quick answers from the manual
Quick answer
- This document provides assembly and installation instructions for the Crystorama 2264-PN-LED bathroom vanity light. p. 1
Key actions
- Install the mounting plate, backplate, glass shade, and metal frame using the provided screws and clips. p. 1
Technical specifications
| Parameter | Value | Meaning | Pages |
|---|---|---|---|
| Power | 26 Watts | LED Module power | p. 1 |
| Dimensions | 23-5/8" x 4-1/2" x 4" | Fixture size | p. 1 |
Show 1 more answers Show less
Where to find it in the PDF
- Assembly Instructions p. 1
- Parts List p. 2
Table of contents
Quick Guide from the Manual
This manual provides instructions for the Crystorama 2264-PN-LED bathroom vanity light. The fixture is damp-rated and must be installed by a licensed electrician in accordance with the National Electric Code and local electrical codes. Always turn off the power at the circuit breaker before starting installation.
Installation Instructions
- Place the mounting plate over the outlet box and mark two points on the wall at the center of the keyhole on the mounting plate.
- Drill two holes at the marked points and insert the wall anchors.
- Place the mounting plate over the outlet box and secure with outlet box screws. Insert and tighten the anchor screws into the wall anchors until snug.
- Install the backplate onto the mounting plate and secure with the mounting screws.
- Place the glass shade inside the metal frame and secure with the clips.
- Install the metal frame onto the backplate and secure with the side screws.
Mounting Options
The fixture can be mounted both vertically and horizontally.
LED Replacement
To replace the LED module, remove the metal frame and screws to access the previous LED.
Technical Specifications
- Power: 26 Watts (1 LED Module included)
- Dimensions: 23-5/8" x 4-1/2" x 4"
- Rating: Damp rated
Parts List
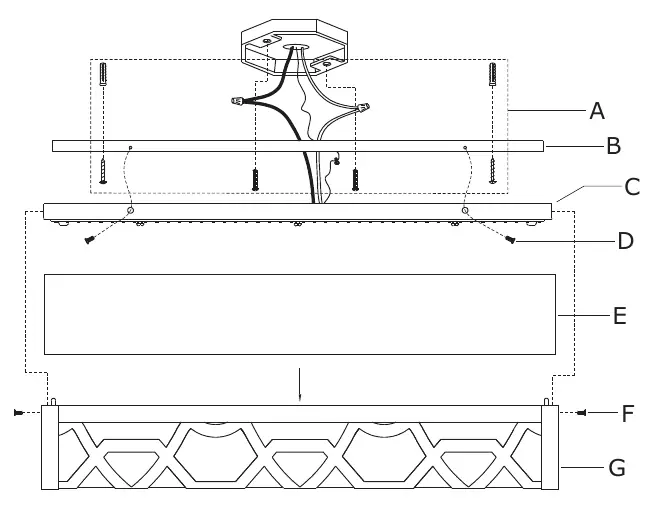
- A: Mounting hardware
- B: Mounting plate
- C: Backplate
- D: Mounting screw
- E: Glass shade
- F: Side screw
- G: Metal frame
Manufacturer information
Crystorama
Practical help
Common problems
Fixture not lighting up
Ensure the power is turned on at the circuit breaker and the LED module is properly connected.
Mounting plate loose
Ensure the anchor screws are tightened into the wall anchors until snug.
Before use
- Turn off power at the circuit breaker
- Ensure installation is performed by a licensed electrician
- Verify all parts (A-G) are present
- Check if the mounting surface is suitable for a damp location
Show more Show less
Images and diagrams
- The assembly diagram illustrates the order of installation: Mounting plate -> Backplate -> Glass shade -> Metal frame.
Model compatibility
- Can be mounted vertically or horizontally.

Manual page author
David Miller
Documentation analyst