Music / Pedalboard Accessories
User Guide for D'Addario DIY Solderless Pedalboard Cable Kit
A comprehensive guide for the D'Addario DIY Solderless Pedalboard Cable Kit. Learn how to assemble custom-length audio cables for your pedalboard or rack gear without soldering, including step-by-step instructions for cutting, inserting...
Table of contents
Manual images
Click an image to enlargeQuick Guide
The D'Addario DIY Solderless Pedalboard Cable Kit is designed to create custom-length audio cables for pedalboards and rack gear without the need for soldering. The system uses a simple cut-and-secure method to provide reliable connections.
Assembly Instructions
Follow these steps to assemble your custom cables:
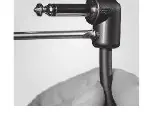
- Cut the cable: Use the included cable cutter to cleanly cut the cable to your desired length. Ensure the cut is clean and free of any loose or overhanging strands of shielding.
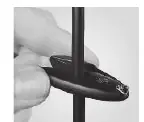
- Prepare the plug: Use the included screwdriver to loosen the set screw on the plug. This allows for clear entry into the plug barrel.
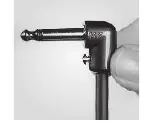
- Insert the cable: Push the cable into the open plug end using a twisting motion until it is fully seated.
- Secure the connection: Completely tighten the set screw to secure the cable and provide strain relief.
Technology and Features
The kit includes specific design features to ensure high-quality audio performance:
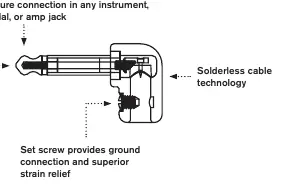
- Patented Geo-Tip Design: Ensures a secure, improved connection in any instrument, pedal, or amp jack.
- 24k Gold-Plated Tips: Provides improved signal flow and corrosion resistance.
- Low Capacitance Cable: Designed to transmit full harmonic detail with high transparency.
- Solderless Technology: Eliminates the need for manual stripping or soldering, reducing the risk of connection errors.
Practical help
Common problems
Connection errors or signal loss
Ensure the cable is cut cleanly without any loose or overhanging strands of shielding that could cause a short.
Cable difficult to insert into the plug
Ensure the set screw is fully loosened and use a 'twisting' motion while pushing the cable into the plug barrel until it is fully seated.
Before use
- Ensure you have the included cable cutter and screwdriver.
- Measure the required cable length for your specific pedalboard layout.
- Verify that the set screw on the plug is loosened before attempting to insert the cable.
- Check that the cable end is cut cleanly.
Specs in practice
- 24k Gold-Plated
- A plating material used on the tips to prevent corrosion and improve signal conductivity.
Images and diagrams
- The assembly diagrams illustrate the three-step process: cutting the cable, inserting it into the plug, and tightening the set screw.
- The comparison diagram shows how the Geo-Tip design provides a more secure connection compared to ordinary cable tips.
Model compatibility
- Compatible with standard instrument, pedal, and amp jacks.

Manual page author
Michael Turner
Technical manual editor
Reviews PDF manuals for structure, safety notes, and practical product details so readers can find the right information quickly.