Lighting / Fixtures
Installation Guide for DALS 2004-3K and 2006-3K LED Recessed Panel Light
Comprehensive installation guide for DALS 2004-3K and 2006-3K LED recessed panel lights. Includes wiring instructions, hole size requirements, and safety precautions.
Quick answers from the manual
Quick answer
- This guide covers the installation of DALS 2004-3K and 2006-3K LED recessed lights, including wiring the junction box and mounting the fixture. p. 1, 2
Key actions
- Shut off power at the circuit breaker before starting installation. p. 2
- Drill a 4-1/4 inch hole for 2004-3K or a 6-1/4 inch hole for 2006-3K. p. 2
Technical specifications
| Parameter | Value | Meaning | Pages |
|---|---|---|---|
| 2004-3K Lumens | 770lm | Light output | p. 1 |
| 2006-3K Lumens | 1100lm | Light output | p. 1 |
Show 1 more answers Show less
Where to find it in the PDF
- Product Specifications and Warranty p. 1
- Installation Instructions p. 2
Table of contents
Manual images
Click an image to enlargeQuick guide from the manual
This document provides installation instructions for DALS LED recessed panel lights, models 2004-3K and 2006-3K. The installation requires basic electrical knowledge and should be performed by a certified electrician.
Safety information
Warning: Installation involves a risk of fire, electric shock, or injury. Always shut off the line feed power at the circuit breaker before starting. Do not expose wiring to edges of sheet metal or sharp objects. This product is suitable for damp locations and is IC-rated for direct contact with insulation.
Installation steps
- Prepare the ceiling: Drill a hole in the ceiling and prepare supply wires. The required hole size is 4-1/4 inches (10.8 cm) for model 2004-3K and 6-1/4 inches (15.9 cm) for model 2006-3K. Strip wires 5/8 inch (1.6 cm).
- Wiring: Open the junction box lid. Use wire nuts to connect the white wire from the line feed to the white wire of the junction box, and the black wire from the line feed to the black wire of the junction box. Connect the ground wire (copper) from the line feed to the green wire of the junction box. Ensure a maximum of 6, #12 conductors in the junction box.
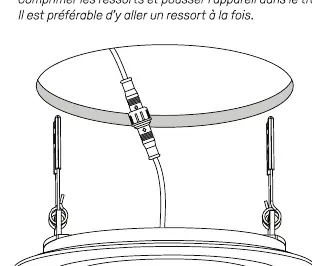
- Connect panel: Route the junction box through the cut-out and connect the LED panel to the junction box using the quick connector.
- Mounting: Compress the springs and push the fixture into the opening. It is easier to do one spring at a time.
Technical specifications
- 2004-3K: 770lm, 11W, 3000K, Dimmable
- 2006-3K: 1100lm, 14W, 3000K, Dimmable
- Beam angle: 110 degrees
Warranty
DALS offers a 5-year warranty from the date of purchase covering the repair or replacement of defective parts of the housing, optics, and electronics. For support, call 1-877-430-1818 or email [email protected].
Practical help
Common problems
Wiring damage or abrasion
Do not expose wiring to edges of sheet metal or other sharp objects.
Junction box overcrowding
Ensure there is a maximum of 6, #12 conductors in the junction box.
Before use
- Shut off power at the circuit breaker
- Ensure installation is performed by a certified electrician
- Verify hole size: 4-1/4 inch for 2004-3K or 6-1/4 inch for 2006-3K
- Strip supply wires 5/8 inch
Show more Show less
Images and diagrams
- The junction box connects to the LED panel via a quick connector.
- The fixture is held in place by spring clips that should be compressed one at a time during installation.
Model compatibility
- Works with most dimmers; refer to DALS website for compatibility list.
- Suitable for damp locations.
- IC-rated for direct contact with insulation.

Manual page author
Emily Carter
User documentation editor