Automotive / Dash Cams
User Manual for DDPAI Mola E3 Rearview Mirror Dash Cam
Quick guide for the DDPAI Mola E3 dash cam. Learn how to install the front and rear cameras, connect via the DDPAI app, adjust settings, and troubleshoot common issues.
Table of contents
Manual images
Click an image to enlargeQuick Guide from the Manual
The DDPAI Mola E3 is a rearview mirror dash cam featuring 1440P front and 1080P rear recording. This guide provides essential steps for installation, app connectivity, and operation. Always ensure the device is installed securely and does not obstruct your driving view.
Product Overview
The device consists of the main rearview mirror unit, a rear camera, power cable, and USB charger. Key physical features include the buckle for mirror mounting, TF card slot, power port, lens, power button, microphone, and reset button.
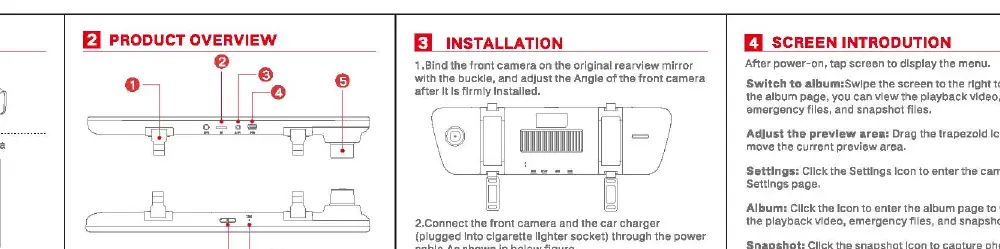
Installation
- Mounting: Secure the front camera to the original rearview mirror using the buckle and adjust the angle until firmly installed.
- Power Connection: Connect the front camera to the car charger using the provided power cable, plugged into the cigarette lighter socket.
- Rear Camera: Install the rear camera as indicated in the diagram.
- Startup: Turn on the engine to power up the dash cam and begin recording.
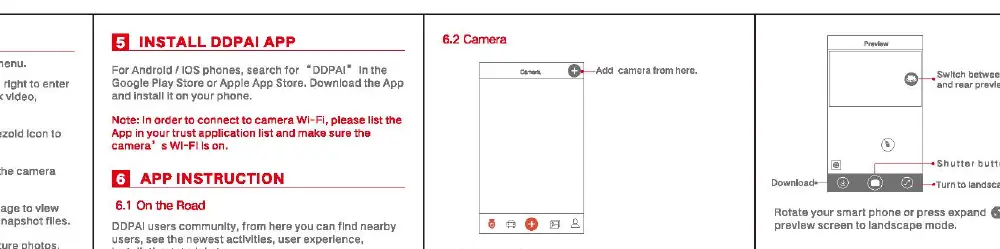
DDPAI App Setup
The DDPAI App allows for remote control, video playback, and settings management.
- Download: Search for 'DDPAI' in the Google Play Store or Apple App Store.
- Connection: Turn on the dash cam's Wi-Fi. In the app, select your dash cam from the network list. The default Wi-Fi name is DDPAI_mola E3_XXXX and the default password is 1234567890.
- Preview/Playback: Once connected, you can view real-time video, download files, and adjust camera settings.
Operation
- Menu Access: Tap the screen after power-on to display the menu.
- Album: Swipe right on the screen to enter the album page to view playback videos and snapshots.
- Settings: Access camera settings, G-Sensor sensitivity, and format the SD card via the app or touch screen.
- Snapshot: Tap the snapshot icon to capture photos.
- MIC: Tap the MIC icon to toggle audio recording.
Maintenance and Safety
- Temperature: The operating temperature range is -20°C to 70°C.
- Cleaning: Do not use cardboard, paper towels, or napkins to clean the lens.
- Memory Card: Use a Class 10 TF card up to 128GB. Format the card via the app to maximize its lifetime.
- Installation Warning: Do not install the device in a location that obstructs your driving view.
Technical Specifications
- Processor: HiSilicon processor with H.264 hardware encoding.
- Sensors: 4MP CMOS (Front), 2MP CMOS (Rear).
- Resolution: Front 2560x1440, Rear 1920x1080.
- Lens: 130° wide angle (Front), 125° wide angle (Rear).
- Storage: Class 10 TF card up to 128GB.
- Connectivity: Wi-Fi 2.4GHz.
Practical help
Common problems
Dash cam not recording
Ensure the TF card is inserted correctly and formatted via the app. Check if the power connection is secure.
Wi-Fi connection failed
Ensure the dash cam's Wi-Fi is turned on. Verify you are using the default password '1234567890' if not changed.
App cannot find the dash cam
Ensure your phone's WLAN is turned on and you are connected to the dash cam's Wi-Fi network.
Before use
- Insert a Class 10 TF card (up to 128GB).
- Format the SD card using the DDPAI App.
- Securely buckle the dash cam to the rearview mirror.
- Connect the power cable to the cigarette lighter socket.
- Download and install the DDPAI App on your smartphone.
Specs in practice
- 1440P Front / 1080P Rear
- High-definition resolution for both front and rear cameras.
- Class 10 TF Card
- Required speed class for stable video recording and playback.
Images and diagrams
- The installation diagram shows the buckle mounting method on the rearview mirror.
- The overview diagram identifies the TF card slot, power port, and reset button locations.
Model compatibility
- Supports Android and iOS devices via the DDPAI App.
- Requires Class 10 TF card up to 128GB.

Manual page author
Emily Carter
User documentation editor
Prepares concise manual descriptions and highlights the most useful setup, operation, and maintenance information for readers.