Automotive / Dash Cams
User Manual for Sprout 1080p Dash Camera
Quick guide for the Sprout 1080p Dash Camera. Learn how to install, set up recording, adjust G-Sensor and motion detection, and manage your video files.
Table of contents
Manual images
Click an image to enlargeQuick Start Guide
To begin using your Sprout 1080p Dash Camera, follow these steps:
- Installation: Clean the interior of your windscreen. Attach the mount by inserting the lock peg into the socket on the camera and sliding it to lock. Press the suction cup onto the windscreen and lock it in place. Adjust the angle using the nut.
- Power: Connect the camera to your vehicle's power using the included car charger. The camera will automatically power on and start recording when the car is started.
- Setup: Insert a Micro SD card (Class 4 or higher, up to 32GB). Press the MENU button twice to access the SETUP menu to configure the date and time.
Product Overview
The camera features a wide-angle lens, speaker, and a 3-inch display screen. Control buttons include:
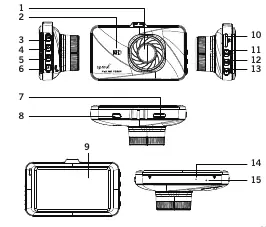
- OK button: Start/stop recording, select/confirm menu items.
- Mode button: Cycle between Video, Still, and Playback modes.
- Menu button: Access settings menus and manually lock footage.
- Up/Down buttons: Navigate menus and adjust settings.
- Power button: Power on/off and activate Park Mode.
Recording Settings
You can customize your recording experience through the Video menu:
- Loop Recording: Set the duration of video blocks (e.g., 1, 2, 3, or 5 minutes). When the memory card is full, the camera overwrites the oldest files.
- G-Sensor: Monitors for impacts. When triggered, it locks the current footage to prevent it from being overwritten. Sensitivity can be adjusted (2G is most sensitive, 8G is least).
- Motion Detection: When enabled, the camera starts recording automatically when it detects movement on screen and stops after 10 seconds of inactivity.
Modes and Playback
The camera operates in three modes, switchable via the MODE button:
- Video Mode: Default mode for recording. Use the OK button to start/stop.
- Still Mode: Used for taking photos. You can adjust quality, sharpness, white balance, and ISO.
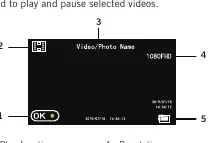
- Playback Mode: View and manage recorded files. You can lock, unlock, or delete files directly from the camera.
Computer Connection
To retrieve files, connect the camera to your computer using a Mini USB cable or use a Micro SD card adapter. Select Mass Storage on the camera screen when prompted. Files are stored in the 'OCIM' folder. Note that AVI files may require a third-party player on Mac computers.
Safety Information
- Ensure the camera is securely mounted and does not obstruct the driver's view.
- Avoid leaving the camera in direct sunlight or unventilated spaces for extended periods.
- Use only the provided charger to avoid damaging the internal battery.
- Never dismantle the device.
Practical help
Common problems
Camera not recording
Ensure a Micro SD card is inserted and formatted. Check if the camera is in the correct mode.
Cannot play files on Mac
The camera records in AVI format, which is not natively supported by Apple computers. Download a third-party video player.
Locked files cannot be deleted
Locked files are protected from overwriting. You must first unlock them using the 'Protect' menu in Playback mode.
Before use
- Insert a Micro SD card (Class 4 or higher, up to 32GB).
- Clean the windscreen thoroughly before mounting.
- Connect the camera to the car charger.
- Set the date and time in the SETUP menu.
- Ensure the G-Sensor sensitivity is set to your preference.
Specs in practice
- Loop Recording
- Continuously records by overwriting the oldest files when the memory card is full.
- Mass Storage
- The mode required to transfer files from the camera to a computer.
Images and diagrams
- The device includes a wide-angle lens, speaker, and various control buttons (OK, Mode, Hold, Power, Menu, Up, Down) for navigation.
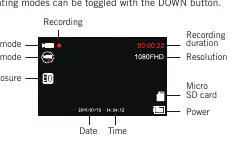
- The screen displays recording status, resolution, and icons for power and SD card.
Model compatibility
- Requires Micro SD card up to 32GB (not included).
- Mac users may need third-party software for AVI playback.

Manual page author
Emily Carter
User documentation editor
Prepares concise manual descriptions and highlights the most useful setup, operation, and maintenance information for readers.