Automotive / Dash Cams
Redtiger F9 Dash Cam User Manual
Quick guide for the Redtiger F9 dash cam. Learn how to install, connect to the app, configure settings, use parking mode, and troubleshoot common issues.
Table of contents
Manual images
Click an image to enlargeQuick guide from the manual
This guide provides essential information for operating the Redtiger F9 dash cam. Before installation, it is recommended to power on the device and test all functions. Ensure you use a U3 Class 10 Micro SD card (32-256GB) for optimal performance.
What's in the box
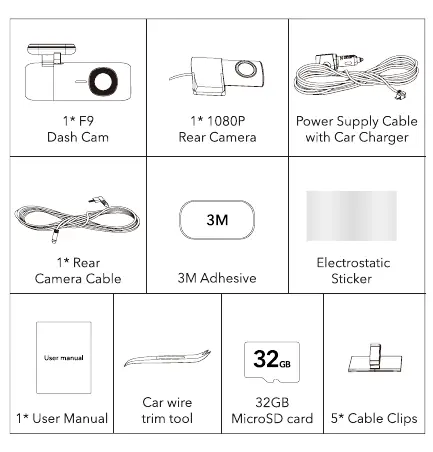
- F9 Dash Cam
- 1080P Rear Camera
- Power Supply Cable with Car Charger
- Rear Camera Cable
- 3M Adhesive
- Electrostatic Sticker
- User Manual
- Car wire trim tool
- 32GB Micro SD card
- Cable Clips
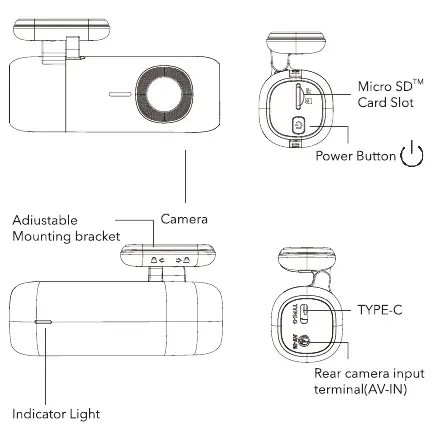
Device overview
The F9 dash cam features a power button, Micro SD card slot, Type-C port, and AV-IN terminal for the rear camera. An indicator light flashes during recording.
Installation
Installing the front dash cam
- Wipe the windshield with a damp cloth.
- Stick the electrostatic sticker onto the windshield.
- Install the dash cam onto the electrostatic sticker using the 3M tape.
- Connect the Type-C car charger to the cigarette lighter.
Installing the rear camera
The rear camera is designed for interior use and is not waterproof. Stick the electrostatic sticker on the rear windshield and mount the camera.
App connection
Download the REDTIGER app from the official website or app store. To connect:
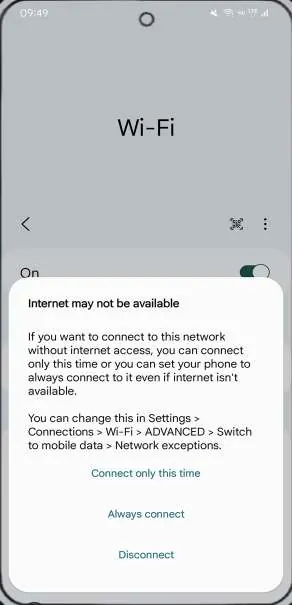
- Ensure mobile data/VPN is turned off.
- Stay within 16 feet of the camera.
- Only one device can be connected at a time.
- Use the Wi-Fi name REDTIGER_F9_XXXX and password 12345678.
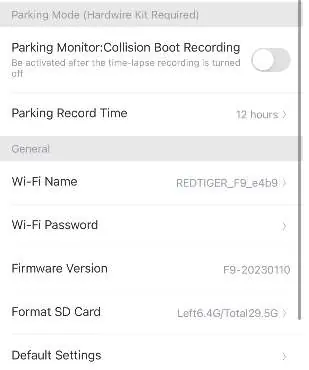
Parking mode
Parking mode requires a hardwire kit (sold separately) to prevent car battery drain. Once installed, you can enable Collision Emergency Recording or Time-Lapse Recording via the app settings.
Troubleshooting
- Wi-Fi connection issues: Ensure mobile data is off and you are close to the camera.
- Won't enter parking mode: Verify the hardwire kit is installed correctly. If the app shows 'ACC disconnected', the connection is incorrect.
- Camera stays on after car turns off: Check if your cigarette lighter remains powered or if the hardwire kit is wired incorrectly.
- Overheating: The operating temperature range is -4°F to 158°F.
Technical specifications
- Power: 12V/24V
- Aperture: F1.5
- Battery: Super capacitor
- Video Format: TS
- Resolution: Front 2160P/1440P/1080P, Rear 1080P
- Storage: Micro SD 32GB-256GB
Practical help
Common problems
Wi-Fi connection fails
Turn off mobile data/VPN, ensure you are within 16ft of the camera, and ensure only one device is connected.
Won't enter Parking Mode
Requires a hardwire kit (sold separately). Check for 'ACC disconnected' pop-up in the app.
Camera stays on after engine off
Check hardwire kit wiring or if the cigarette lighter remains powered after parking.
Overheating
Ensure the environment is within the operating range of -4°F to 158°F.
Before use
- Test all functions before installation.
- Wipe windshield with a damp cloth.
- Use a U3 Class 10 Micro SD card (32-256GB).
- Format the SD card regularly to extend its lifespan.
- Insert the SD card while the power is off.
Specs in practice
- Video Format
- TS format.
Images and diagrams
- Front camera installation: Clean windshield, apply electrostatic sticker, attach with 3M tape.
- Rear camera installation: Install inside the vehicle on the rear windshield.
Model compatibility
- Parking mode requires a separate hardwire kit.
- Supports 32-256GB U3 Class 10 Micro SD cards.

Manual page author
Emily Carter
User documentation editor
Prepares concise manual descriptions and highlights the most useful setup, operation, and maintenance information for readers.