Automotive / Dash Cams
User Manual for Vantrue OnDash S1 Dual Dash Cam
Quick guide and user manual for the Vantrue OnDash S1 Dual Dash Cam. Learn how to install, configure settings, manage recordings, and use features like Parking Mode and GPS.
Table of contents
Manual images
Click an image to enlargeQuick guide from the manual
Before using your Vantrue OnDash S1, ensure you charge the camera for 4 hours. Use a genuine Class 10 or higher microSD card (Samsung Pro Endurance or Evo recommended) and format it to FAT32 on the camera before first use. The camera automatically starts recording when connected to a power source and powered on.
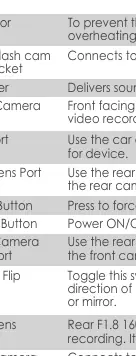
Camera Overview
The device features a 2.0-inch TFT LCD screen. Key buttons include the Menu button for settings, Up/Down buttons for navigation and recording control, and the OK button for confirmation, locking files, and entering Parking Mode. LED indicators show recording status (blinking red on Up button) and charging status (red on Down button).
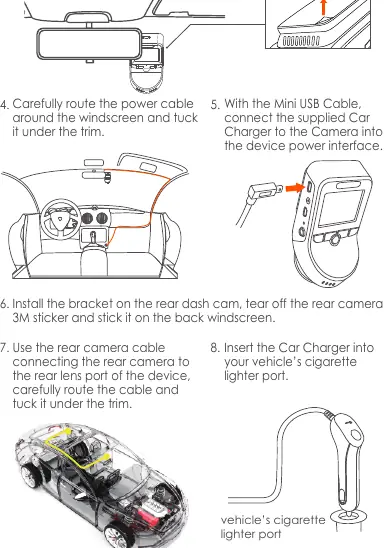
Installation
Clean the windshield thoroughly with water or alcohol. Attach the bracket to the front dash cam, peel off the 3M tape, and stick the camera behind the rearview mirror to ensure it does not obstruct the driver's view. Route the power cable around the windscreen and tuck it under the trim. Connect the rear camera using the provided cable and mount it on the rear windshield.
Menu Settings
Press the Menu button to enter the setup interface. The menu is divided into Record Setup, System Setup, and Files. Use the Up/Down buttons to navigate and the OK button to confirm selections. You can adjust resolution, loop recording duration, G-Sensor sensitivity, and enable features like HDR, GPS, and Parking Monitor.
Recording Modes
The camera supports loop recording, which overwrites the oldest files when the memory card is full. You can manually lock important video clips by pressing the OK button during recording. The camera also supports Time Lapse recording, which captures static photos at set intervals to create a video montage.
Parking Mode
Parking Mode acts as a sentry function. When enabled, the camera automatically enters Parking Mode if no movement is detected for 5 minutes. It will start recording if movement is detected in front of the camera. To ensure functionality, keep the camera powered with a mobile power bank or hardwire it to the car battery.
File Management
You can review and delete videos or photos directly on the camera by navigating to the Files folder. Files are categorized into Event (locked videos), Normal (standard recordings), and Photos. When connected to a computer via USB, the camera acts as a mass storage device for transferring files.
Specifications
The OnDash S1 features a front camera with a 170° wide viewing angle (F/1.47 aperture) and a rear camera with a 160° wide viewing angle (F/1.8 aperture). It uses a super-capacitor for power and operates in temperatures from -4°F to 158°F (-20°C to 70°C).
Warranty & Support
The product comes with a 12-month warranty, which can be extended to 18 months by registering on the official Vantrue website. For support, contact Vantrue via Amazon or email [email protected].
Practical help
Common problems
No SD Card Inserted or Error message
Ensure a genuine Class 10 or higher microSD card is inserted. Format the card to FAT32 using the camera's system setup menu.
Camera shuts off unexpectedly
Ensure the mini USB cable and car charger are securely connected. If charging via computer, select 'Power On' on the screen.
Parking Mode not activating
Ensure the camera is powered by a mobile power bank or hardwired to the car battery, as it requires continuous power.
Before use
- Charge the camera for 4 hours before first use.
- Use a genuine Class 10 or higher microSD card (Samsung Pro Endurance or Evo recommended).
- Format the microSD card to FAT32 on the camera.
- Clean the windshield with water or alcohol before mounting.
- Ensure the camera is positioned behind the rearview mirror.
Specs in practice
- Front Camera
- 170° wide viewing angle, F/1.47 aperture.
- Working Temperature
- -4°F to 158°F (-20°C to 70°C).
Images and diagrams
- Front Camera Mounting: Clean windshield, peel 3M tape, stick behind rearview mirror.
- Cable Routing: Route power cable around the windscreen and tuck under the trim.
Model compatibility
- Compatible with Windows XP/Vista/7/8/10 & Mac OS.
- Do not use Sandisk SD cards.

Manual page author
Michael Turner
Technical manual editor
Reviews PDF manuals for structure, safety notes, and practical product details so readers can find the right information quickly.