Automotive / Dash Cams
User Manual for Vantrue Falcon 1 Motorcycle Dashcam
Quick guide for the Vantrue Falcon 1 motorcycle dashcam. Learn how to install the power cord, set up the cameras, connect via Wi-Fi, and troubleshoot common issues.
Table of contents
Manual images
Click an image to enlargeQuick guide from the manual
The Vantrue Falcon 1 (F1) is a motorcycle-specific dashcam. Before using the device, ensure you have a high-speed microSD card (Class 10/U3, up to 512GB). The system is designed for 12V motorcycle batteries. Always turn off the motorcycle power before installation. The device supports Wi-Fi connectivity for app control and real-time preview.
Installation Guide
Memory Card: Insert the microSD card into the slot. After the first insertion, press and hold the remote control record button for 10 seconds to format the card.
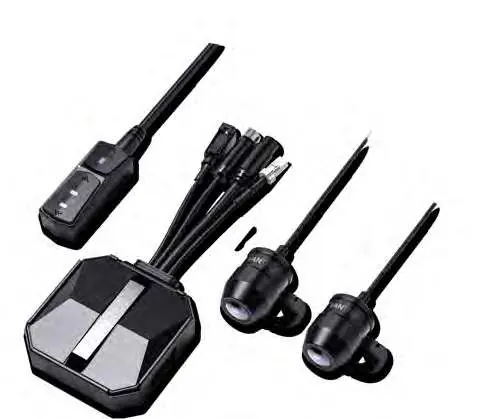
Main Unit: Install the main unit in a location without metal cover, such as under the seat. Use the provided 3M adhesive to fix it. If installing on a curved surface, use cable ties.
Remote Control: Install on the handlebars or fuel tank. Ensure the button side faces up to avoid affecting GPS signal reception. Do not cover the speaker hole with adhesive.
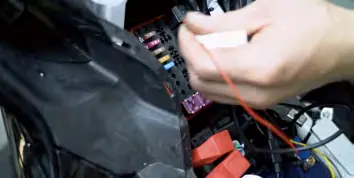
Power Cord Wiring: Connect the power cord to the fuse box as follows:
- Red wire: Connect to the positive terminal of the battery.
- Yellow wire (ACC): Connect to the ACC power fuse.
- Black wire: Connect to the negative terminal of the battery or an override position.
Cameras: Mount the front and rear cameras. You can adjust the recording angle by loosening the hexagonal screw on the camera holder. Ensure the lens orientation correction line is properly aligned.
Basic Operation
Remote Control Buttons:

- Power/Emergency button: Long press to power off. Short press to power on. When on, short press to lock a file or capture a picture.
- Recording button: Long press for 10 seconds to format the SD card. Short press to pause/start recording.
- Microphone button: Long press to toggle Wi-Fi. Short press to toggle the microphone. Press 5 times continuously to restore factory settings.
App Connection: The dashcam broadcasts a 5G Wi-Fi signal (F1_VANTRUE_XXXX). Use the Vantrue App to connect using the default password 12345678. The app allows for live preview, file management, and settings adjustment.
App Features and Settings
Through the app, you can adjust various settings including resolution (up to 2160P+1080P), loop recording duration, G-sensor sensitivity, and parking mode. The app also supports OTA firmware upgrades. Note that some features like GPS track analysis require downloading the video file to your phone first.
Troubleshooting
- Device won't power on: Check all line connections to the battery and ACC fuse.
- Cannot record/lock video: Ensure the SD card is inserted and formatted.
- Blurred video: Clean the lens of dust.
- EMI/Purple streaks: Ensure you are using R-rated resistive spark plugs and that cables are routed smoothly without sharp folds.
- Wi-Fi connection issues: Ensure Wi-Fi is turned on and you are using the correct default password.
Specifications
The Vantrue Falcon 1 features Sony CMOS sensors (8MP front, 2MP rear) with an F/1.8 aperture. It is IP67 waterproof and operates between -20°C and 60°C. It uses a built-in supercapacitor and requires a 12V, 2A power supply.
Practical help
Common problems
Motorcycle does not turn on after starting
Check if the line connection is normal.
Dashcam cannot record or lock video
Check if the SD card is inserted or needs formatting. Re-insert or replace the card if the problem persists.
Video becomes blurred
Check if there is dust on the lens and wipe it.
App shows streaked EMI or purple EMI
Check the motorcycle spark plug type; use R-rated resistive spark plugs. Ensure wires are run smoothly without folding or tight squeezing.
Wi-Fi does not connect properly
Check if Wi-Fi is turned on. Use the default password 12345678.
Before use
- Use a Class 10/U3 high-speed microSD card (up to 512GB).
- Turn off the motorcycle power before installation.
- Format the SD card before first use (hold remote record button for 10s).
- Download the Vantrue App.
- Ensure the main unit is installed in a location without metal cover.
Specs in practice
- Power Source
- Requires 12V, 2A power supply; uses a built-in supercapacitor.
- Working Temperature
- -20°C to 60°C (-4°F to 140°F).
Images and diagrams
- Wiring: Red wire to battery positive, Yellow wire to ACC fuse, Black wire to battery negative.
- Remote Control: Includes Power/Emergency, Recording, and Microphone buttons with specific long/short press functions.
Model compatibility
- Motorcycle-specific recorder, limited to 12V battery systems.

Manual page author
David Miller
Documentation analyst
Organizes user manual content into clear summaries, with attention to model details, product context, and everyday usability.