Power / EV Chargers
User Manual for DEFA eMove Portable Charger 502103
Quick guide for the DEFA eMove Portable Charger 502103. Learn how to connect, adjust charging power, interpret display symbols, and troubleshoot errors.
Table of contents
Manual images
Click an image to enlargeQuick guide from the manual
The DEFA eMove Portable Charger is designed for Mode 2 charging of electric vehicles. Always follow the correct sequence to ensure safe operation.
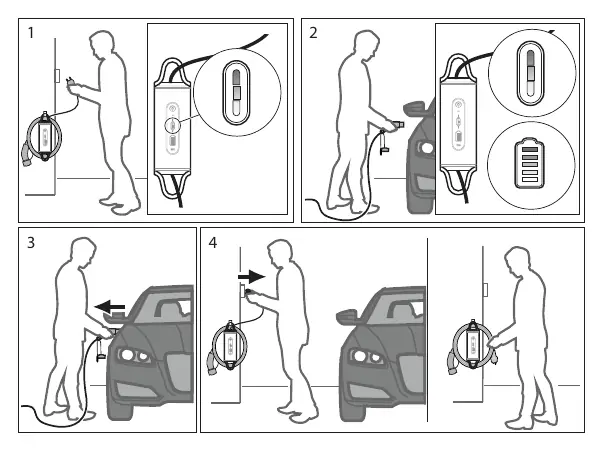
- Plug in: Insert the domestic plug into the outlet first. Wait for the automatic self-test to finish (indicated by solid white bars on the Charger Status Indication). Then, insert the vehicle plug into the vehicle inlet.
- Unplug: Always remove the vehicle plug from the vehicle inlet first, then remove the domestic plug from the domestic outlet. Do not unplug from the domestic outlet while the vehicle is charging.
Description and Features
The eMove Portable Charger features an aluminum housing for durability, flexible cable management, and a temperature sensor in the connector for safety. It includes a one-button interface for power adjustment and an intuitive display.
Safety Information
Danger: Only connect to an earthed domestic outlet. Do not use if the charger is damaged, cracked, or frayed. Do not use extension cords, multiple sockets, or adapters. Never carry out repairs on the charger yourself.
Warning: Do not allow water to enter the domestic outlet or vehicle inlet. Do not insert the domestic plug if the outlet is wet or covered in snow. Avoid exposing the charger to very hot temperatures.
Main Parts
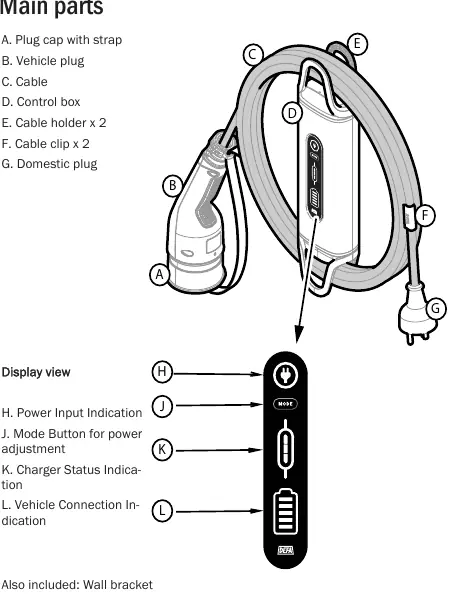
- Plug cap with strap
- Vehicle plug (Type 2)
- Cable
- Control box
- Cable holder and clips
- Domestic plug
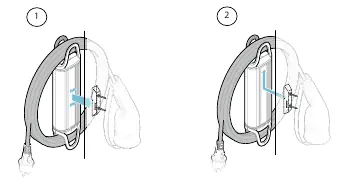
- Wall bracket
Display Symbols and Indicators
The control box features several indicators:
- Power Input Indication: Shows if the charger is connected to power. Pulsing red indicates an error.
- Charger Status Indication: Shows the current mode (Normal, Low, High) or error states.
- Vehicle Connection Indication: Shows connection status and charging progress.
Setting Charging Power
Press the Mode Button to toggle between modes: Normal (default) → Low → High → Normal. The selected mode is indicated by the number of bars on the Charger Status Indication.
- Normal mode: 10 A.
- High mode: 13 A. Provides faster charging for 120 minutes, then automatically switches back to Normal mode.
- Low mode: Factory set to 8 A. Useful if the circuit is shared with other appliances.
Adjusting Low Mode Manually
You can customize the Low mode current level:
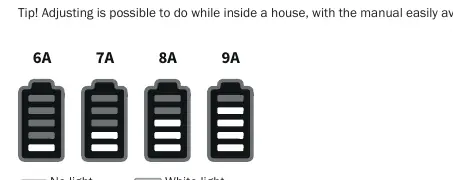
- Connect the charger to a domestic outlet.
- Press and hold the Mode Button for about three seconds until the Charger Status Indication blinks white.
- Press the Mode Button within five seconds to start setting the level. The level moves upward in 1A steps (starting from 6A).
- Wait 5 seconds after reaching the desired level to store the setting.
Storing and Maintenance
Always store the cable rolled up using the cable clips. Use the included wall bracket to hang the control box; never hang the charger by the cable. Keep plugs dry and check regularly for dust, dirt, or damage. Clean with a damp cloth; do not use water or harsh chemicals.
Troubleshooting
If an error occurs (pulsing red light):
- Vehicle side error: Unplug and plug in again. Consult the vehicle's manual or contact the vehicle vendor.
- Charger unit error: Check if the control box is hot. Unplug, wait a few minutes, and plug in again.
- Domestic side error: Check if the control box or plug is hot. Ensure the power supply to the property is functioning and the circuit breaker has not tripped.
Technical Specifications
- Rated voltage: 230 VAC (1-phase, 50-60Hz)
- Portable charger type: Mode 2
- Connection to vehicle: Type 2
- Operating temperature: -40°C to +50°C
- IP rating: IP 67
- Weight: 2.1 kg
Practical help
Common problems
Pulsing red light on Power Input
Indicates an error. Unplug the charger, wait a few minutes, and plug it back in.
Vehicle side error
Problem with vehicle battery or connection. Consult vehicle manual or contact vehicle vendor.
Control box is hot to the touch
Overheat protection may be active. Unplug the charger and allow it to cool down.
Domestic side error
Check if the domestic circuit breaker/fuse has triggered or if the power supply is unstable.
Before use
- Check the domestic outlet for damage, looseness, or wear.
- Check the vehicle inlet for damage.
- Ensure the cable is not cracked, frayed, or broken.
- Verify the domestic outlet is earthed.
- Ensure the charger is not exposed to extreme heat.
Images and diagrams
- Plug in sequence: 1. Domestic outlet, 2. Wait for self-test, 3. Vehicle inlet.
- Unplug sequence: 1. Vehicle inlet, 2. Domestic outlet.
Model compatibility
- Designed for Mode 2 charging of electric vehicles and plug-in hybrids.
- Requires Type 2 vehicle inlet.
- Compatible with 230 VAC (1-phase, 50-60Hz) grids.

Manual page author
David Miller
Documentation analyst
Organizes user manual content into clear summaries, with attention to model details, product context, and everyday usability.